Word count: 2476. Estimated reading time: 12 minutes.
- Summary:
- The past month has been blocked on finishing my 2021 company accounts before applying for a mortgage, halting progress on building my future house. Despite this, the wall of my container home has finally been painted and support beams erected, enabling subsequent work to proceed more quickly. A sheltered space has been created for solar inverter installation and wiring.
Monday 21 November 2022: 00:34.
- Summary:
- The past month has been blocked on finishing my 2021 company accounts before applying for a mortgage, halting progress on building my future house. Despite this, the wall of my container home has finally been painted and support beams erected, enabling subsequent work to proceed more quickly. A sheltered space has been created for solar inverter installation and wiring.
I did get this finished in the past month however:
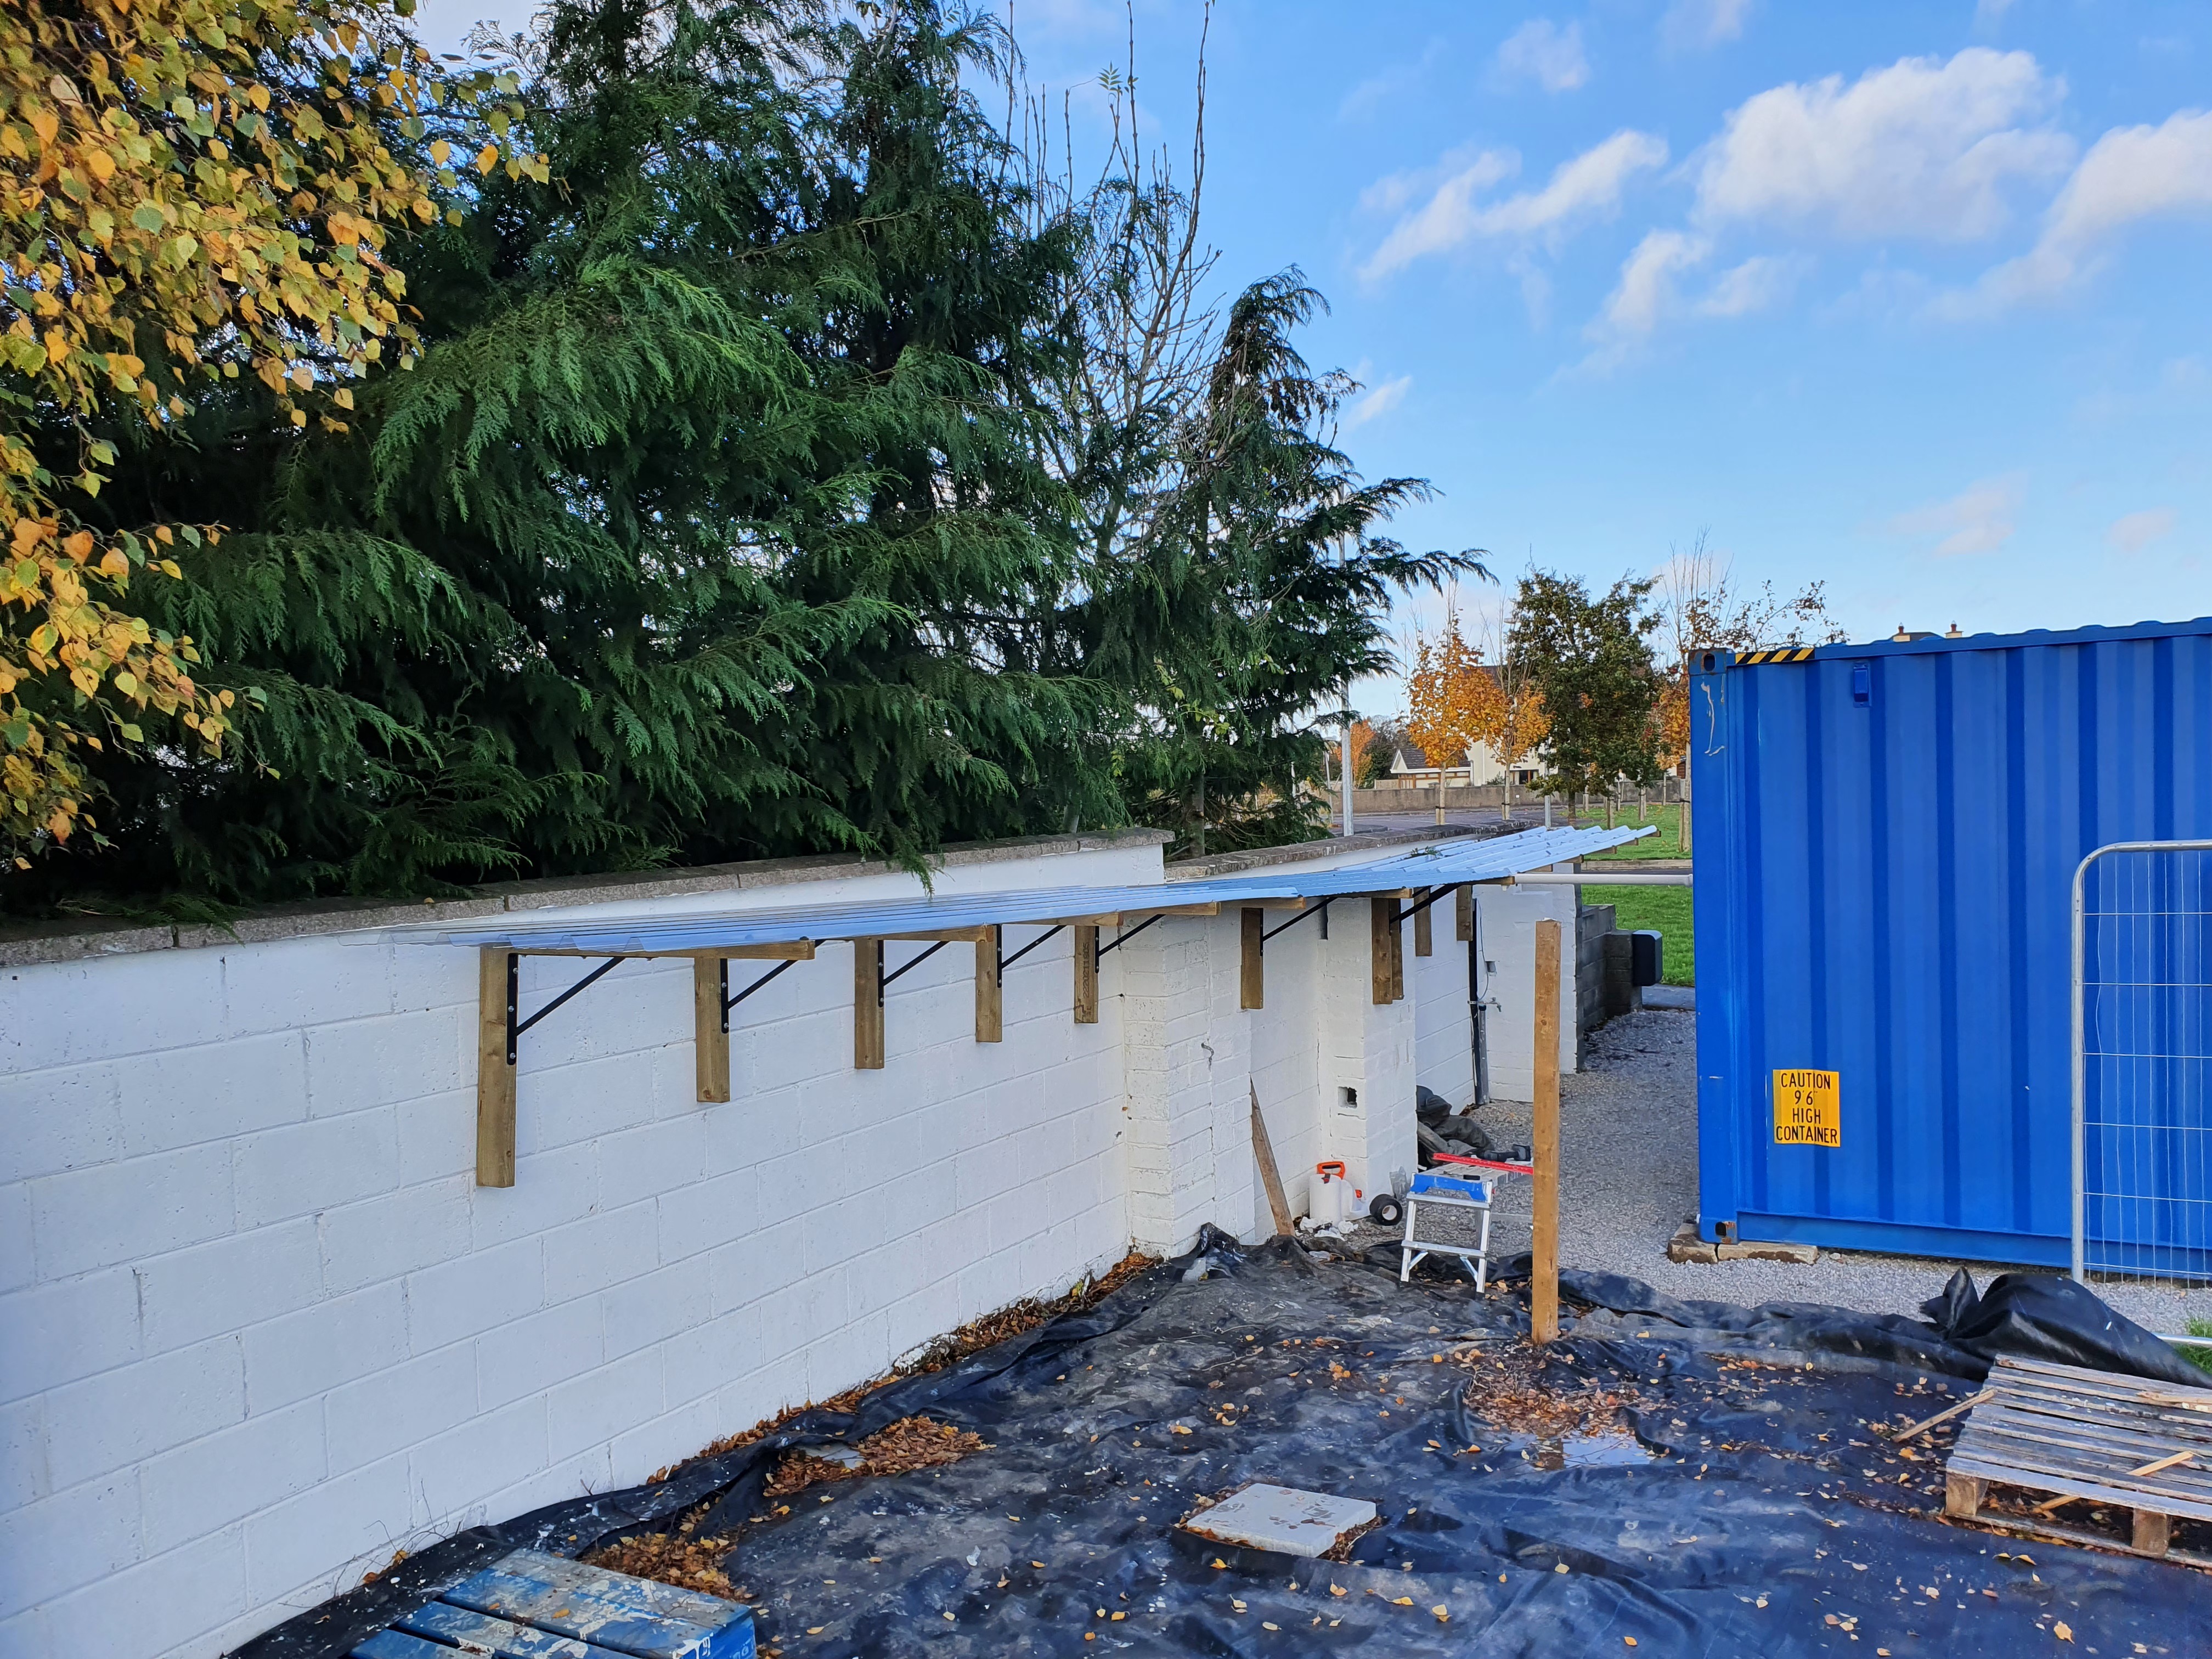
Strictly speaking, it’s actually the last four months because I bought the roof sheets in July, and it’s taken me well over two months to get the wall painted and to erect the support beams. As much as that was painstakingly slow, the beams have been designed to aid installing wiring and lighting, so they will enable subsequent stuff to go quicker. And, I now have a sheltered place for the solar inverter and all the other wiring to be installed (plus, that roof is absolutely super when a rain shower comes in, you can go hide under it until the rain passes, or get a lot of cutting and sawing type of work done when it’s raining full belt). The roof panels cost a few hundred euro, as did the paint, as did the raising of the wall. I reckon €1,500 or so of materials has gone into just that little bit of wall. Crazy for what it got me, but that’s the cost of construction I guess. And still vastly cheaper than getting somebody in to do the same work.
I’ve got plenty to keep me busy left to go – conduit needs to be installed for ethernet, 16A three phase mains, local earth and 60v DC to run to the far end of the existing wall. RGBWW outdoor strip lighting needs to be installed under the roof, after waterproof flashing between the roof and the wall is installed (I await a few dry days in vain I suspect). I have two watertight large plastic boxes for wifi APs for each end of the wall, and two security cameras to raise each end of the wall. I have a 12v battery powered alarm system to install, with a roof mounted trickle charging solar panel, and some 50 watts of alarm siren to light the place up if somebody tries to burgle it. At some point the solar inverter will turn up, that and the lithium batteries will need installing. I have months of work ahead of me before I can move in as my daytime work office.
I’m currently working on that 12v system for the container. It will consist of one of my Olimex ESP32-POE boards, a 5m RGBWW PWM controlled strip to light the inside of the container, an infrared movement detector, oodles of 12v siren capacity, a 20w solar panel, a solar charge controller, and an old 12v battery reclaimed from an old UPS which after me reconditioning it appears to still be able to hold 50-60 watt hours. The total cost for all these parts was under €100, which puts the expense of that wall into perspective. Still, I need to wire this up and get a firmware onto it.
The solar charge controller is really cheap and dumb. It draws off the 12v supply to run itself obviously, but it doesn’t turn itself off at nighttime, so it therefore drains the battery for zero good reason. I am therefore going to insert a mechanical relay between it and the battery, and have the ESP32 physically disconnect it each night and reconnect it in the morning. To achieve this, the ESP32 obviously enough needs to know when the sun will rise and when it will fall. Complicating this is that one of the many quirks of the ESP32 is its shitty real time clock, it will happily wander by minutes per day if the CPU is running, but worse, if you put it into deep sleep then it wanders by hours, and obviously I intend to deep sleep it when it’s not needed. To solve the real time clock problem, I bought a cheap DS3231 i2c connected battery powered real time clock which won’t drift more than a minute per year, so now the ESP32 always knows the correct time and date. The next problem is calculating when the sun rises and sets for a given latitude and longitude and date.
The correct solution can be found at https://gml.noaa.gov/grad/solcalc/solareqns.PDF, and it involves lots of maths because the earth isn’t quite a sphere, and it doesn’t go around the sun linearly – it actually slows down and then catches up across the year as the other planets (mainly Jupiter) tug on it. The ESP32 only has hardware floating point for adds and multiplies, everything else is hideously slow, so whilst that is a once per day calculation, I was hoping to derive a simplified estimator of sunrise and sunset for a latitude by assuming that the earth is a sphere and its motion around the sun is linear. I think I have derived a correct simplification:
# Turn your latitude in degrees into radians
latitude = (52.129877 / 180) * math.pi

const1 = 12 / math.pi
const2 = -math.tan(latitude)
const3 = 0.40910517666747085283091311613373
const4 = 2 * math.pi / 365

def calc_sunrise_sunset(days):
    diff = const1 * math.acos(const2 * math.tan(const3 * math.sin(const4 * (days + 284))))
    sunrise = 12 - diff
    sunset = 12 + diff
    return (sunrise, sunset)

# Normally pass this time.gmtime().tm_yday
sunrise, sunset = calc_sunrise_sunset(81)

# Must be true at the equinox
assert abs(6 - sunrise) < 0.01
assert abs(18 - sunset) < 0.01
This costs a sine, a tangent and an arc cosine plus three additions and four multiplies. The trig functions will be implemented on the ESP32 as a sequence of Chebyshev multiplies and adds (maybe six of each per trig function?) giving maybe 20-25 adds and 20-25 multiplies, so I’d consider the above fairly optimal. It’s not the most accurate estimator as it is too simplified, it can be up to 45 mins out depending on the time of year, but for my needs I think it’ll do just fine.
Despite what I said earlier about not having any more money to spend, I did take advantage of the Chinese Singles Day sales to pick up an Anycubic Kobra Go 3D printer this past month for under €200 inc VAT delivered. This is a self assembled printer capable of printing in PLA, PETG, TPU, ABS and low temperature formulations of Nylon (just about!) to dimensions no larger than 20 x 20 x 24 cm. It’s very much conventional bog standard cheap 3D printer tech, albeit a very well put together package thereof, so you get what you get for the price point i.e. it’s going to be very slow if you want quality, but all the parts and firmware are the same as any other printer in this price bracket, so it’ll be very easy to maintain and/or upgrade.
My experiences with the printer so far have been extremely positive, given its price. It is perfectly calibrated i.e. 1cm in X, Y or Z on the computer is exactly 1cm in the print. I have been feeding it extremely cheap filament – as in, rock bottom cheap – and the results have been very good considering that. Here is the owl print Anycubic supply with all their printers for you to test its assembly:
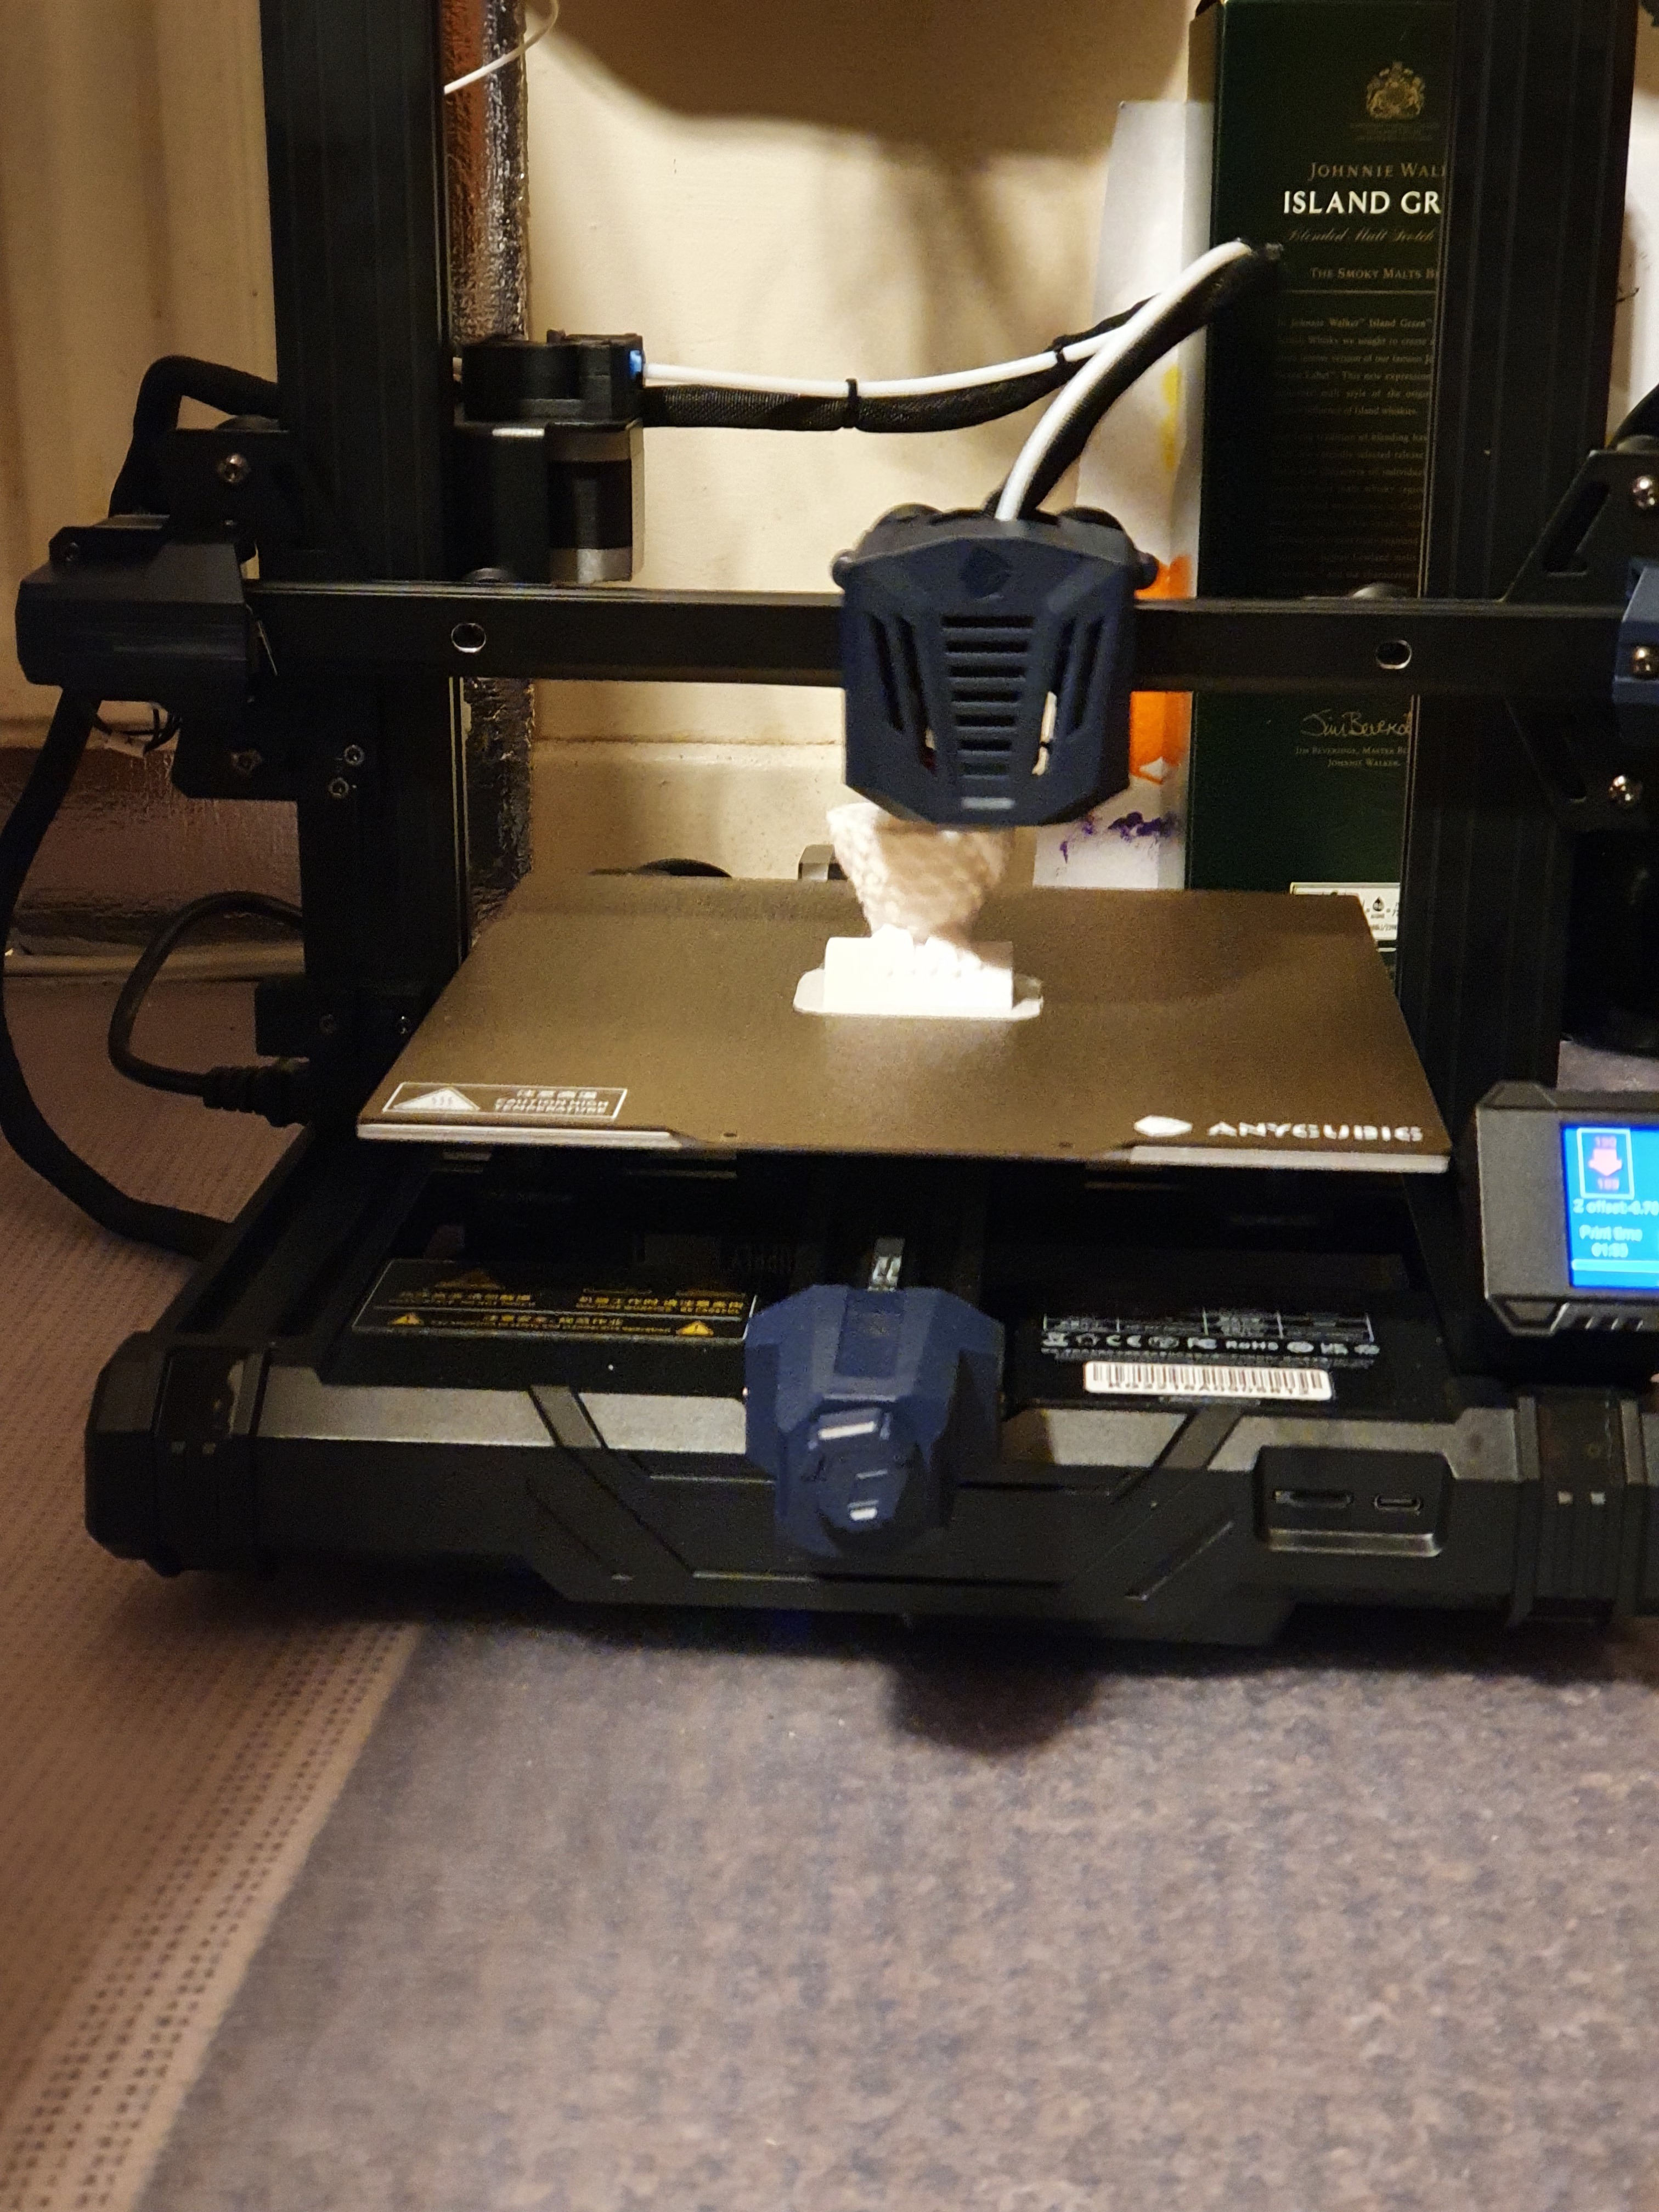
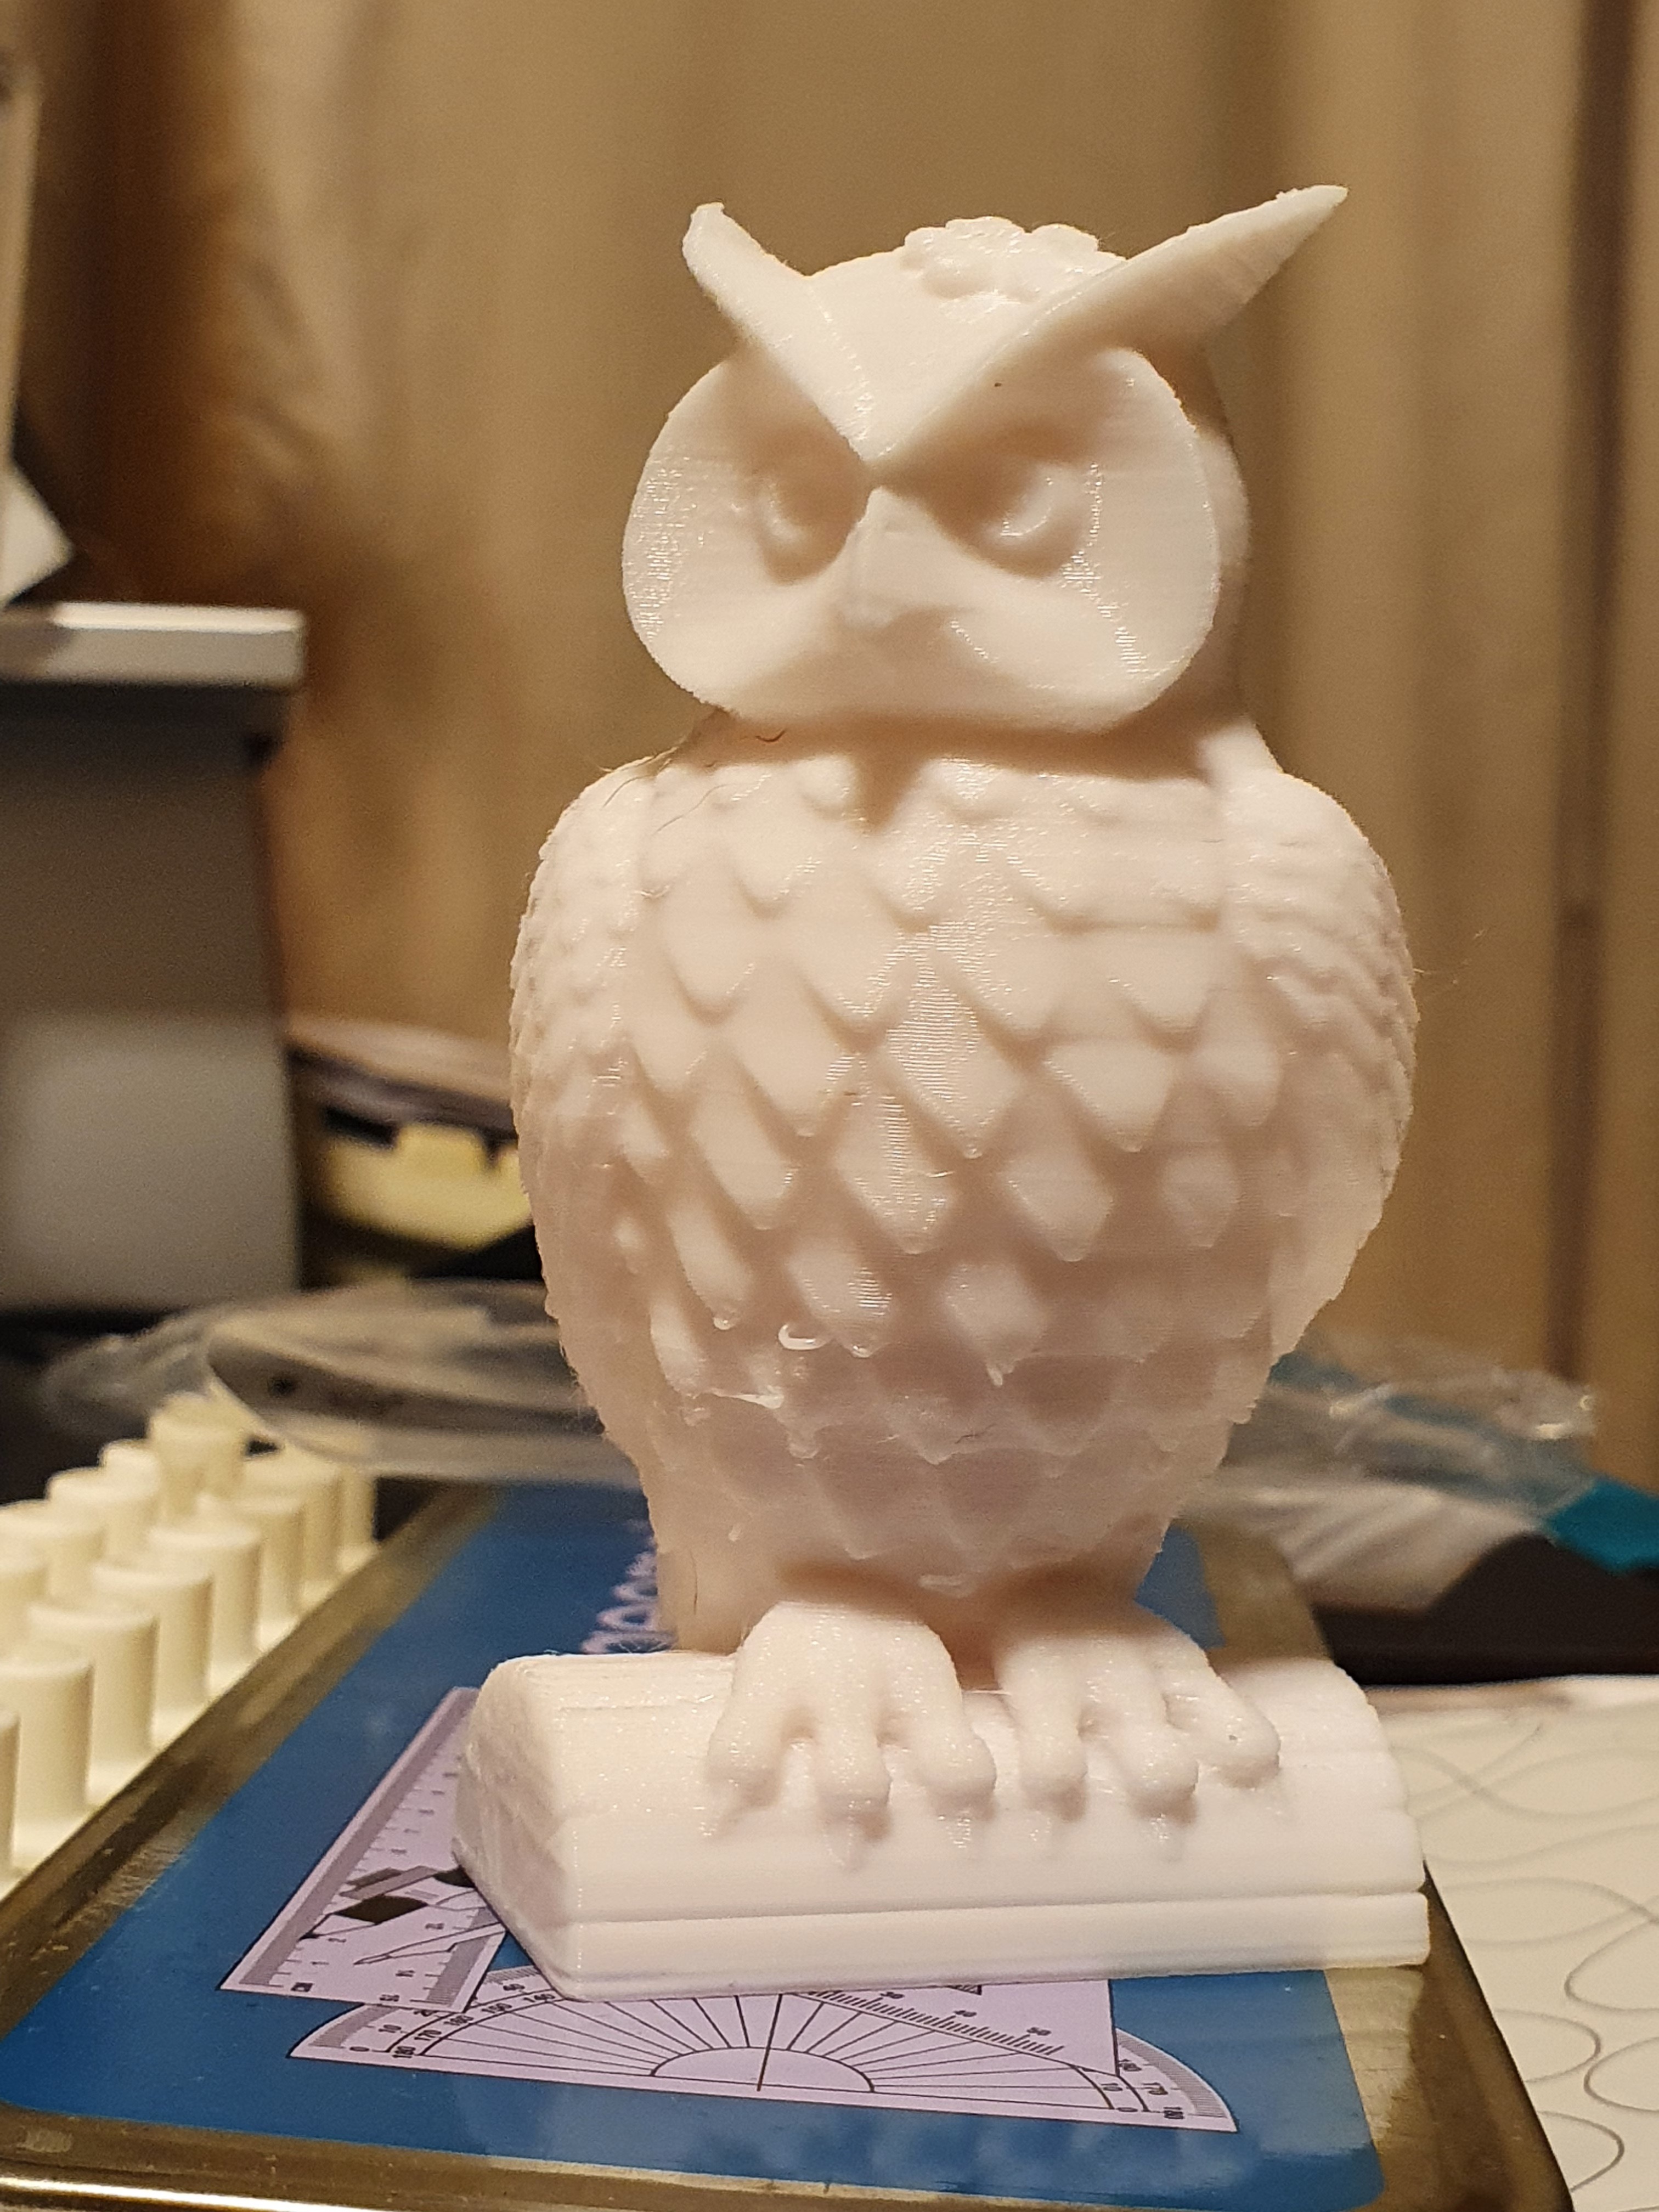
This is the owl straight out of the machine uncleaned, and the small amount of ringing at the bottom came off very quickly with a knife. Look at the ears – that is a mightly overhang, yet they do not sag despite the printer going at maximum speed with a 0.2 mm layer thickness.
I’ve had the printer for a few weeks now, and this weekend after much earlier testing to ensure this final test wouldn’t be a waste of a lot of filament, I set it printing this over thirty hours:

(Note the roughness of the bottom half, and the smoothness of the top – a classic example of the effects of moisture getting into the filament. It doesn’t matter for our use case, we’ll be enrobing this with several layers of epoxy resin, which will produce a glossy ceramic-like finish)
That’s the full height (24 cm) and most of the full width and depth (20 cm) using a single thickness over-extruded wall i.e. if anything, absolutely anything, were out of balance or wrong this print would have failed. The nozzle is 0.4 mm wide, but I had it print this by depositing 0.6 mm of material (over extrusion). Obviously, this is highly prone to slipping unless the material is placed absolutely perfectly on top of the preceding material down to micrometre accuracy, and as you can see, the printer is capable of that, albeit it had to run at half speed. There was almost no fluff – only a marginal amount along the Y axis due to the bed slinger – no ringing, no holes, no deformations nor errors of any kind. If you’re willing to wait, this printer is supremely capable at half speed, the quality is second to none. What a more expensive model will buy you is speed, the 3D printing world is currently abuzz about the Ankermake M5 which costs 5x-6x more than mine, but also prints maybe 8x faster using proprietary nozzles and other fancy technology. Indeed, after a few years of stagnation, it looks like a real technological leap forwards is currently happening in consumer 3D printing – high end features typical in industrial printers are increasingly appearing in sub-€1000 consumer printers, and it’s not hard to imagine that in a decade from now for under €500 you’ll be able to buy a 3D printer capable of all non-organic materials printable under 350 C which can ‘plug and play’ turn out a fifty litre print within 24 hours with almost zero chance of print failure.
Speaking of print failure, I ended up spending as much as I did on the printer on preventing print failures. I bought a large sized filament dryer, an enclosure and vacumn seal bags with dessicant for the filament reels to try and keep the moisture out of them. Where I live in the south of Ireland typically has relative humidity exceeding 80%, and I’ll be keeping the printer outside in the garage where it is particularly moist (right now, condensation drips constantly from the roof!) as you can’t safely print ABS indoors due to the fumes produced. I’m hoping that between the filament dryer and the enclosure I can get away with printing in the garage, I certainly don’t have the space here inside the rented house.
I mentioned earlier that I very much cheaped out on the filament. Most filament if bought in Europe costs €20-30 per kg, and if bought from China once you add in the postage it is usually around the same for non-commercial quantities. Bulk filament manufacturers such as https://gst3d.eu/ will get you down to €15/kg if you buy > 10 kg at a time, but if you really want to get down to cheap cheap cheap filament then YOYI filament from Amazon kinda occupies the whole market below €15/kg in Europe at least. I picked up my YOYI filament for €10.50/kg delivered, to reach that price I had to buy 4 kg but I was allowed to choose any colours or materials (PLA, PETG, TPU, ABS) I liked. Remarkably, YOYI charge the same for PLA, PETG and ABS, only the TPU is more expensive.
Based on internet reviews, YOYI filament can deliver excellent results but it is finickety and intolerant. I’ve only had a bit of experience with it, however I can confirm other reviews that for the grey PETG, you need >= 230 C nozzle with a >= 80 C bed for the first layer if you want bed adhesion after which you can dial back to 210-220 C nozzle to reduce stringing. It’s kinda annoying having to hang over the printer until the first layer is done, so when Raspberry Pis return into stock I hope to kit out the printer with a Wifi Raspberry Pi based print manager and then I can watch and control it via Wifi connected camera from within the warmth of my home. Still, for a one third reduction in the cost of running – given the amount I expect to print – I’ll take it.
This brings me to why I bought the 3D printer at all – I have found myself increasingly needing custom plastic parts, and having to work around the lack of them is costing me time and money. I intend to teach myself over the next few weeks how to design end to end a 3D print – so far, I have taken other people’s designs from the internet, sliced them for my printer using my own hand and judgement, and so far so good it appears I understand the tradeoffs given that all my prints to date have been successful. But where I need to get myself is the capability to design and print say a durable custom waterproof case for an assembly of ESP32 automation board with various modules and sensors, which is almost certainly going to require PETG or ABS. PETG is the same stuff from which they make disposable drink bottles, so it’s quite durable and capable. However, ABS has the unique ability to be postprocessed using acetone i.e. if you ‘paint’ an ABS print with acetone it ‘melts’ the plastic, which means you can seal the print against everything other than organic solvants, which includes the rain. Unfortunately, printing ABS is both tricky and toxic, so I’m semi looking forward to attempting a print using the cheap cheap cheap YOYI ABS filament spool I bought, maybe next weekend or the weekend after.
Here’s an example of the kind of custom plastic part I need, these were printed a few hours ago in that YOYI grey PETG using a 0.1 mm layer rather than 0.2 mm to improve vertical strength and resolution:
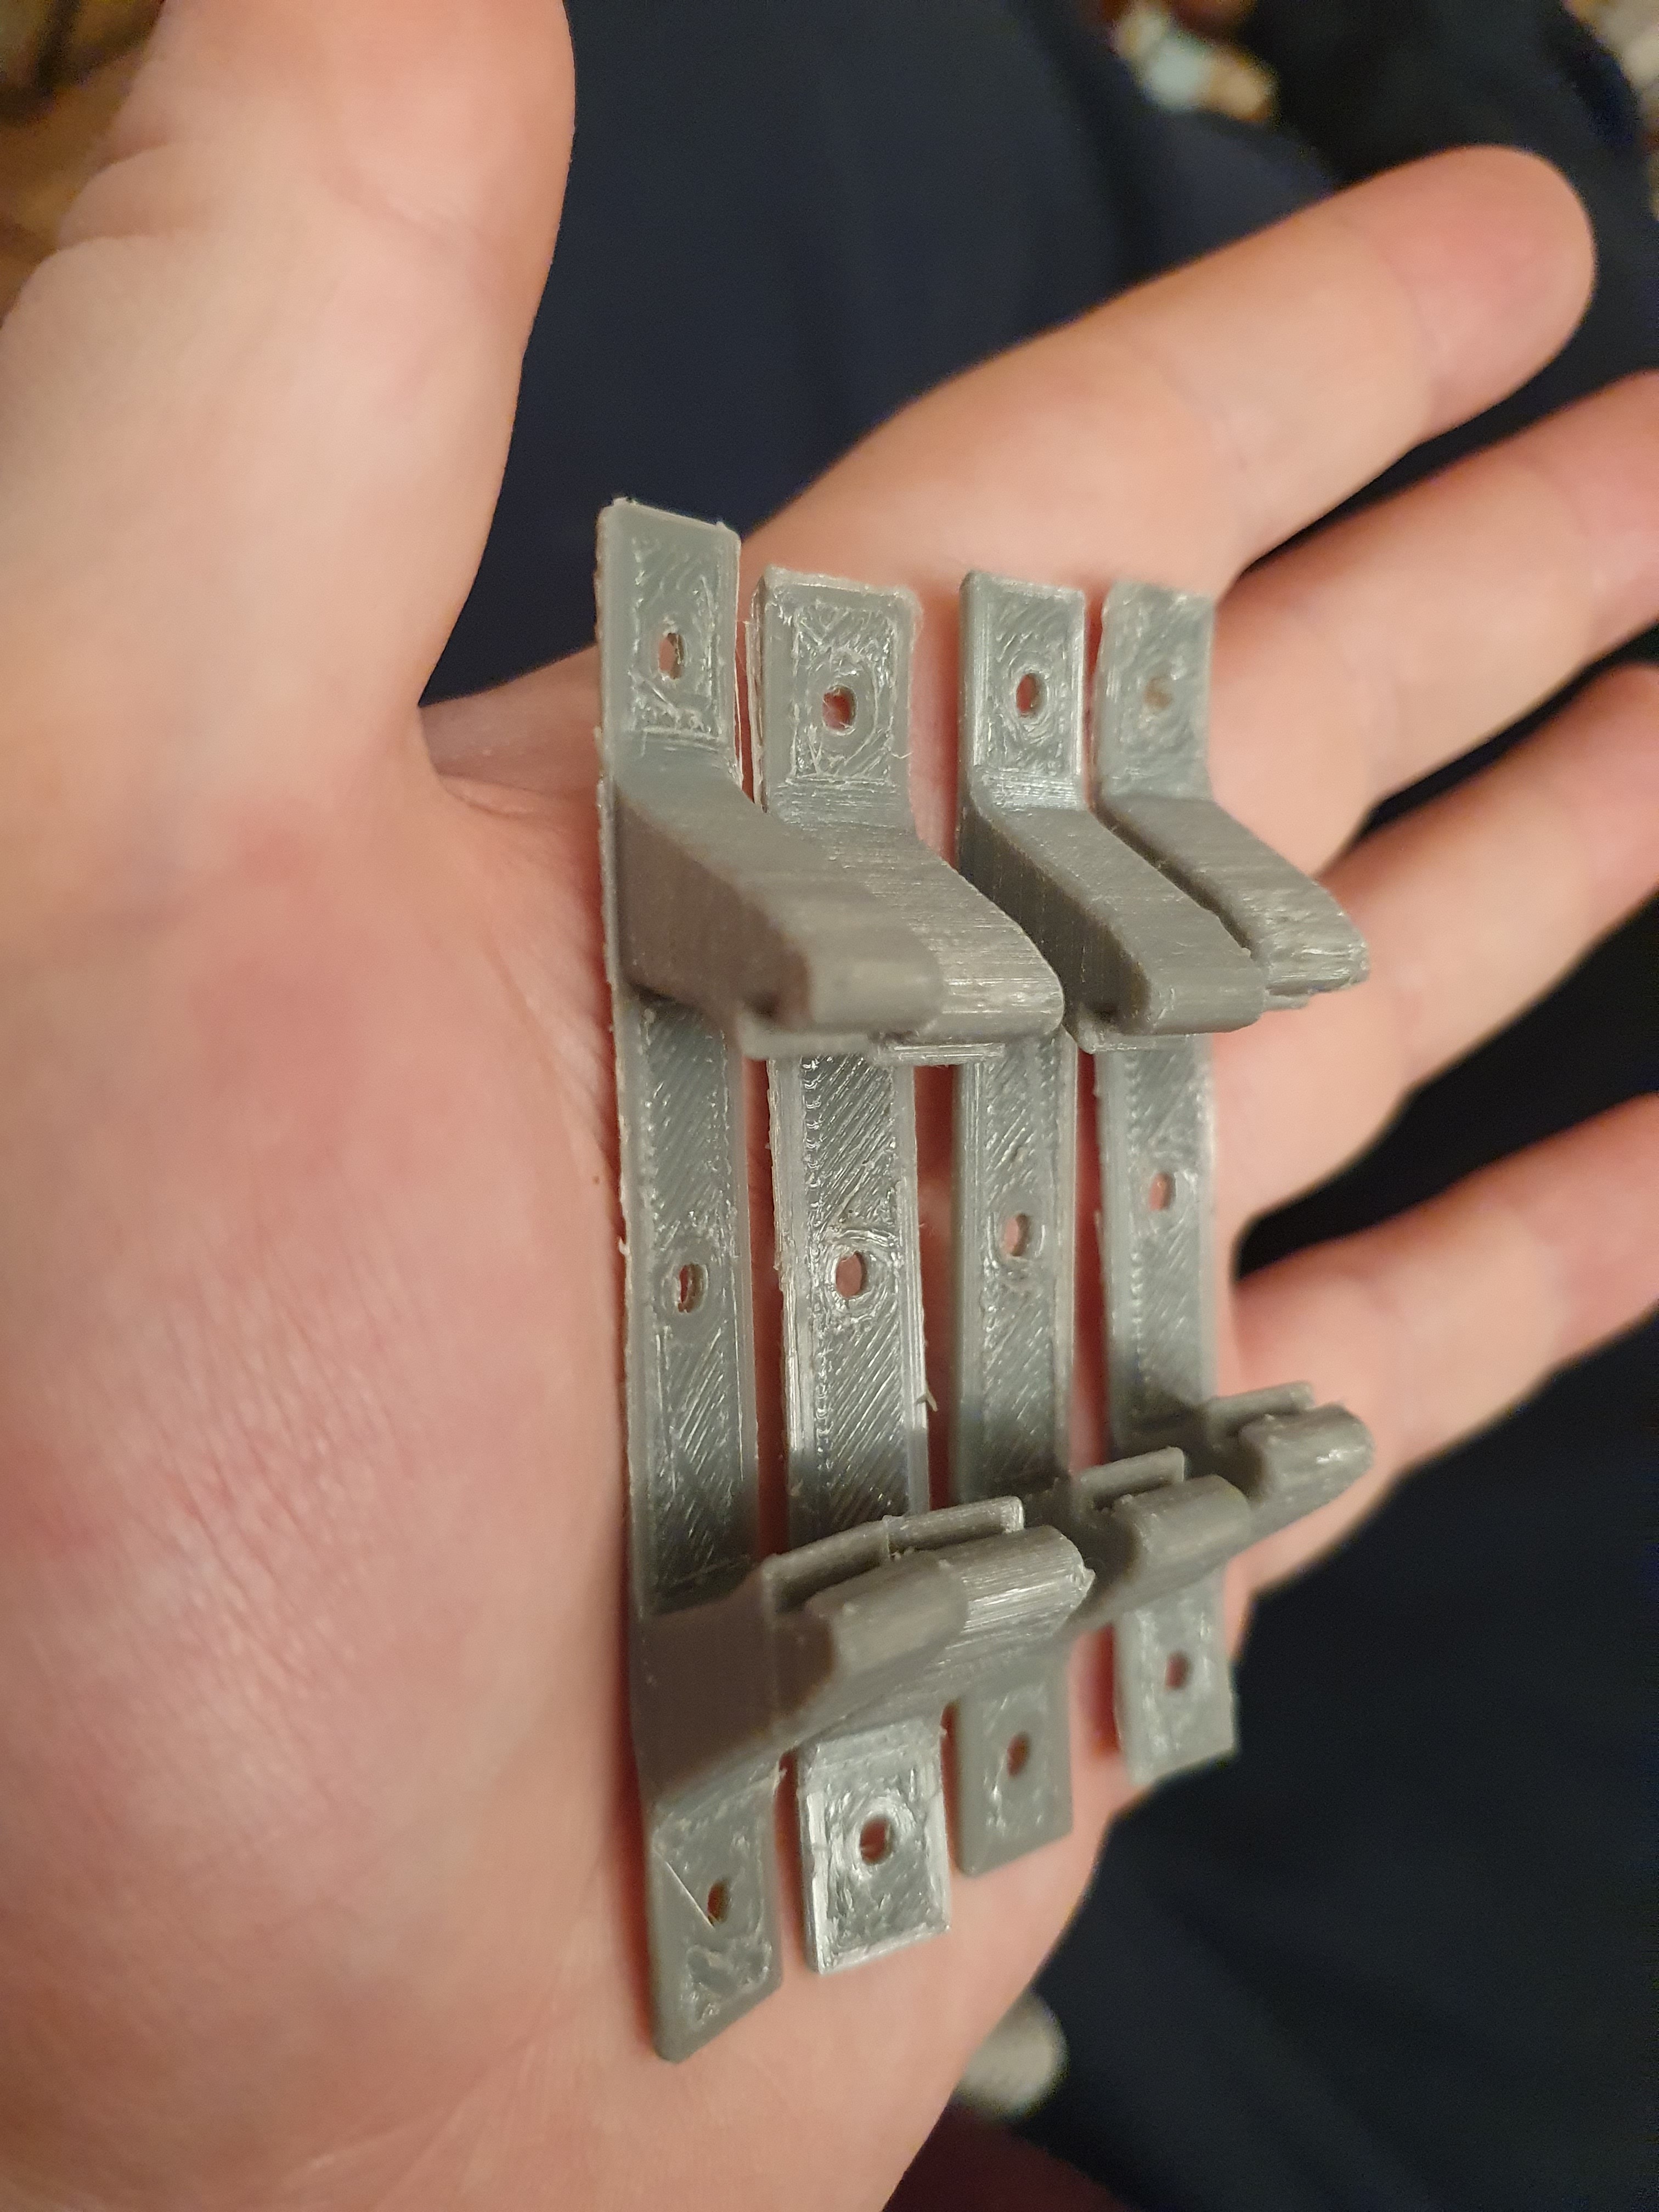
Despite the low post-first-layer print temperature there was a bit of stringing, but it was very easily cut off to yield the above. These brackets aren’t pretty, but they are functional – they clamp any 65 mm wide circuit board, which is most of the Olimex stuff. That means I can finally mount the Olimex stuff onto an acrylic board, and that in turn means no more rat’s nest jumble of wires and modules with so much that can short or get loose or get tangled. Everything going forth will be fixed onto a solid board and immovable, woo hoo! Down the line, as mentioned earlier, I hope to print waterproof custom cases, but for now even these simple printed mounting brackets will be a big time and hassle saver.
| Go to previous entry | Go to next entry | Go back to the archive index | Go back to the latest entries |