Word count: 4608. Estimated reading time: 22 minutes.
- Summary:
- The final design of the house is being submitted to preplanning this week, after months of work with architect Stephen O’Leary from Rebel Design Studio. The design has undergone significant changes since the original concept, with the master bedroom taking on a central role in shaping the layout and features of the house. The Passive House Institute’s design course was taken by Stephen, but this will be his first Passive House project.
Monday 8 November 2021: 03:49.
- Summary:
- The final design of the house is being submitted to preplanning this week, after months of work with architect Stephen O’Leary from Rebel Design Studio. The design has undergone significant changes since the original concept, with the master bedroom taking on a central role in shaping the layout and features of the house. The Passive House Institute’s design course was taken by Stephen, but this will be his first Passive House project.
Anyway, I’m glad to report that our house design is finally done. After a mere five months to secure the rights on our site, our architect Stephen O’Leary from Cork based Rebel Design Studio only could get started these past few weeks. As you may remember, in my original post in August, I had already had a crack at designing the whole house, including layouts internal and external, designing its ventilation, heating and electrical systems, and I had prepared a thirty-five page brief dense with detail. Stephen took that design and rendered it into 3D, along with a few variants and then finally a fourth design which was entirely his, albeit thematically similar.
Getting the VR headset to view architecture
I had bought an Oculus Quest 2 specifically to wander around these concept designs in VR, so I tried importing the Twinmotion renders into Unreal Engine 4 and then generating an Android mobile binary targeting the Oculus. Unfortunately, Oculus’ Android doesn’t implement Mobile HDR, and when you disable HDR, all the Twinmotion assets render as sheets of entirely all white or all black – i.e. useless. If you enable Mobile HDR, the binary doesn’t work on the Quest 2 at all.
This was rather unfortunate, so I had to fall back to the Oculus Rift emulation function of the Quest 2 whereby a PC renders the VR and the image gets blitted over a USB cable to the headset. Alas the Windows Oculus software sucks monkey balls, it just silently refuses to work if you don’t get everything exactly right, and it provides zero help messages nor clues as to what is wrong with it. Literally trial & error black magic to get it working. Awful experience, but I got there in the end mainly through a lot of Google searching of people having the exact same awful experience as me. Thanks Facebook  .
.
Unreal Engine 4, at least if you stay on the PC, works really rather well in VR with very little added effort, and my recently bought AMD Radeon 6600 XT renders such simple 3D models as these like butter. Without me coding anything up, it’s a very basic experience, you esssentially fly around with the keyboard and you have free range look with the headset. But, it’s enough to get the job done in terms of evaluating the concept designs.
Yes, Twinmotion also has a VR viewing option, but if you try it you’ll find it sucks. As it’s also UE4 based, I have no idea how they managed to make it suck so badly. In any case, importing your Twinmotion file into UE4 is so straightforward it’s the obvious workaround. Also, if you package up your UE4 game into a standalone binary, even a laptop with Intel integrated graphics will do a passable job of rendering it, whereas for some reason Twinmotion’s standalone viewer binaries suck badly on Intel integrated graphics. Again, same bloody engine, no idea why it’s so bad.
(Incidentally, if you’d like UE4 to make it look really pretty, try turning on ray tracing. Looks gorgeous on the outside, but inside everything’s too reflective, and I didn’t find the time to figure out how to dial back so much reflection. The pictures below were rendered actually by my laptop’s Intel integrated graphics using a standalone packaged game without ray tracing enabled)
My original design
Stephen had rendered my original design mostly as I had it into 3D. The general design was that of a bungalow, but with victorian style raised ceilings on the ground floor, and a reduced width loft conversion upstairs spanning three quarters of the house length. The design showpiece was a roof to floor open vaulted space for the living area, with a raised mezzanine reading and library area overlooking it. I had chosen the golden ratio for width to length, but I had been worried that it just wasn’t wide enough to have the ‘church hall’ effect I was seeking. Looking at the images without VR it seemed reasonable (note these are rendered by BIMx not Unreal Engine):
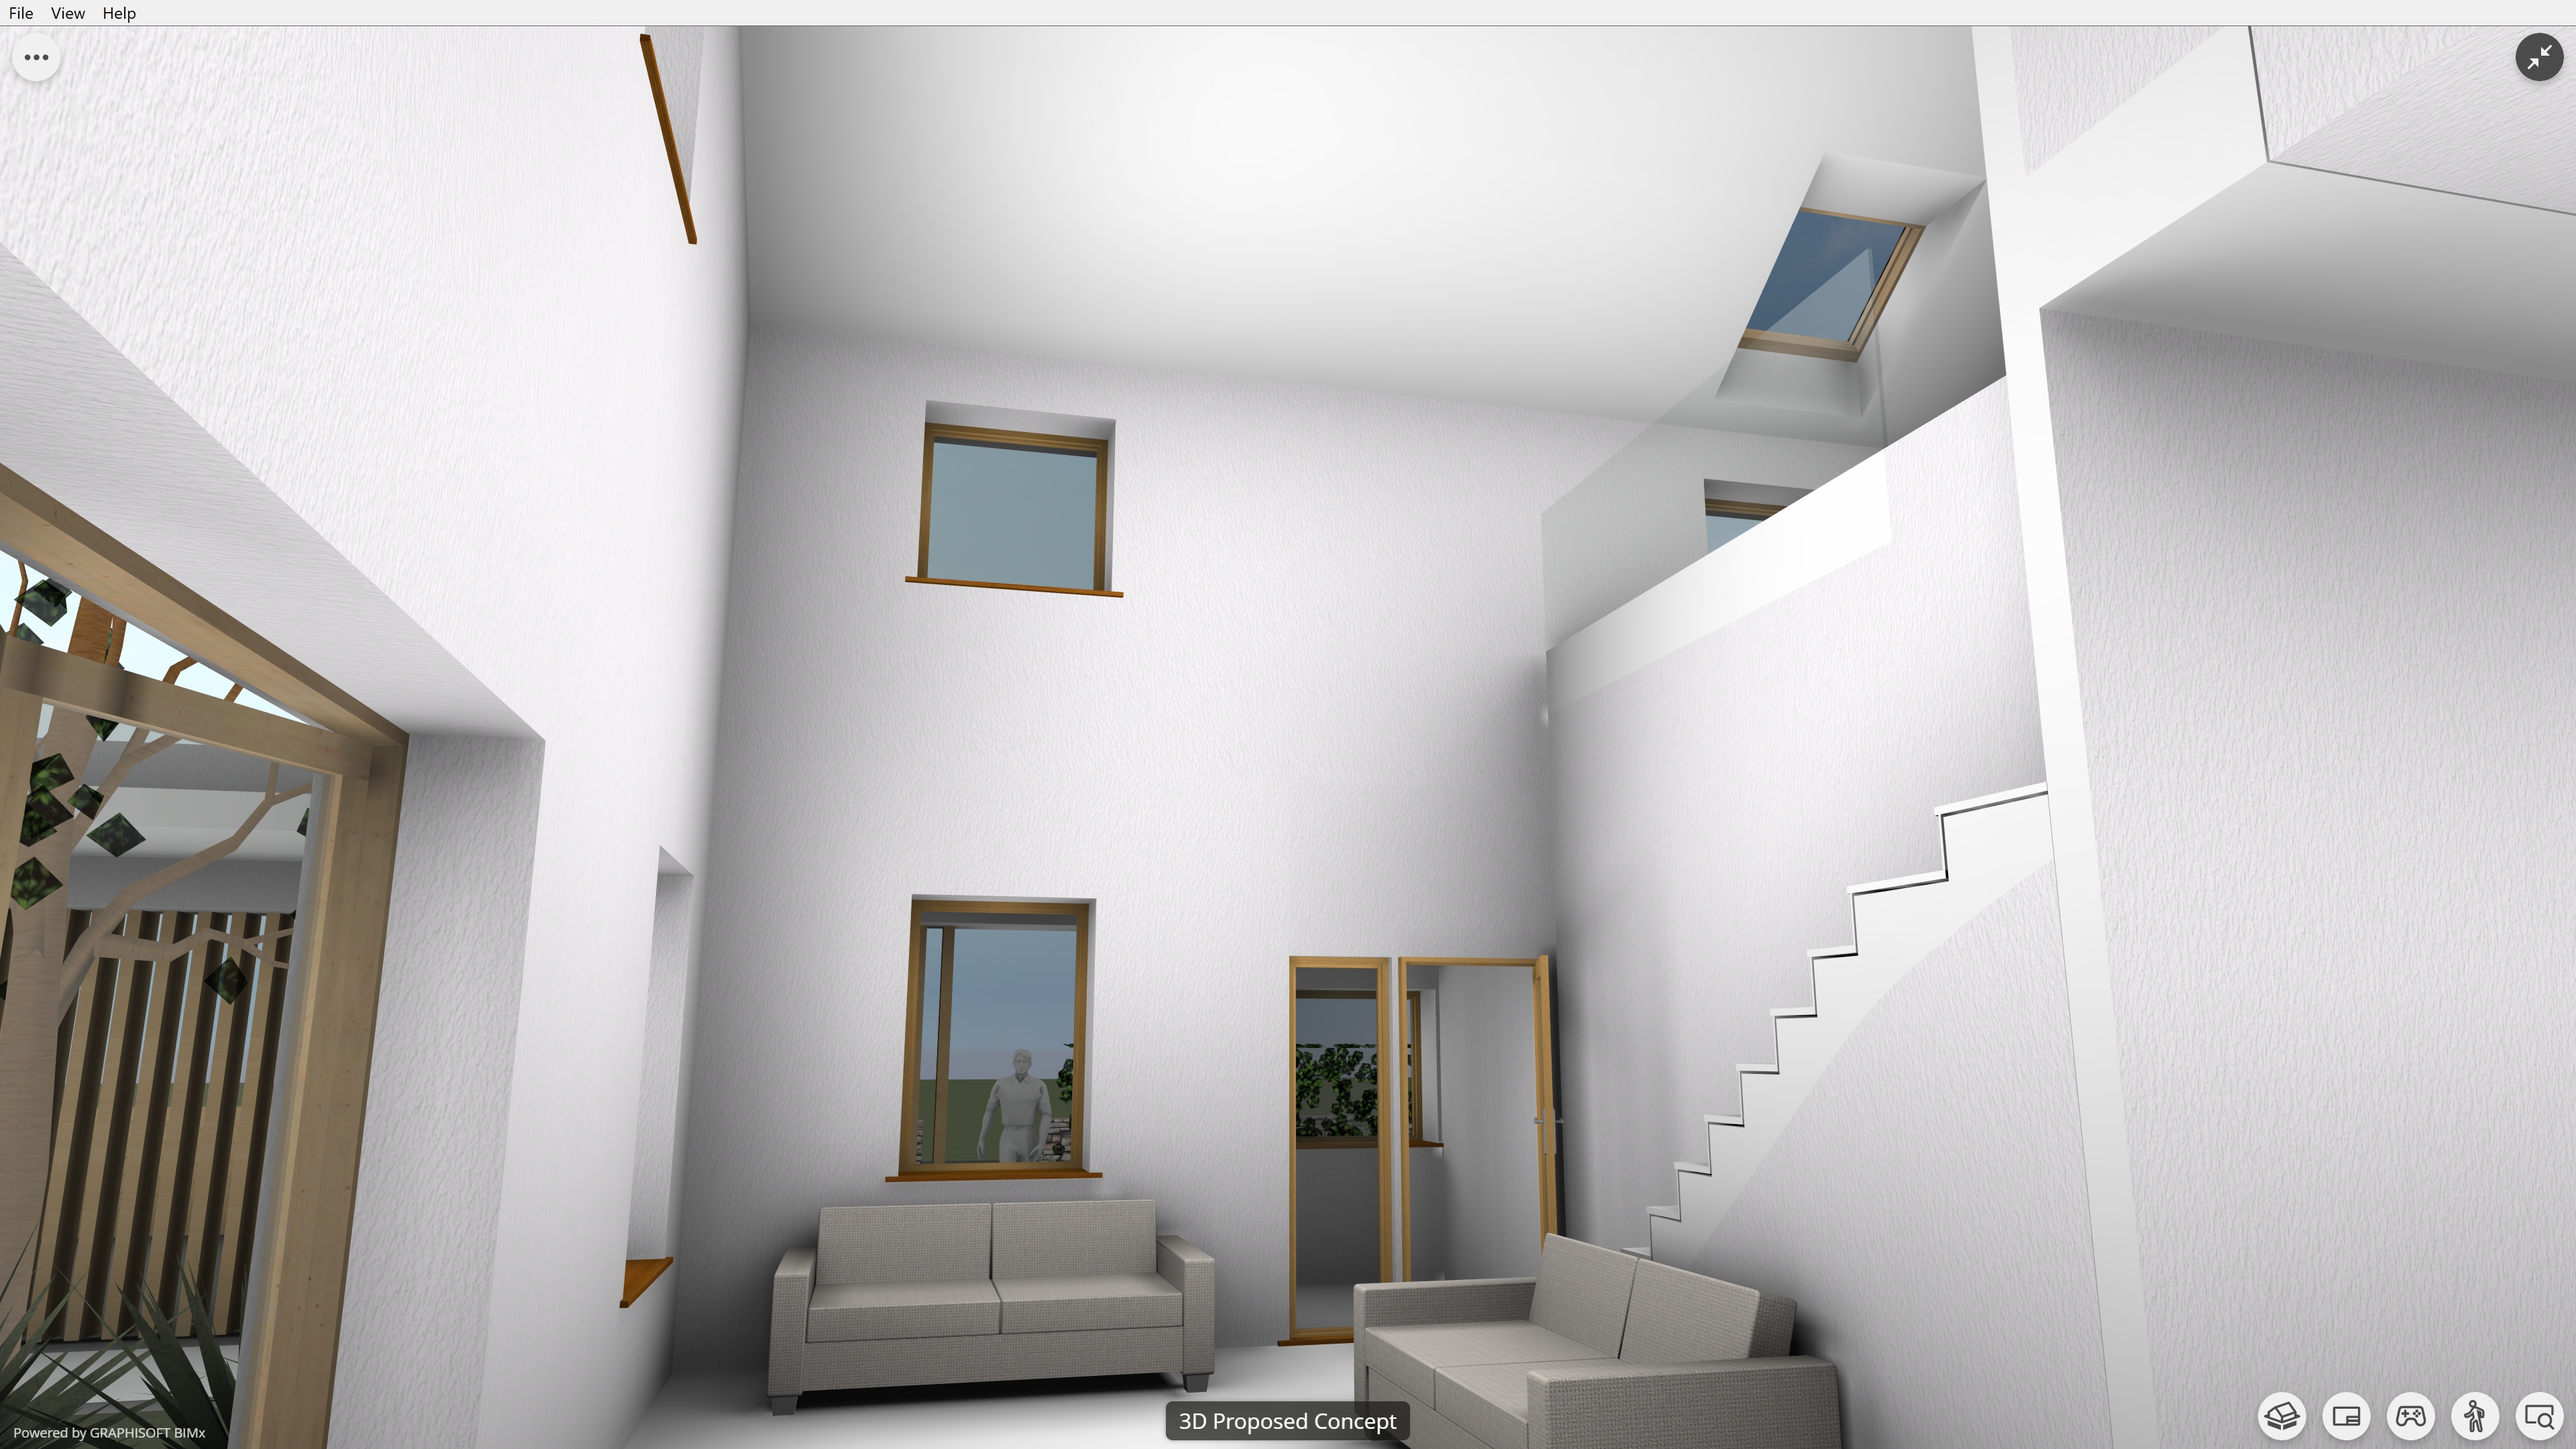
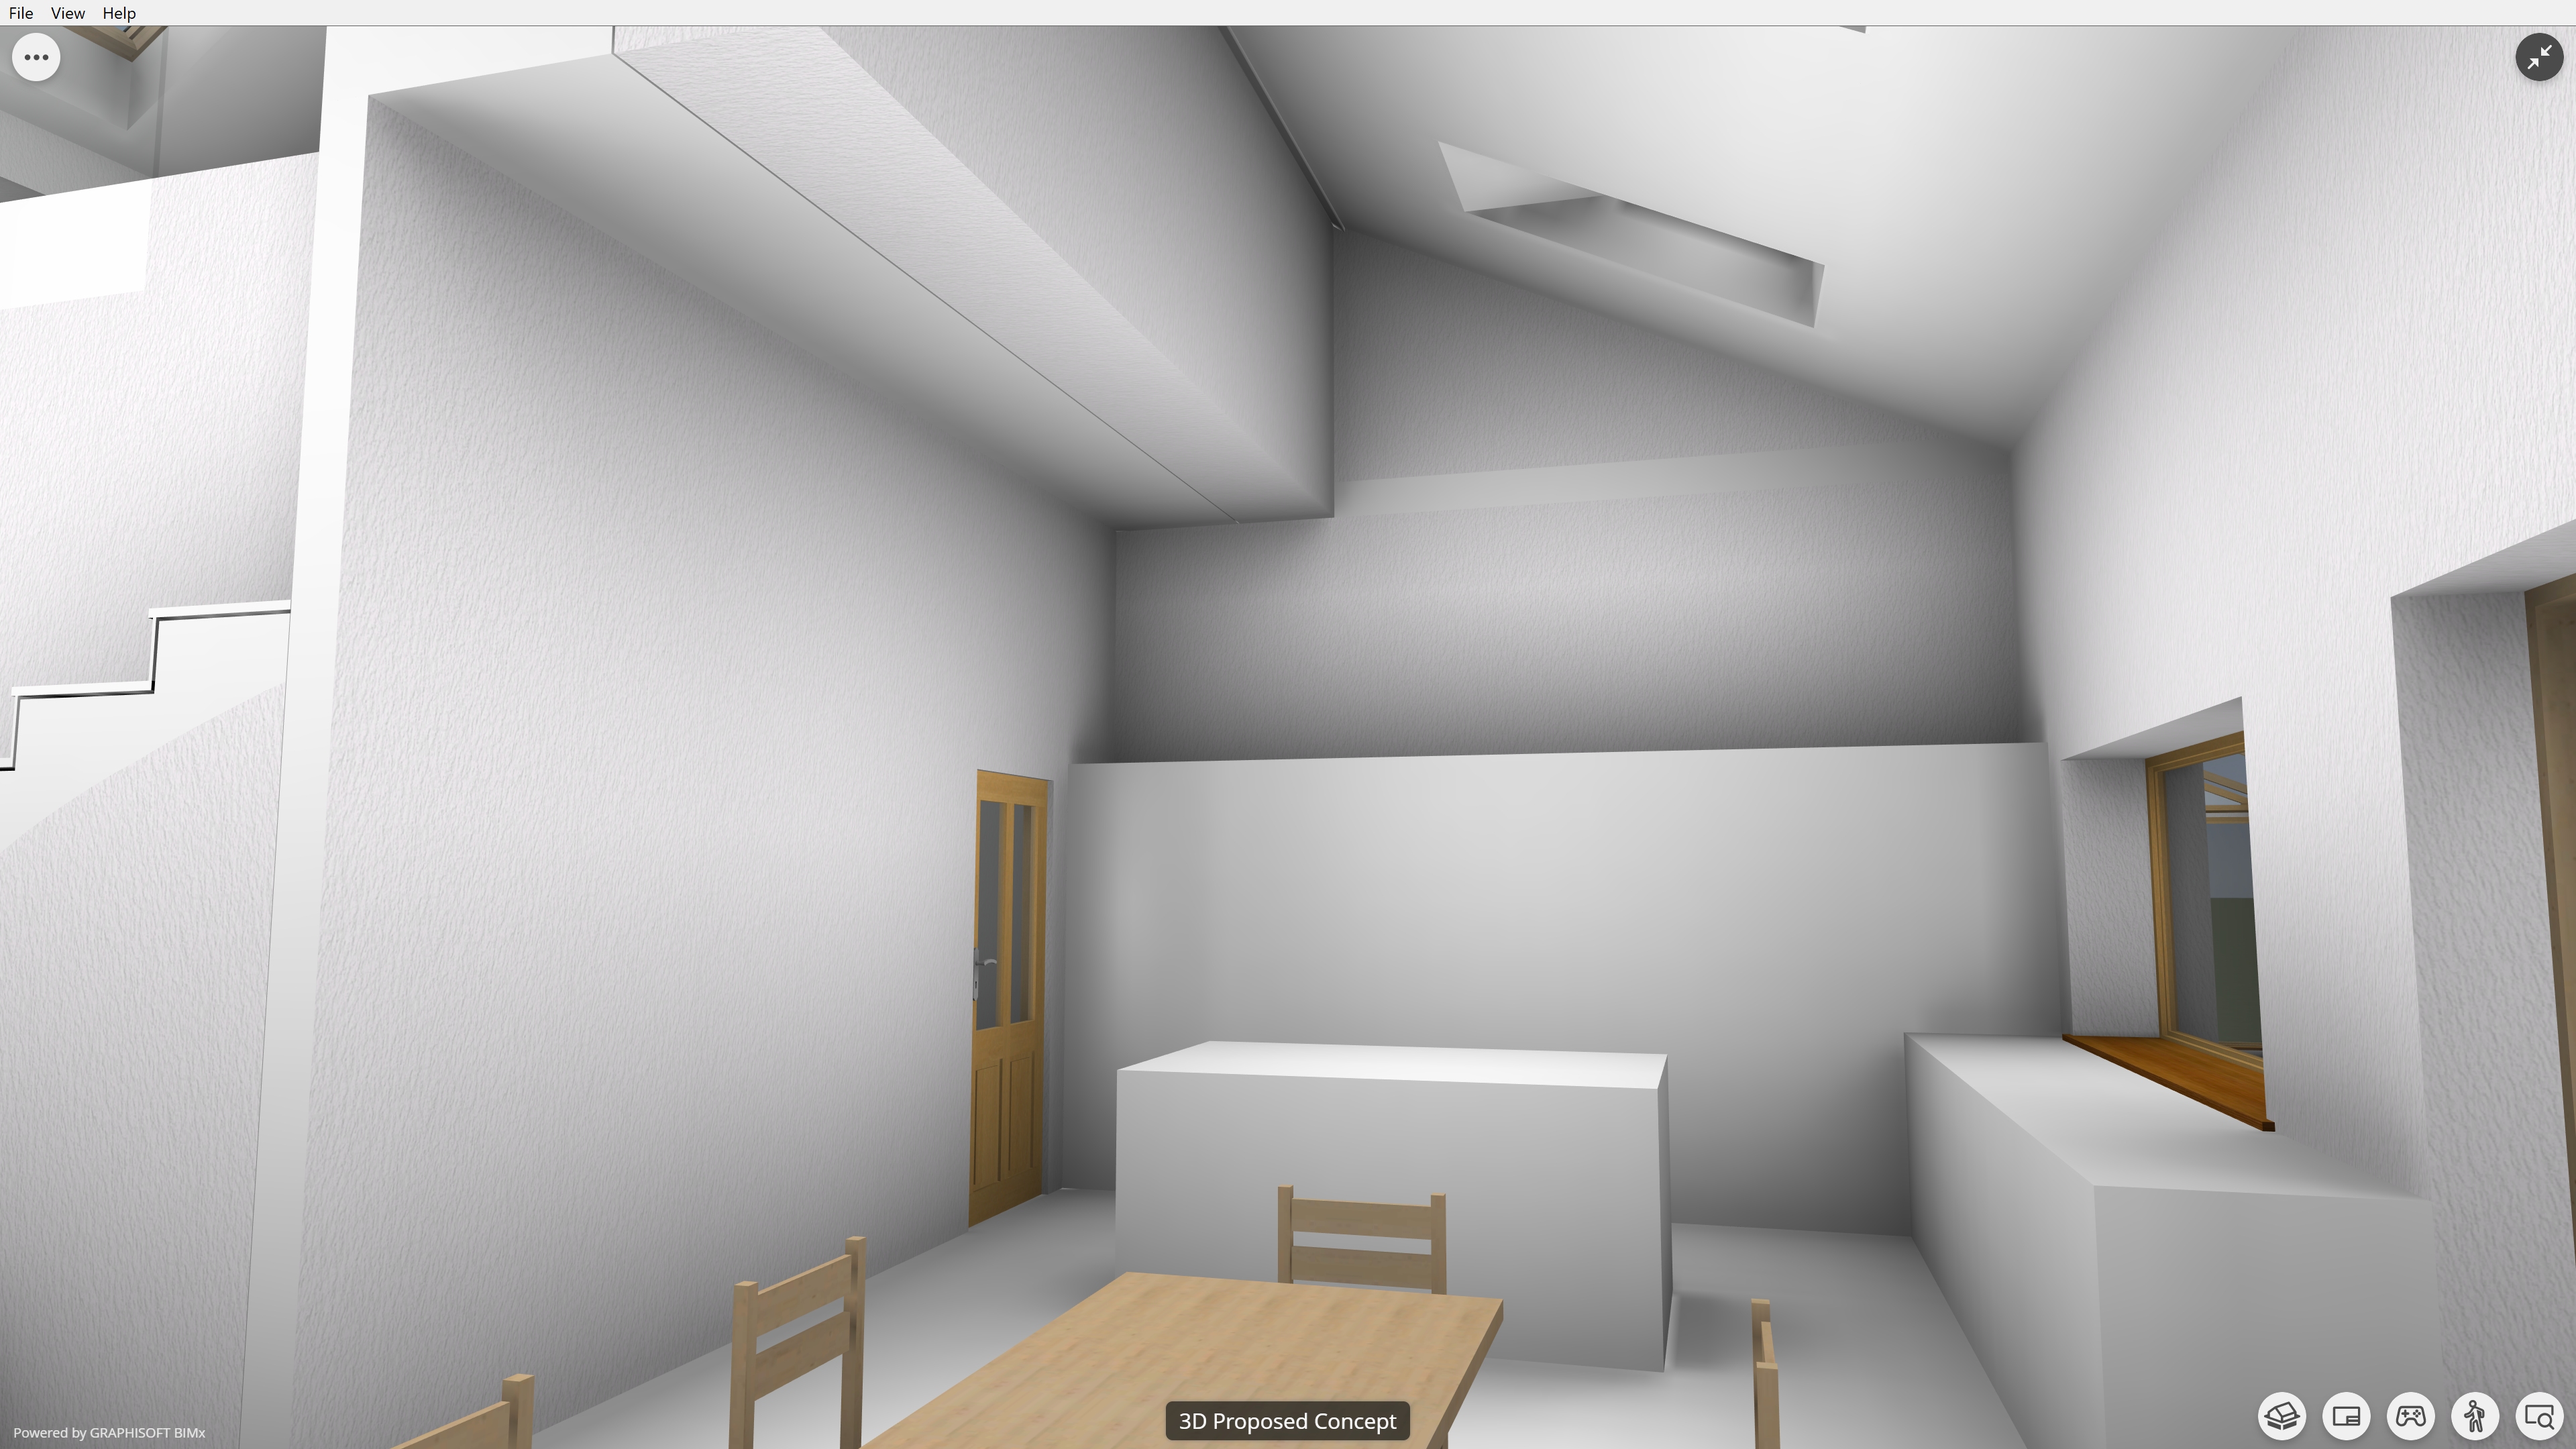
Once into the VR however, my fears were confirmed: the vaulted area felt ‘pokey’. Stephen’s rendition deviated from my original design, I actually had the vaulted space wider, and the mezzanine was lower and jutted into it around the middle, all of which was going to require expensive steel beam structural support. However, his wasn’t a million miles away. The problem was – and it was only really obvious once in VR – that the height to width ratio just wasn’t there, and as the house already had a 180m2 footprint, and I wanted all bedrooms on the ground floor, extending it another five metres just for the main living space seemed inefficient.
Another issue was that I had chosen a ten metre wide building, which leaves nine metres wide internally (the raised ceilings were to admit additional light to compensate for the added width). Stephen was adament that this would not fly with planning, who seek eight metre wide buildings. I know that some rural one off houses get away with ten metres, but as we are building on an estate, the best Stephen felt possible was a roof not peaking in the middle such that the front roof of the house would match the others on the estate, and the back roof would be consequently much longer and steeper as a result in order to stretch the width out to ten metres.
That seemed reasonable, but it rather ruins the roof symmetry of my original design in an unpleasing way. As you’ll see later, Passive House Plus (< 45 kWh/m2K) isn’t achievable without the ratio of total house shell area to floor space being below a certain ratio, and the eight metre maximum width requirement makes that virtually impossible. Passive House Classic (< 60 kWh/m2K) is still just about within reach however.
The final design as being submitted to preplanning
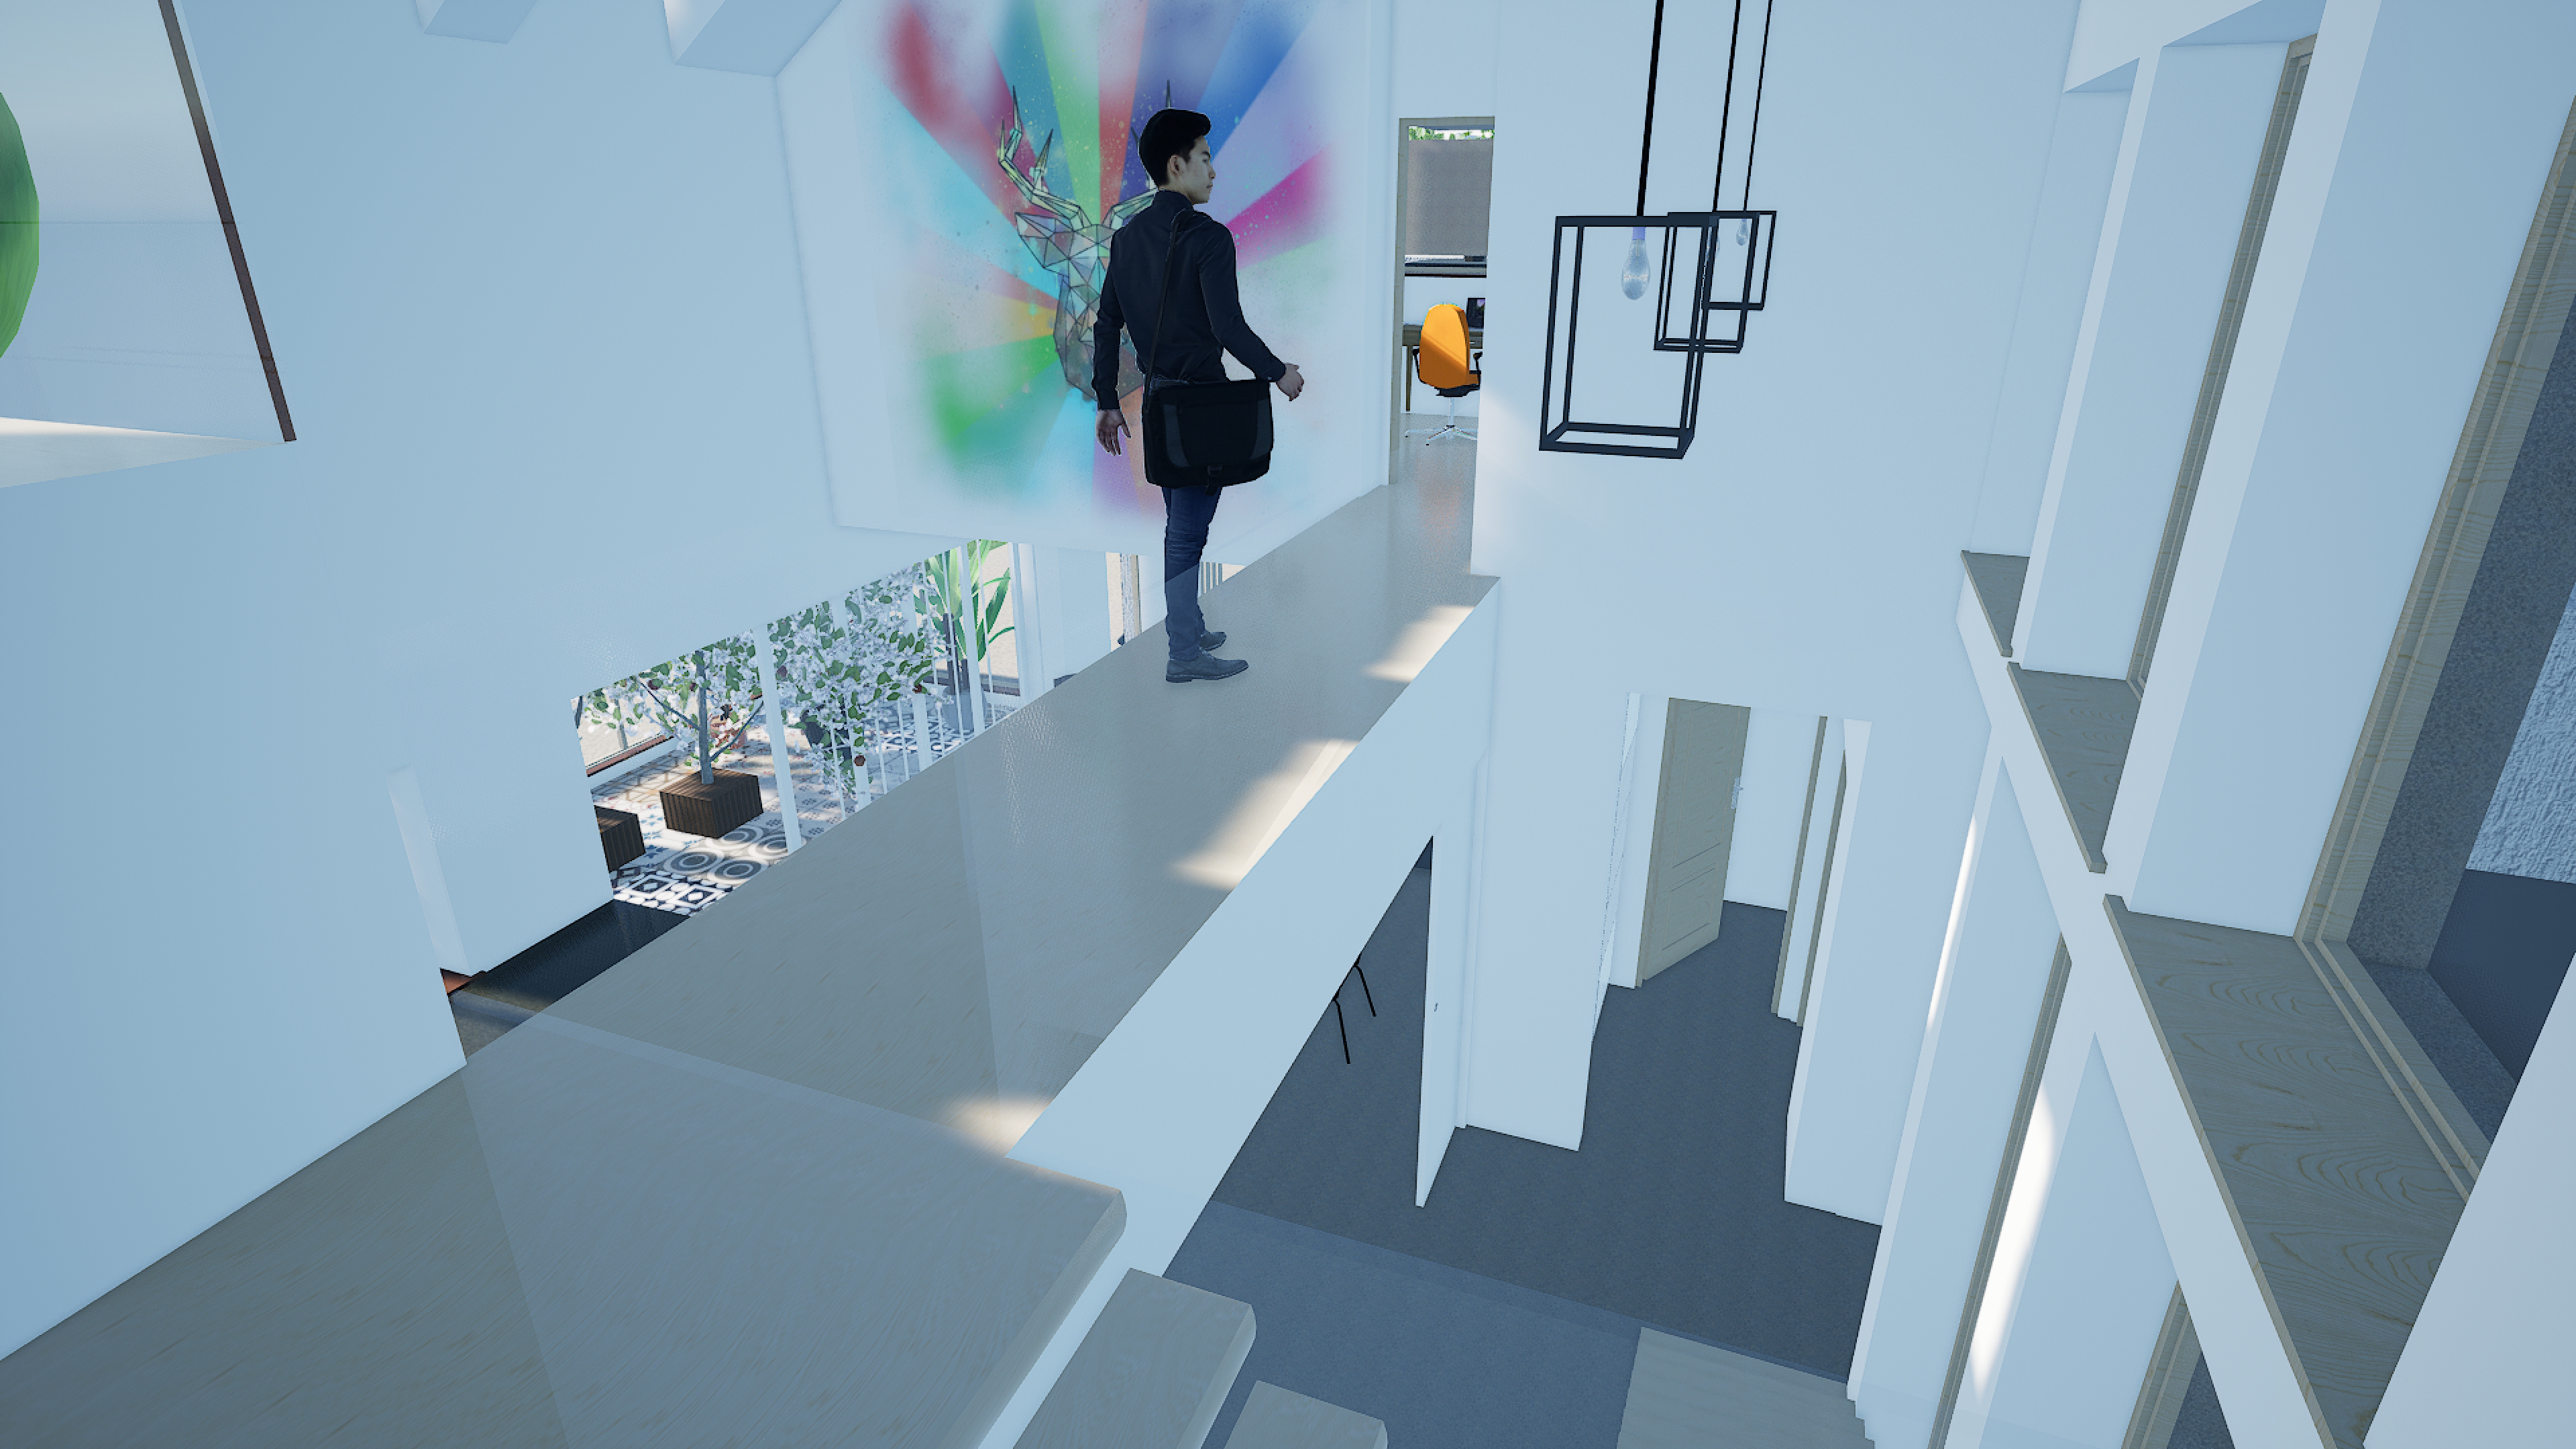
Stephen’s own design had taken my original concepts and done something rather different with them: If you imagine an S-shape whereby your living room opens up into the vaulted height as you approach the kitchen, the kitchen terminates the ground approach but then you sweep upwards onto your mezzanine library reading area, that’s pretty much Stephen’s design. The clever thing here is you now get the width proportional to the height that my design was lacking – actually, you get oodles of width, it’s about 2x width for the height, but as it’s an S-shape, it breaks up that width in a fluid flow.
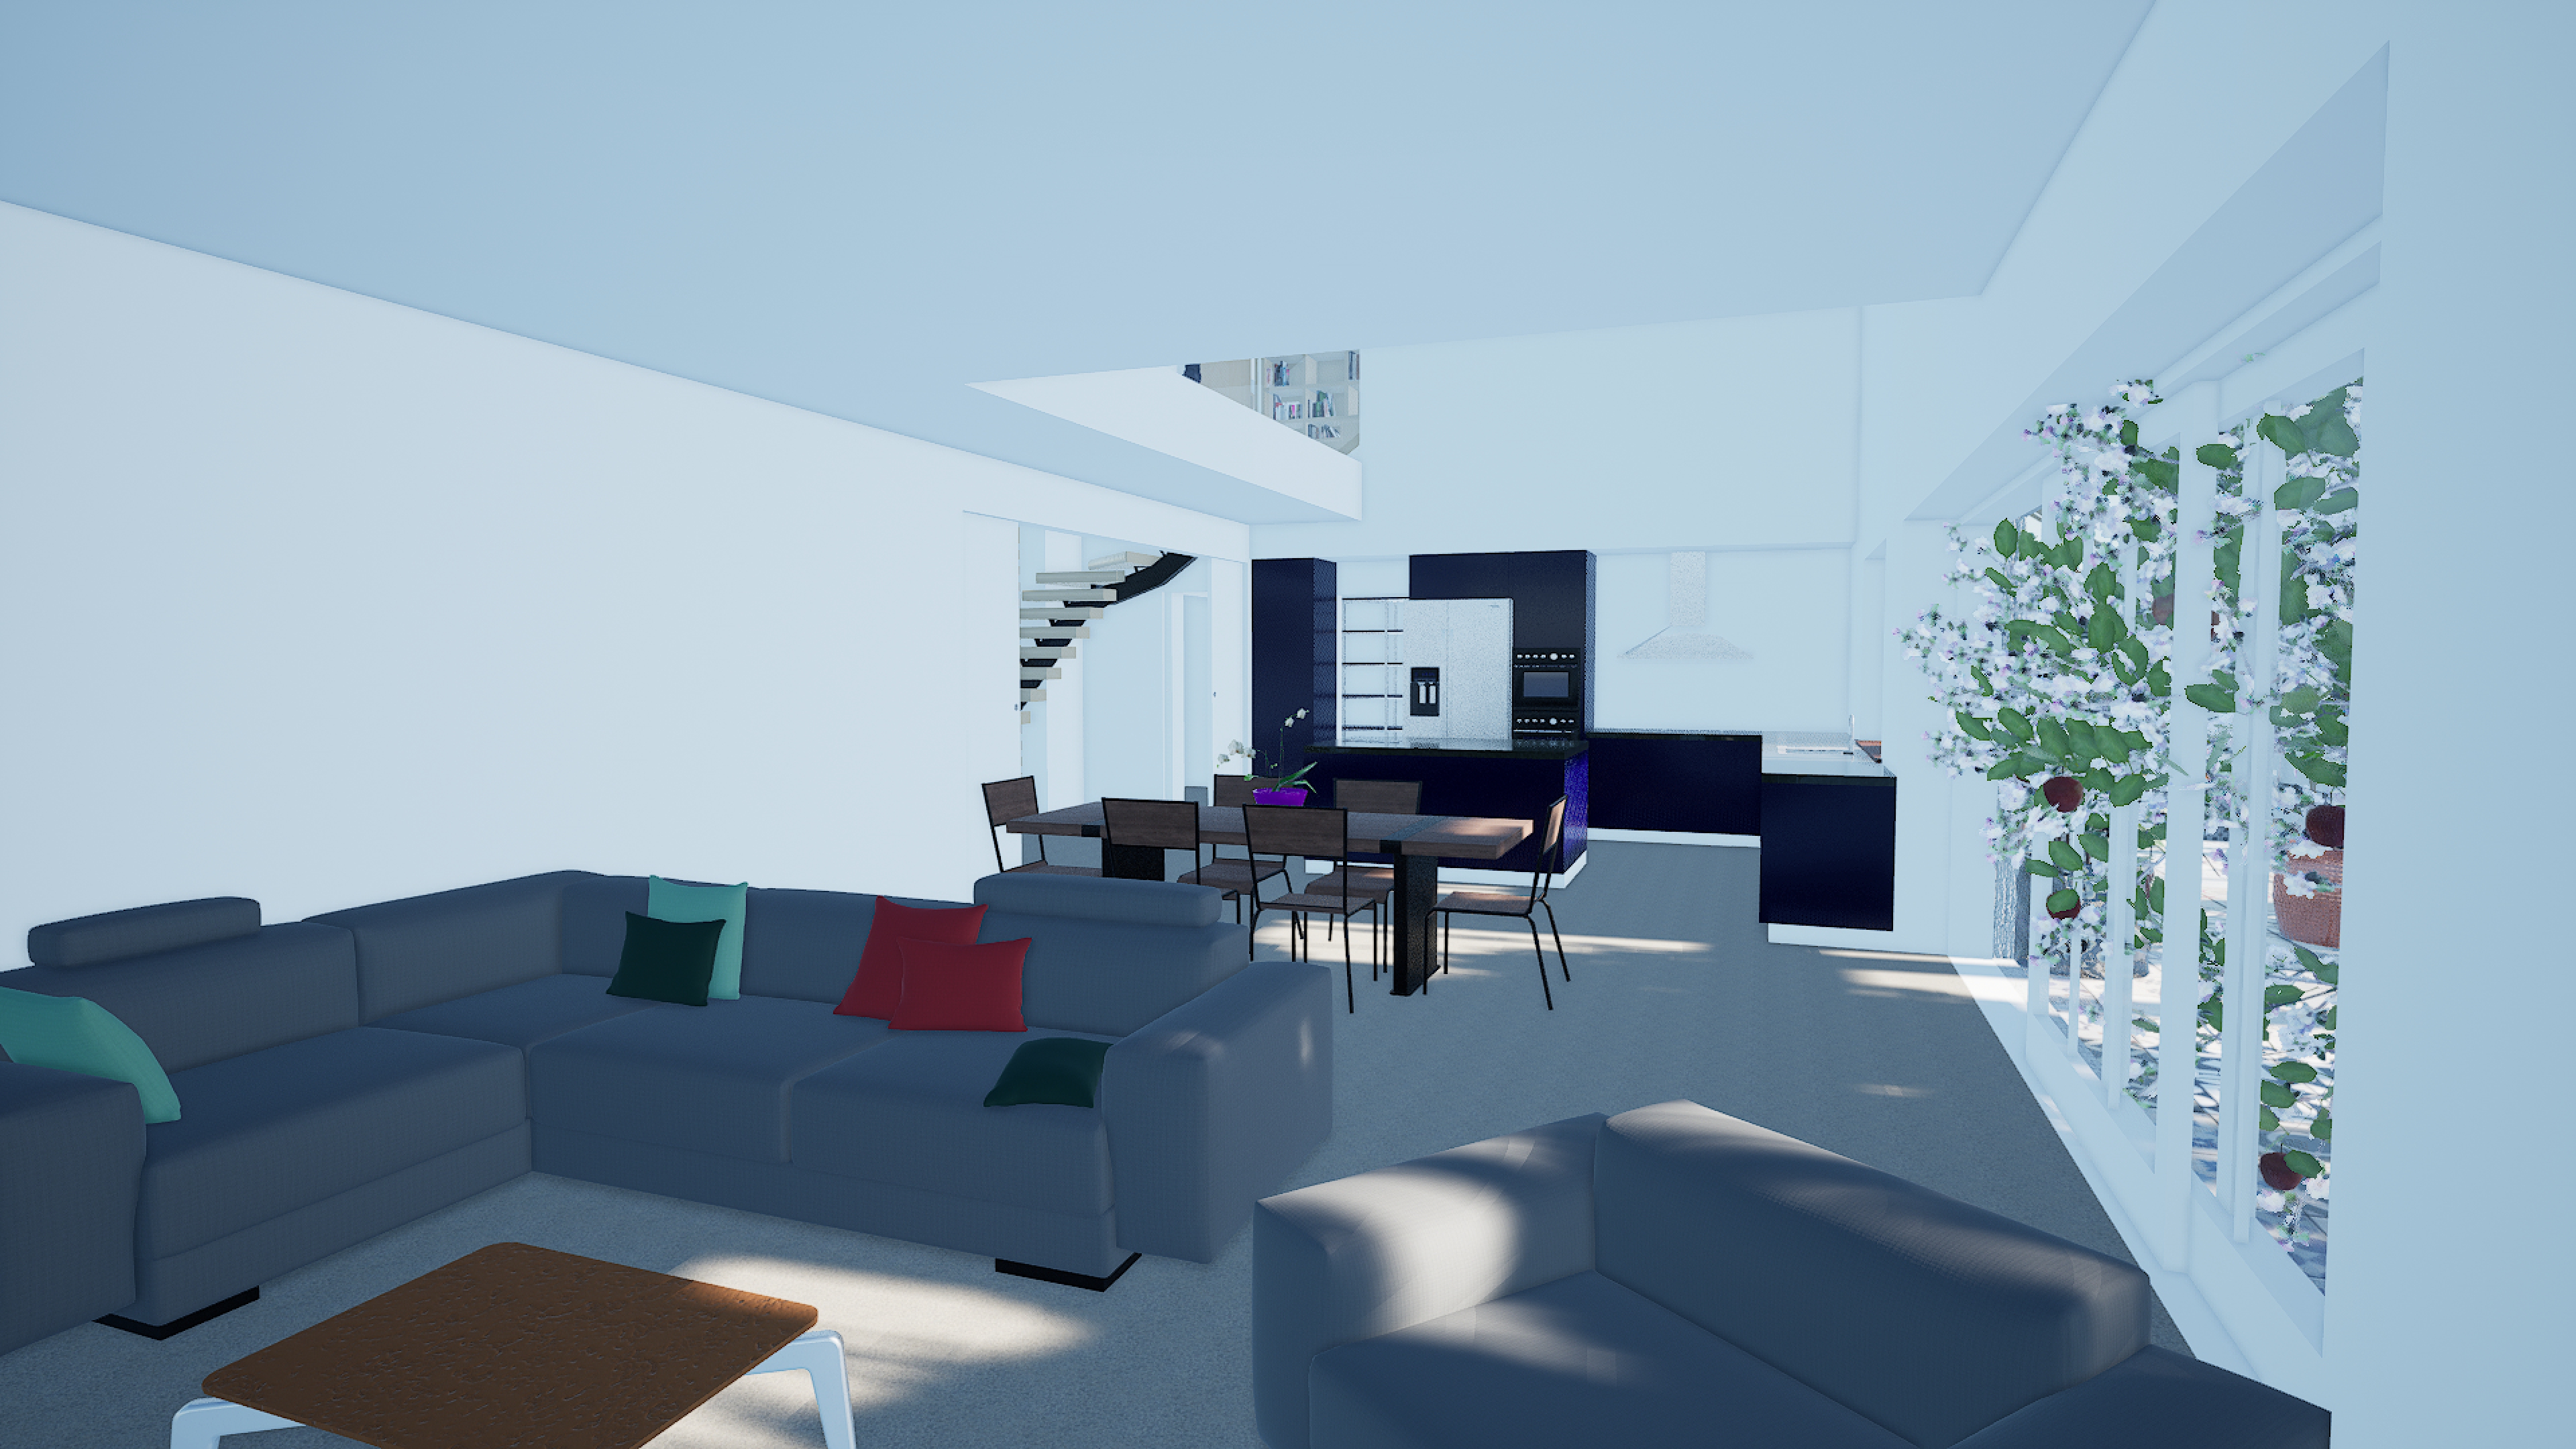
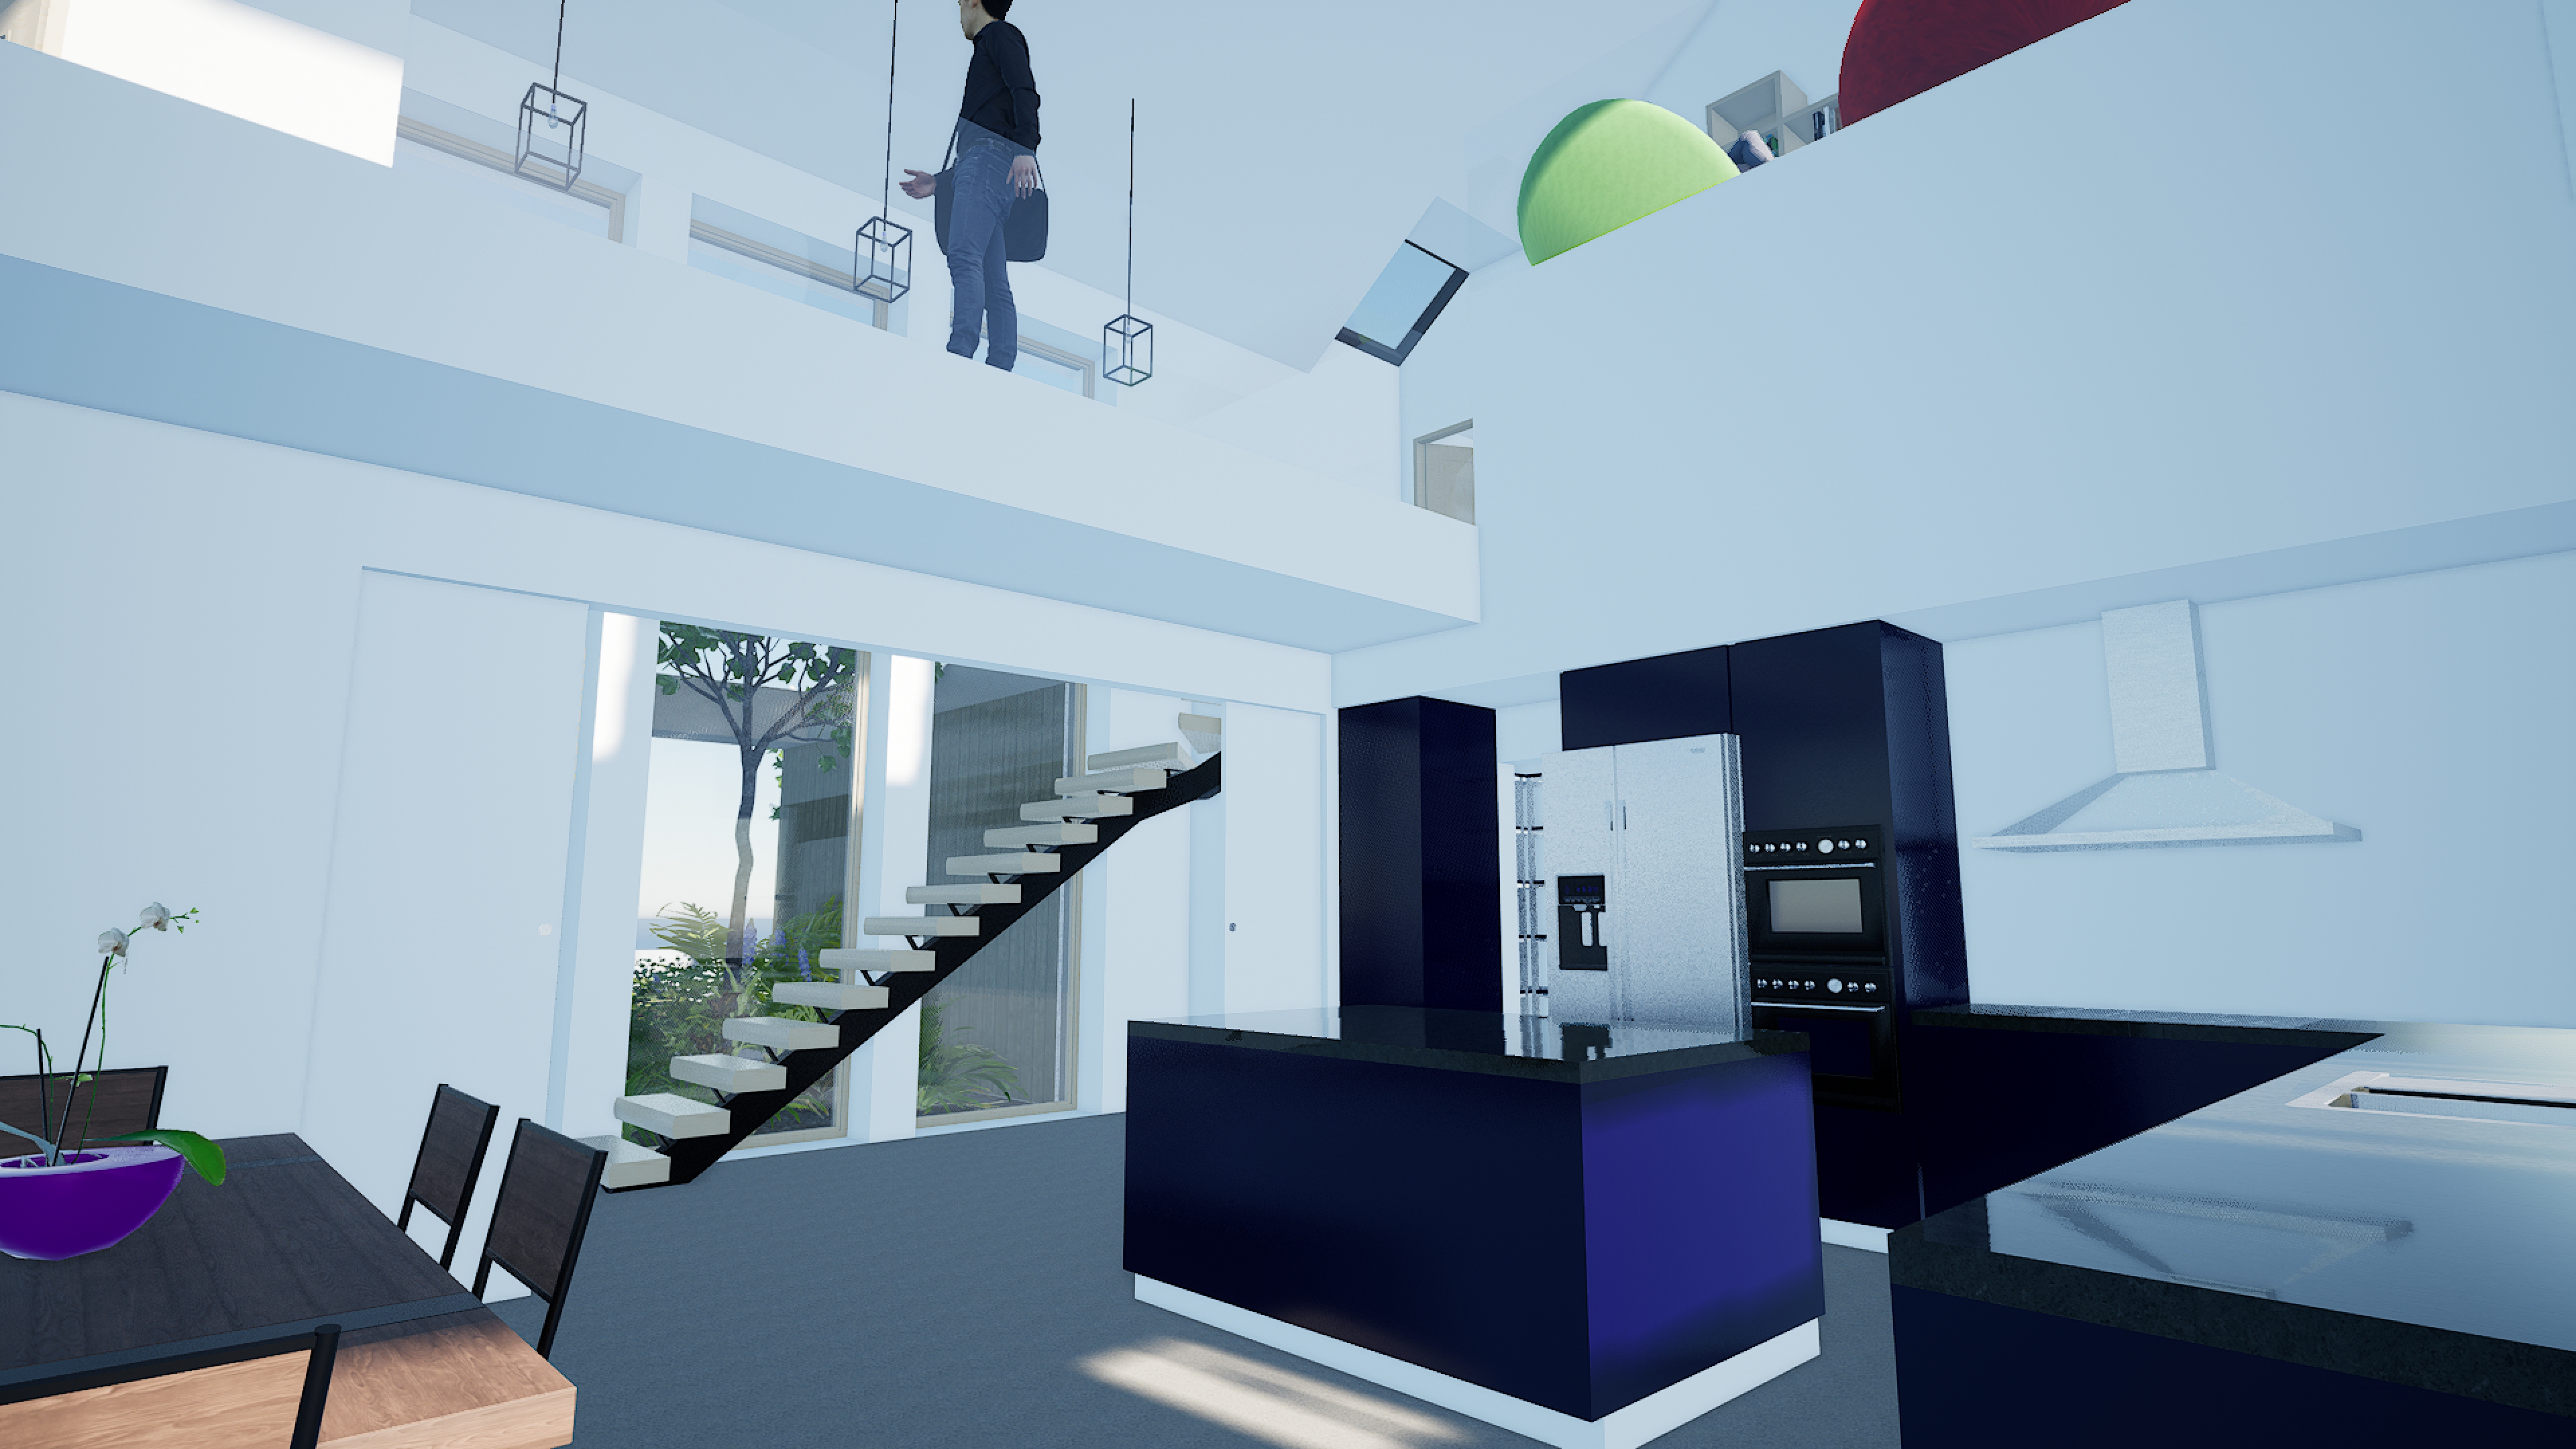
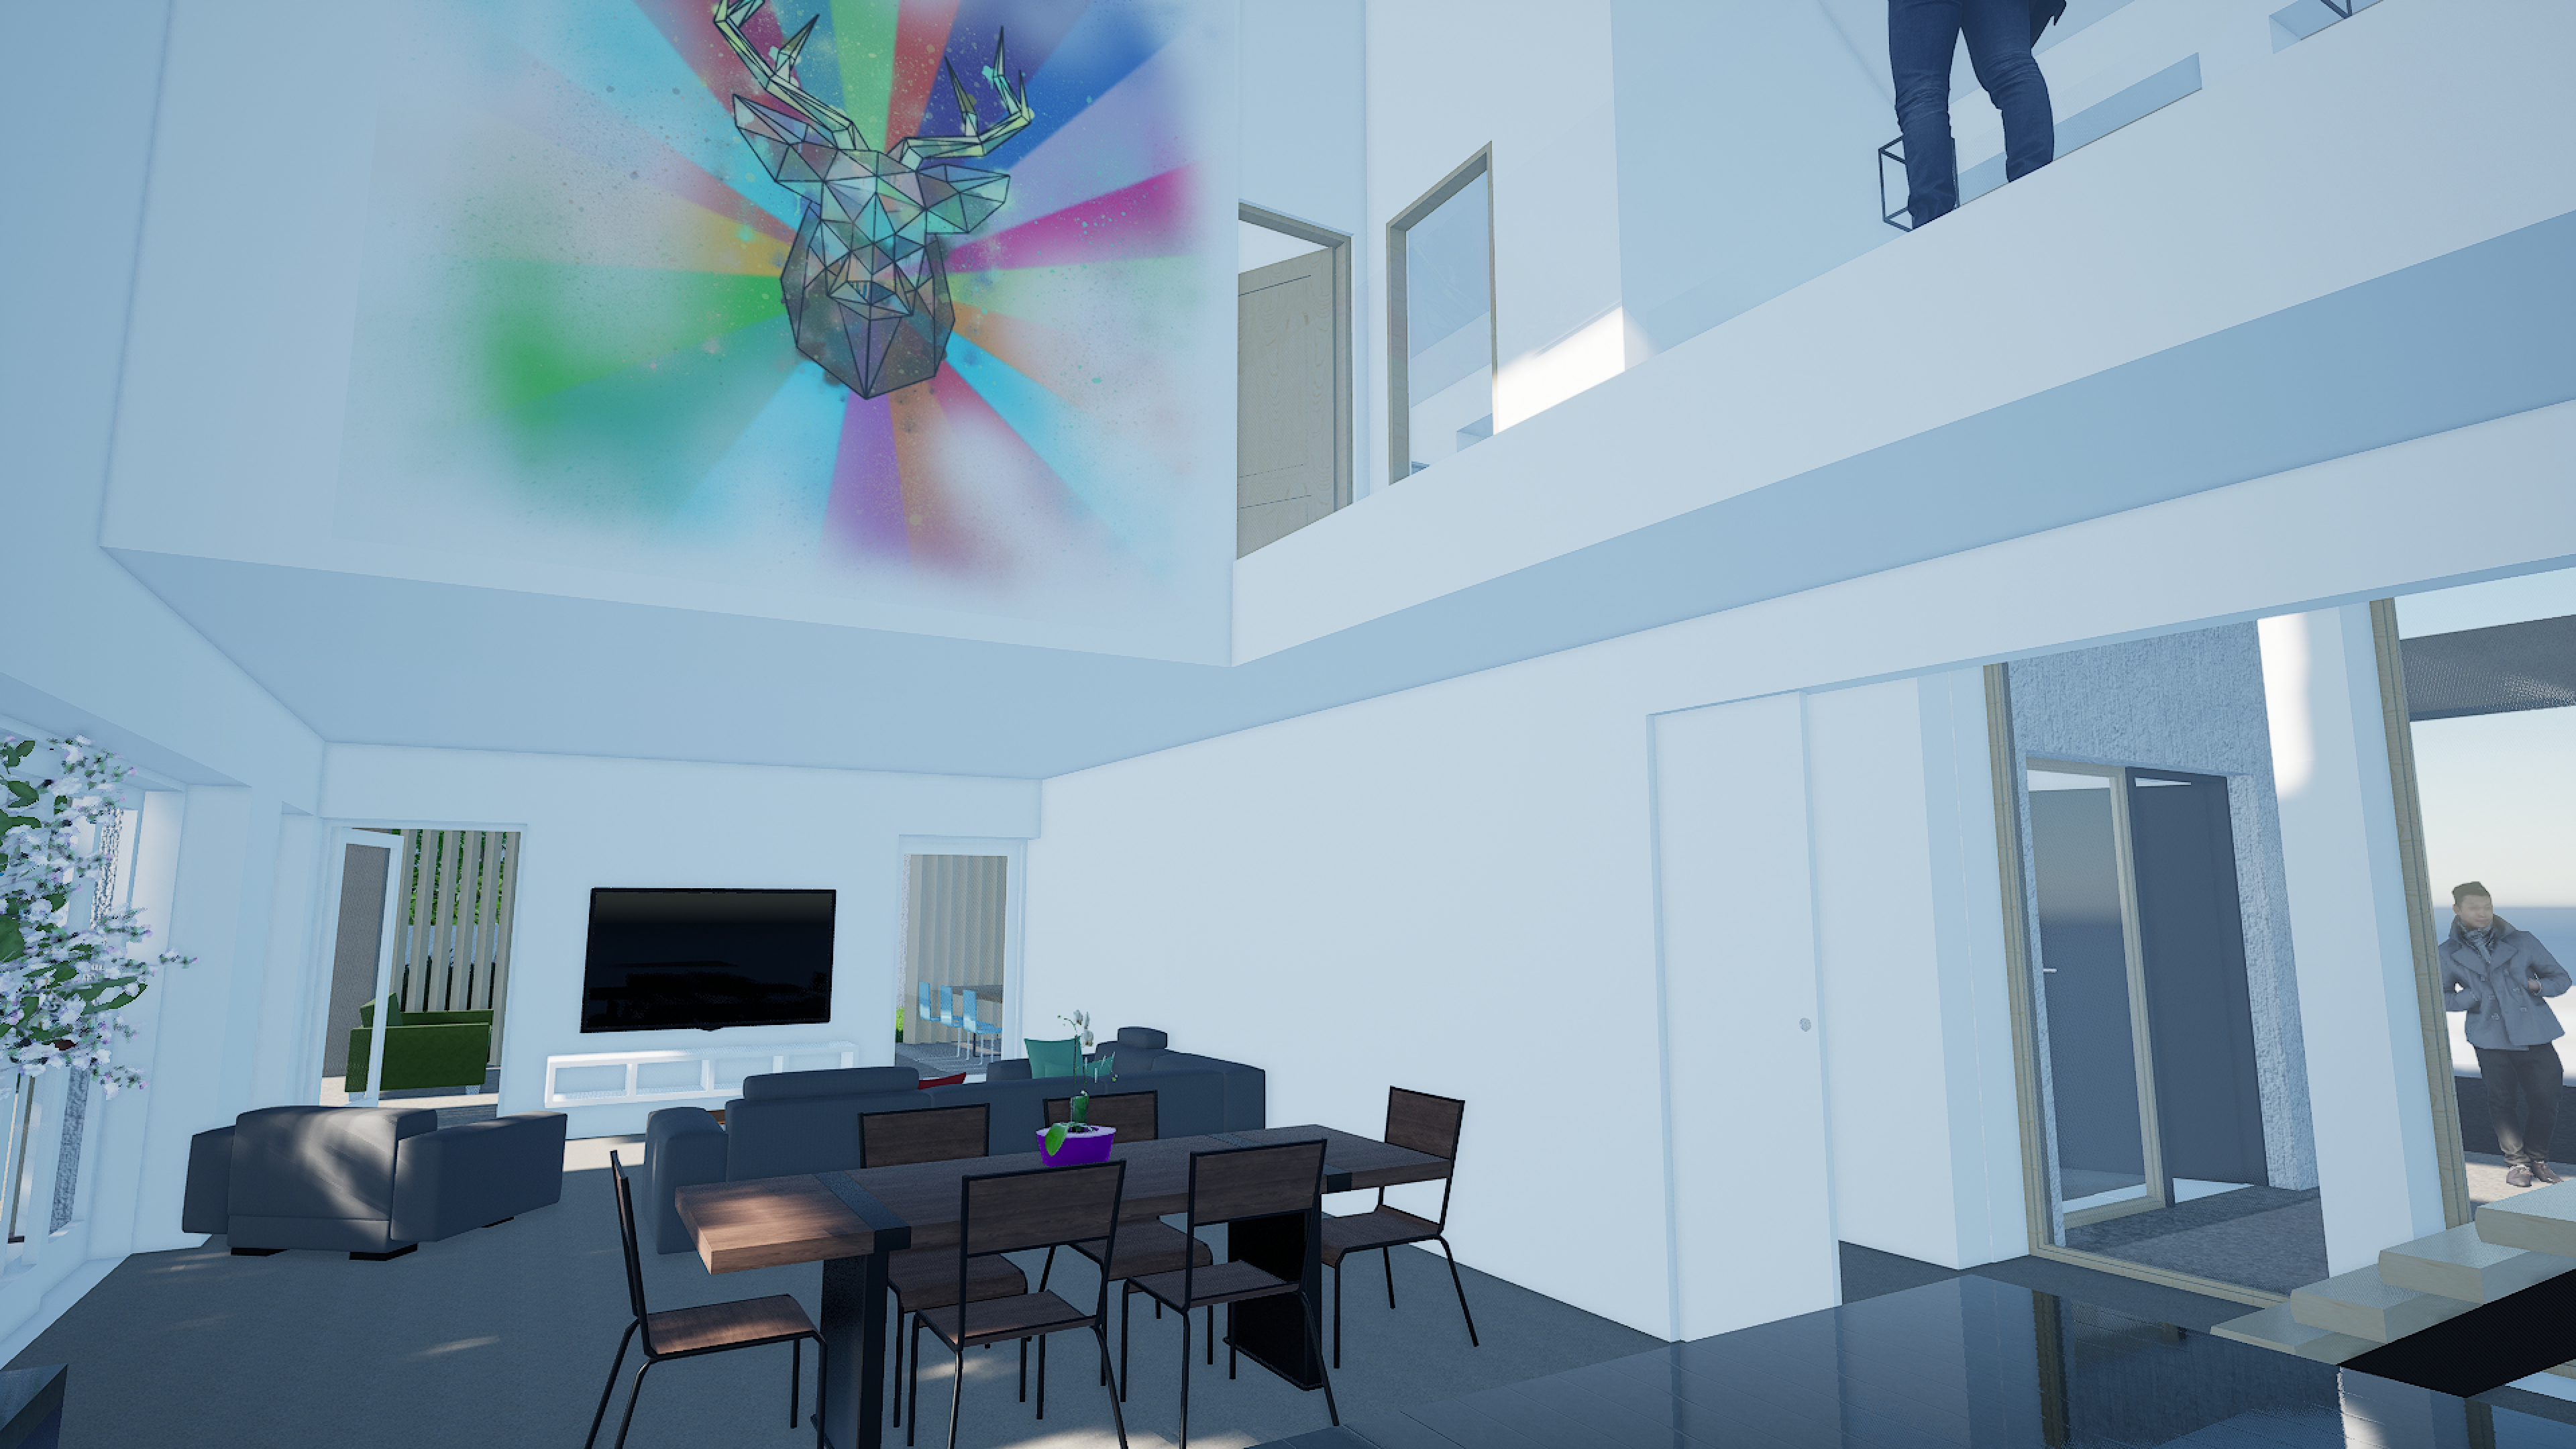
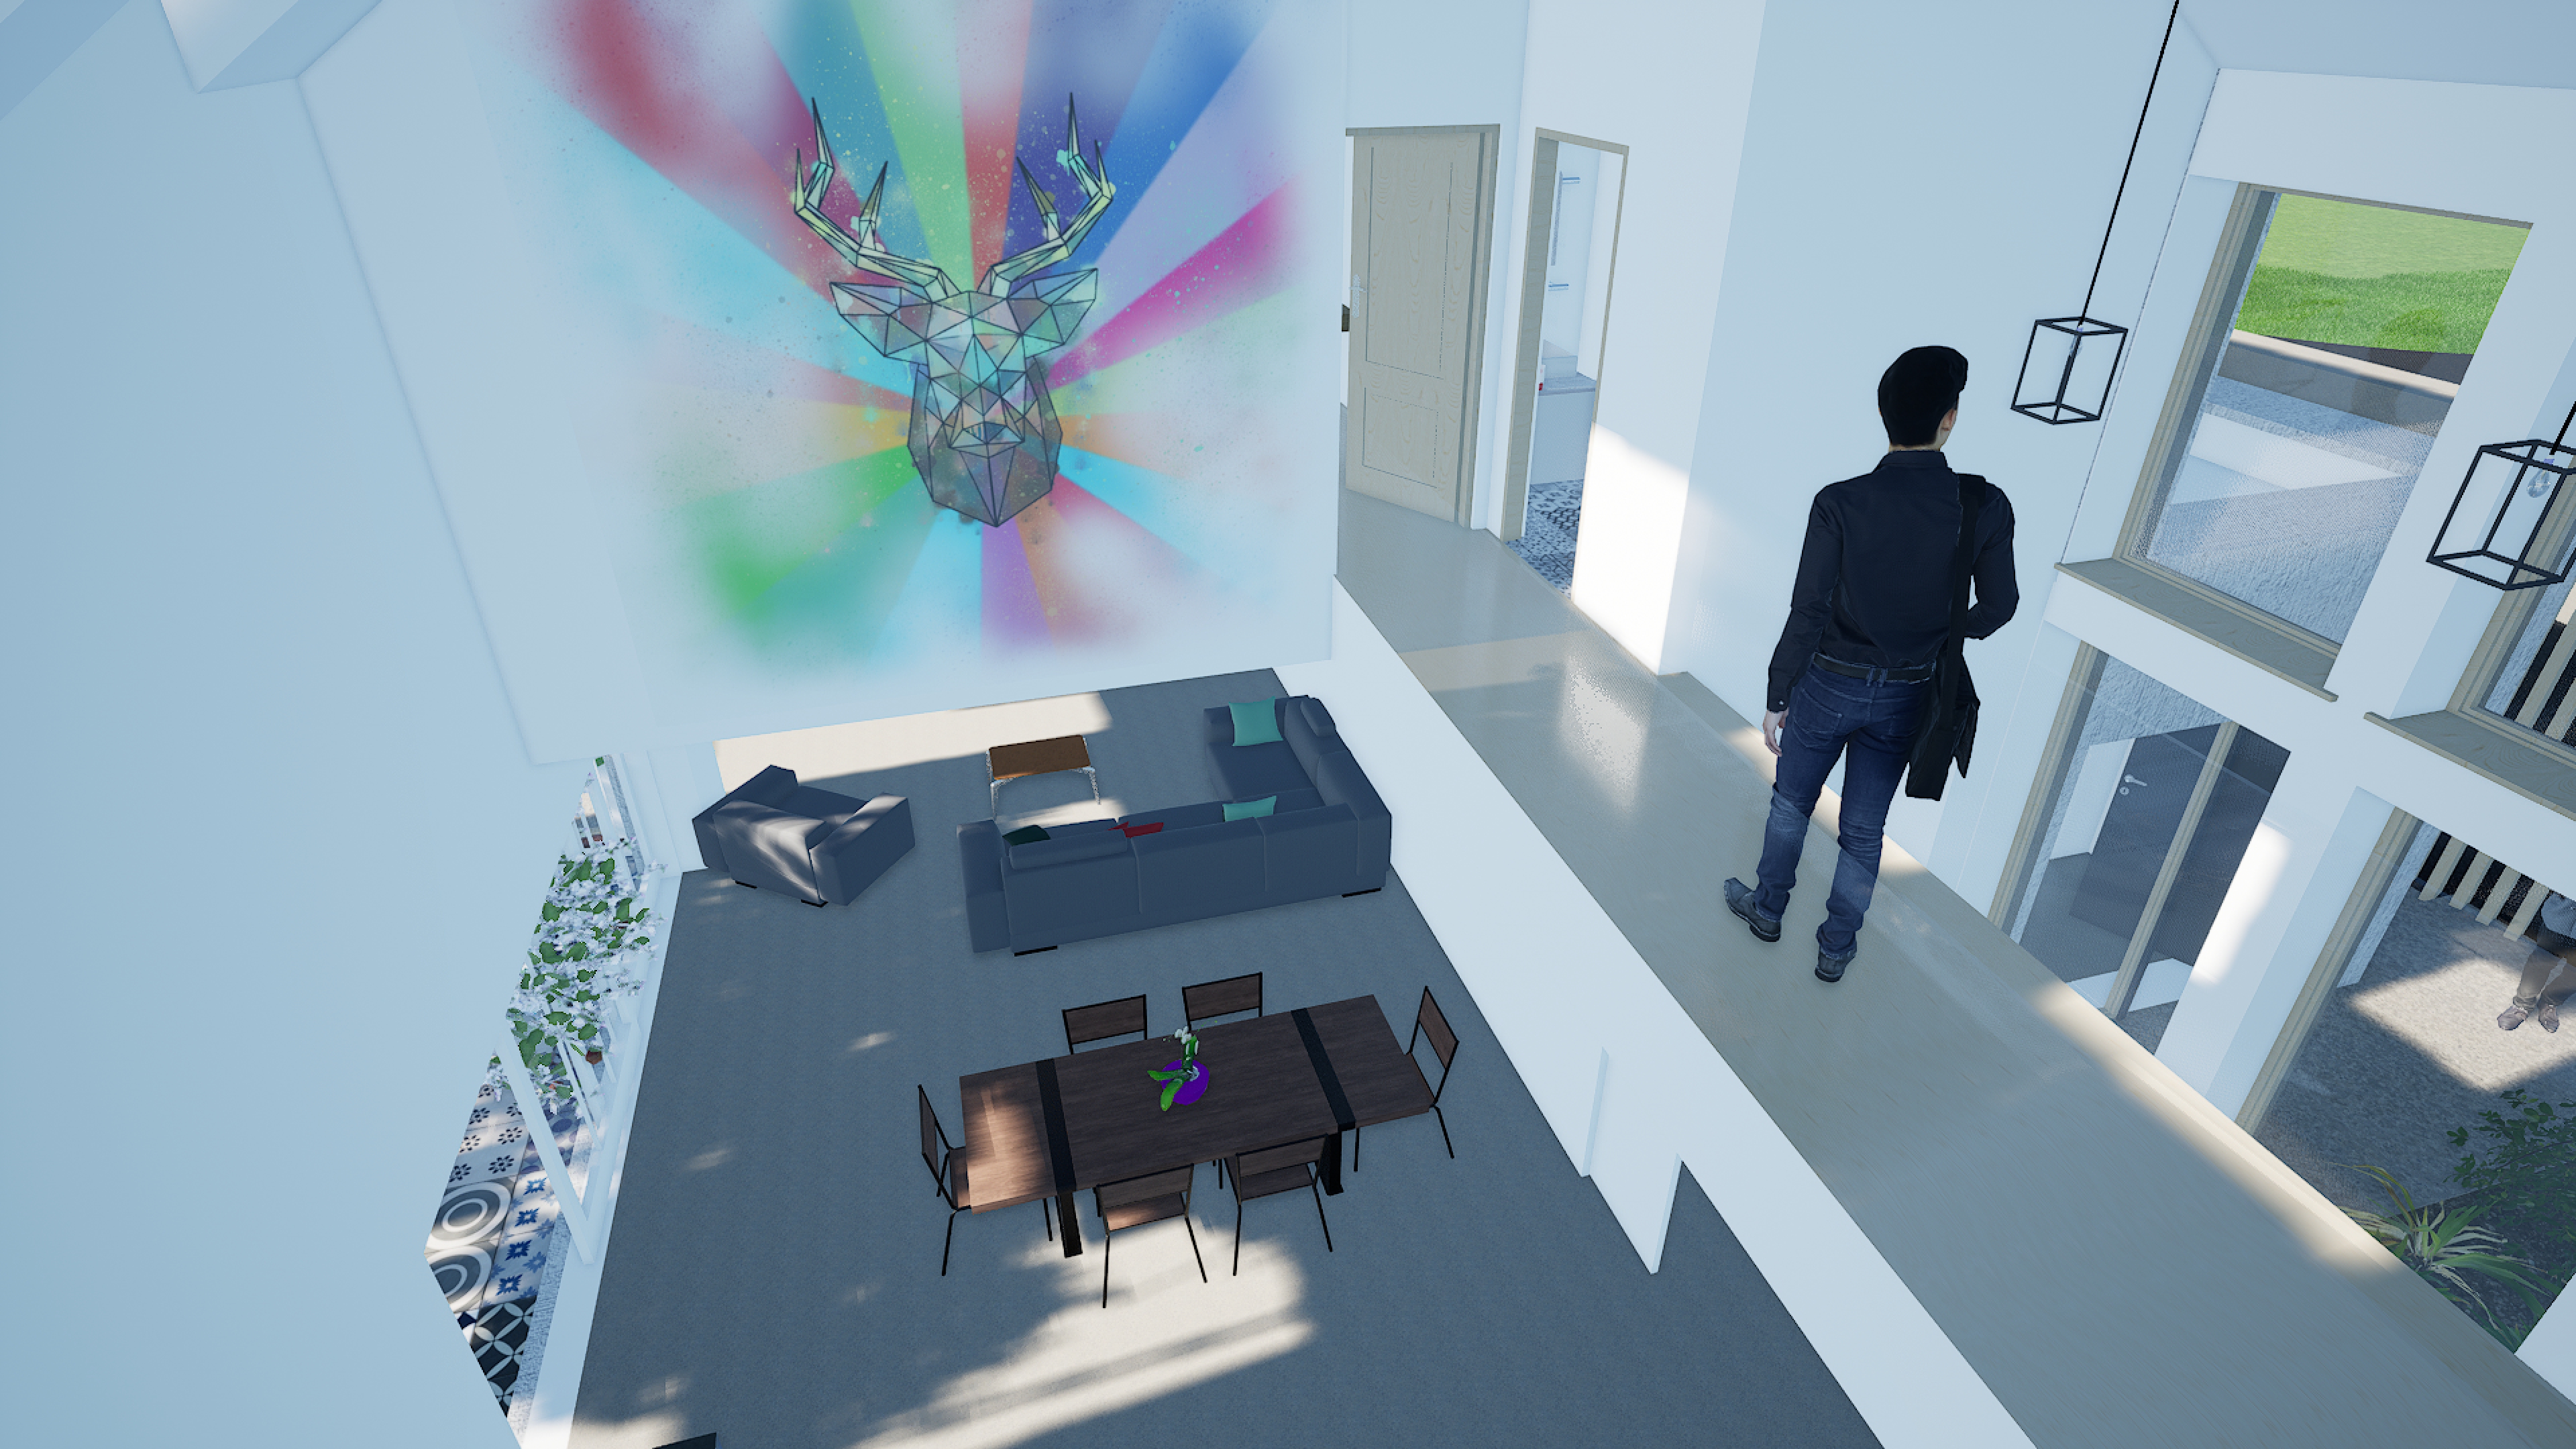

Obviously, using so much of the house’s length and height to achieve this effect leaves insufficient space for all of the rooms I had in my original design, so two of the four bedrooms get partially extended out the front of the house, leaving a space in the middle for a tree where the front door is, which is then brought as-if into the vaulted space by a whole ton load of glazing:
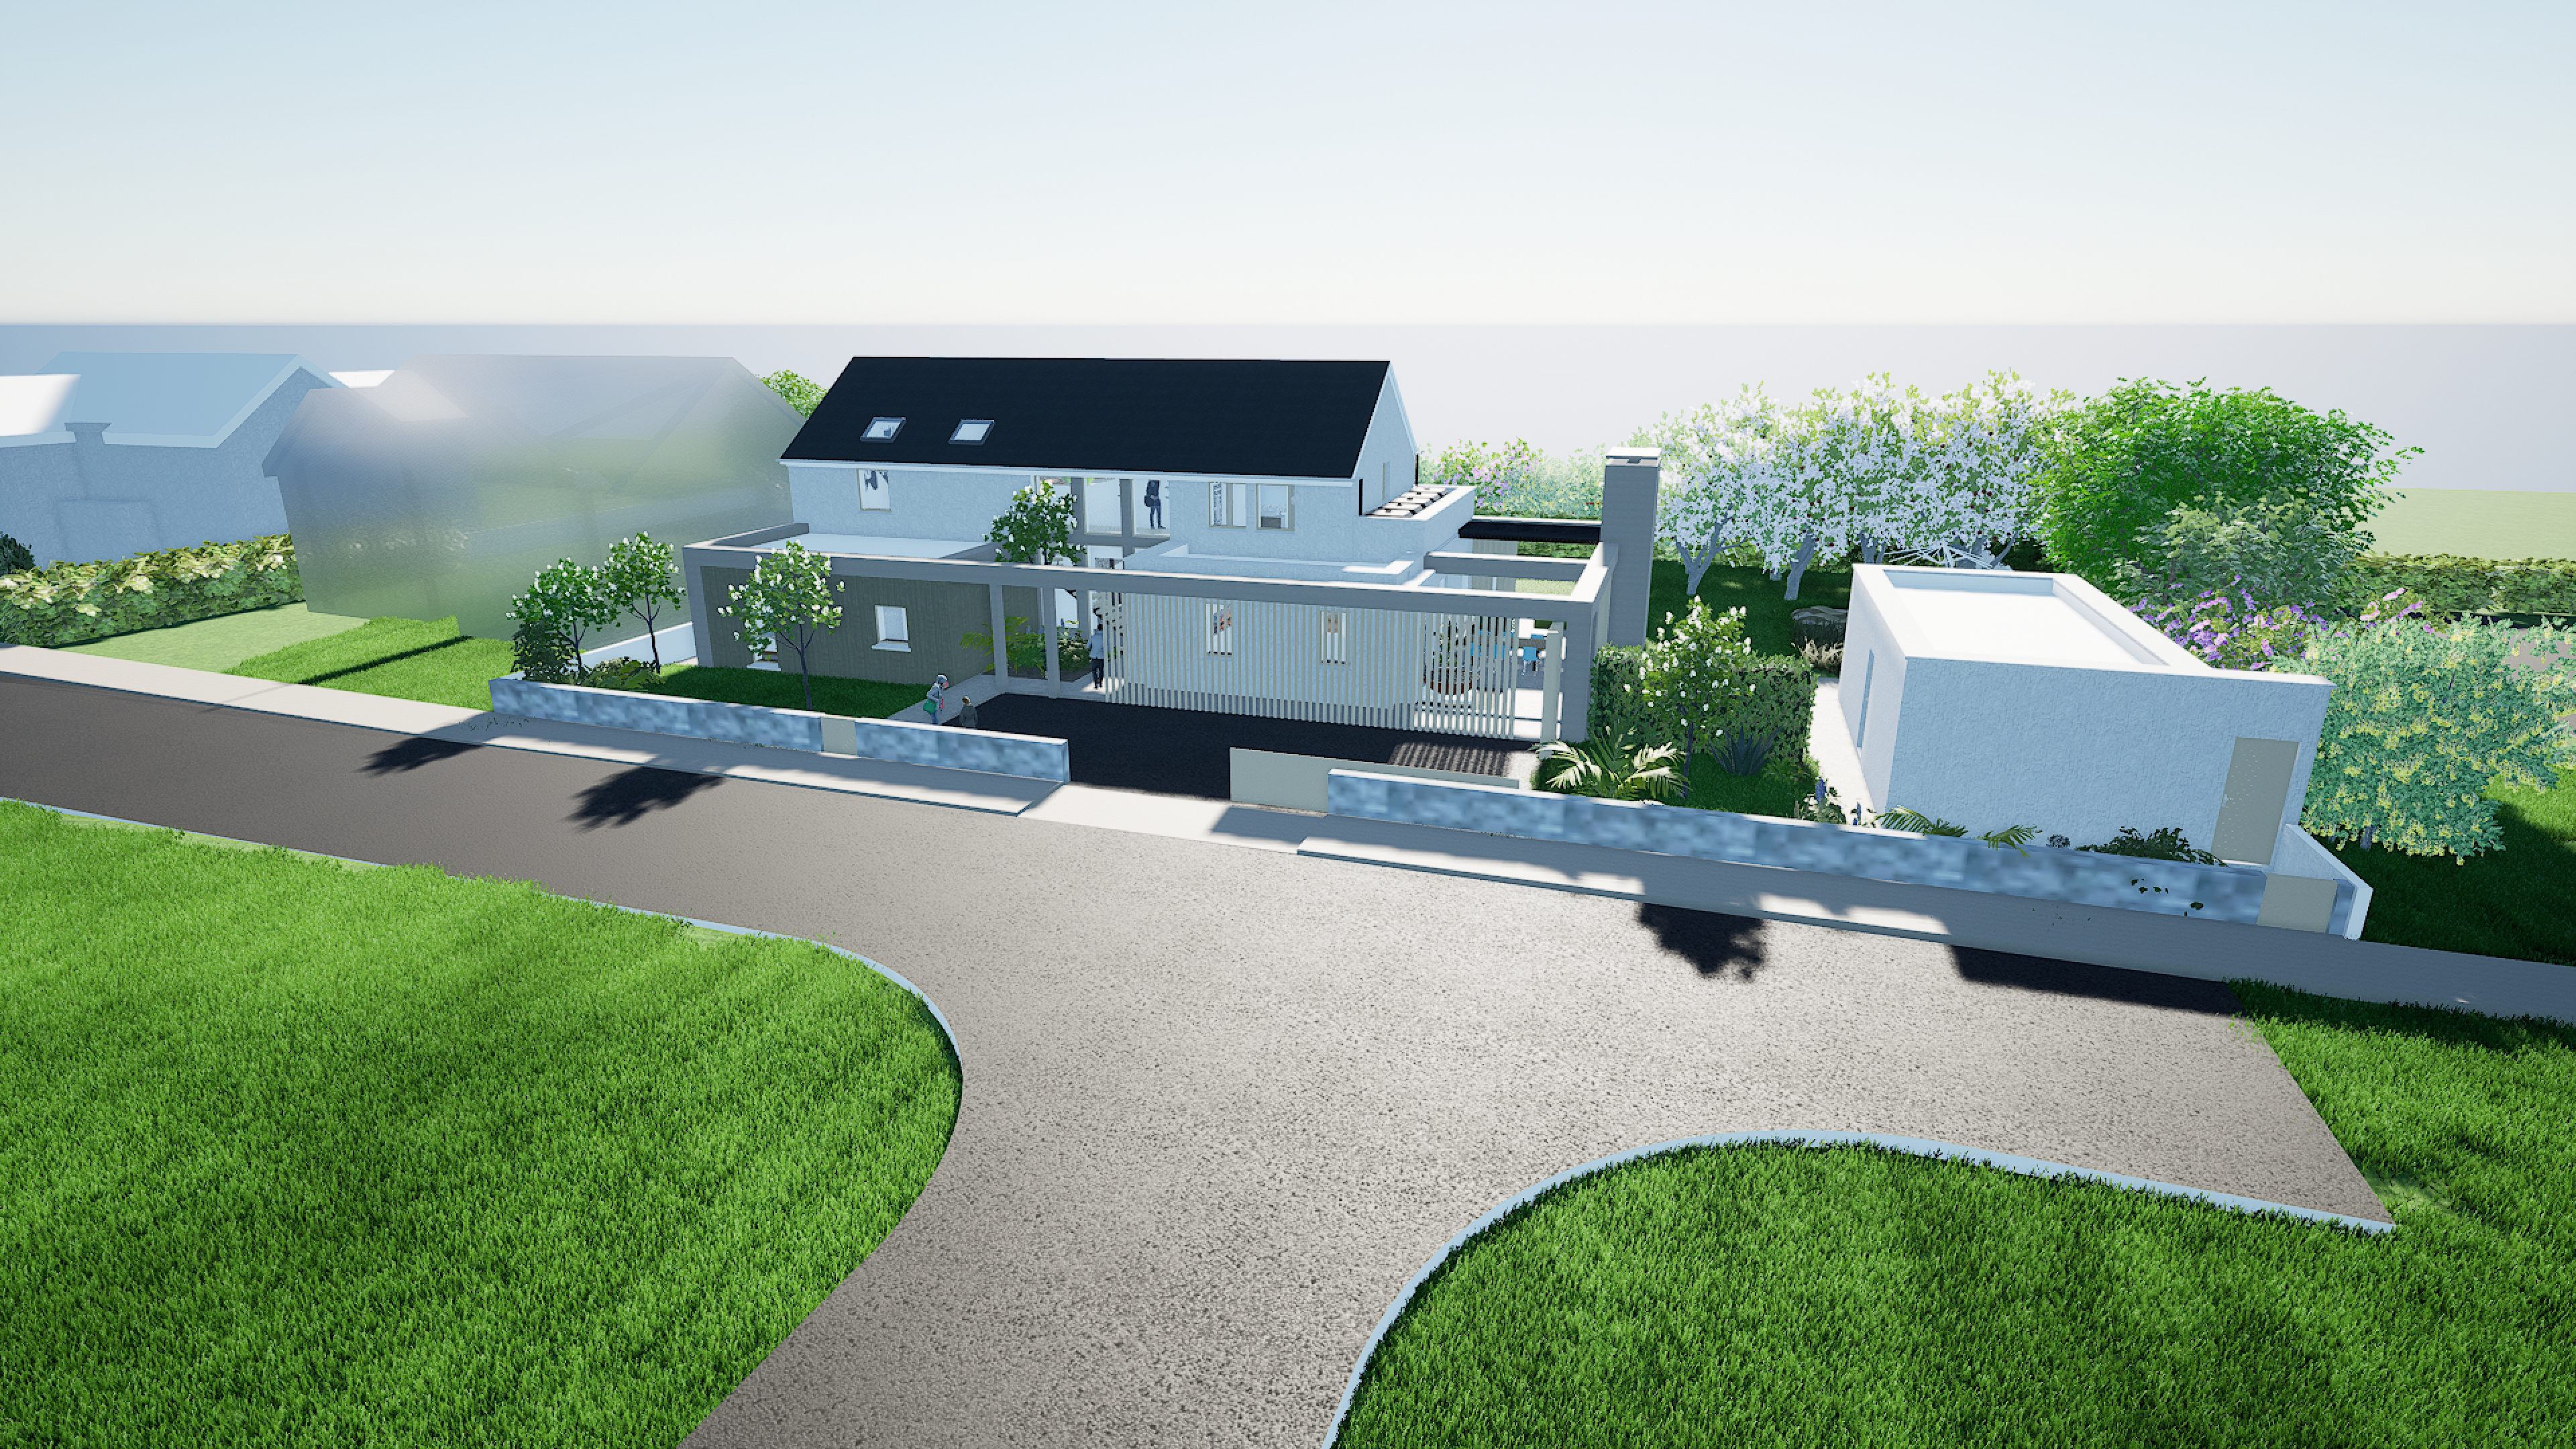
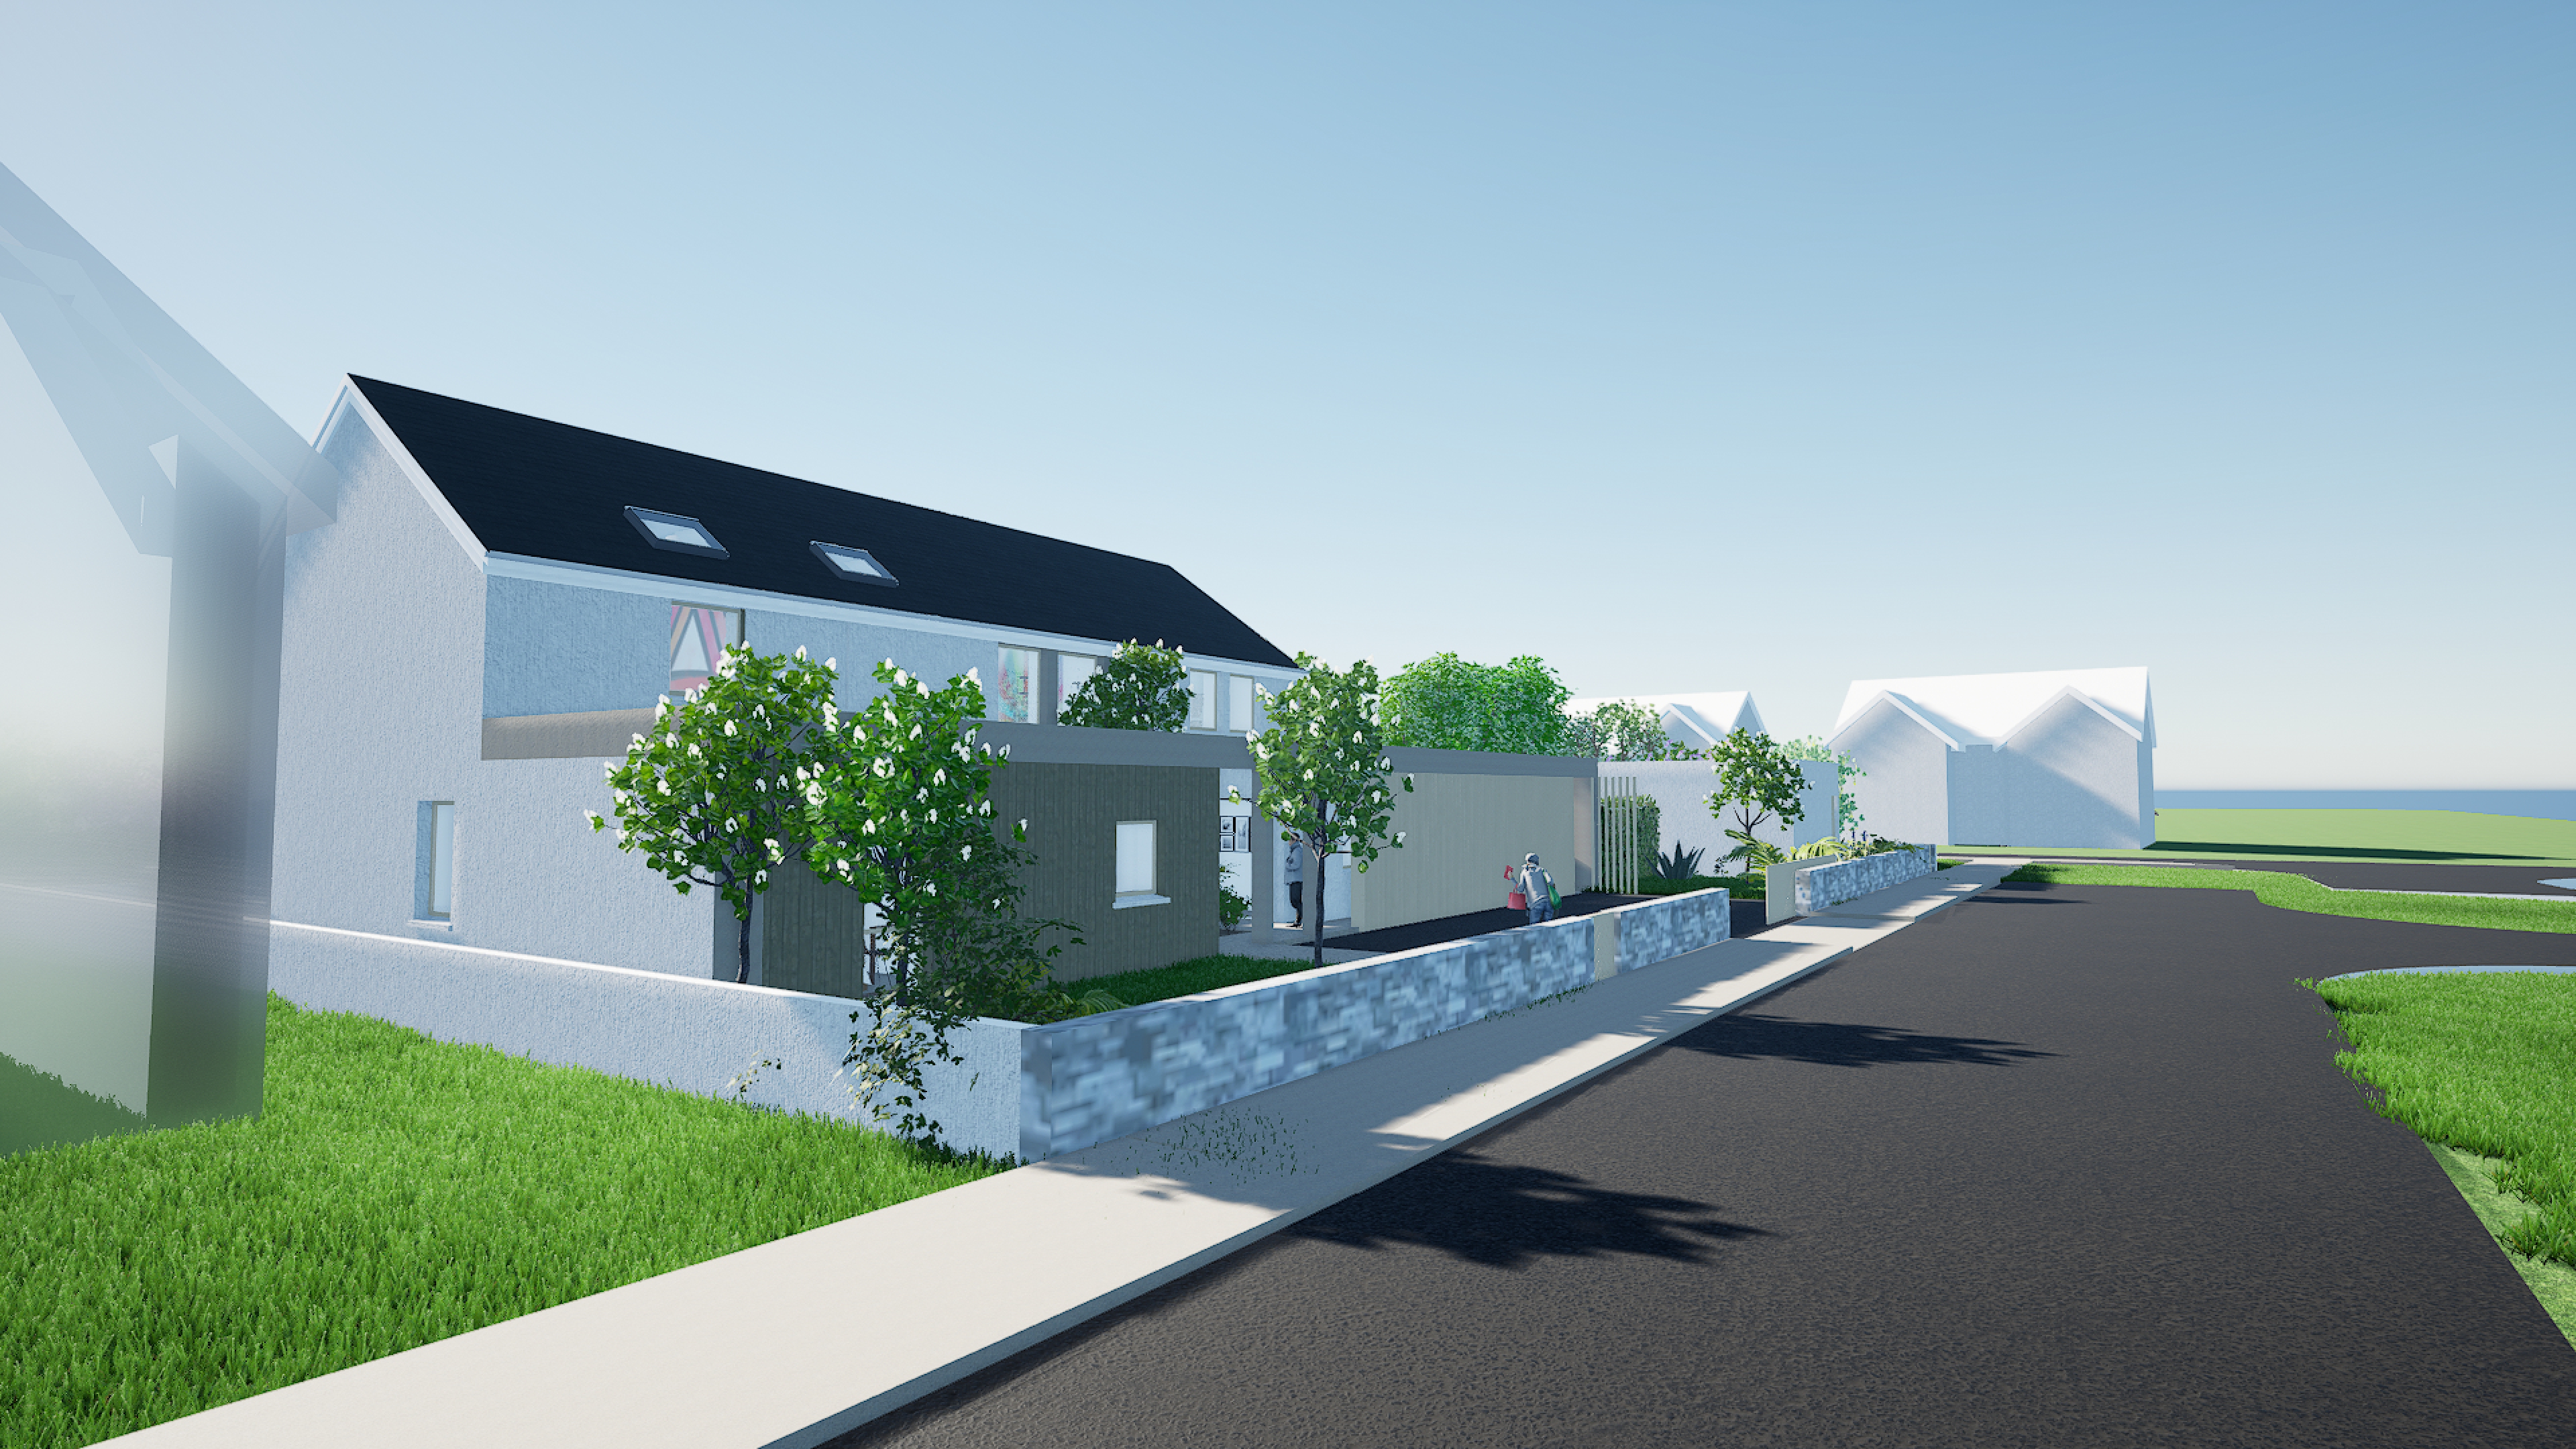
(If you’re wondering why there is a transparent house next door, it’s because the site next to us is empty. The white houses are existing neighbour houses)
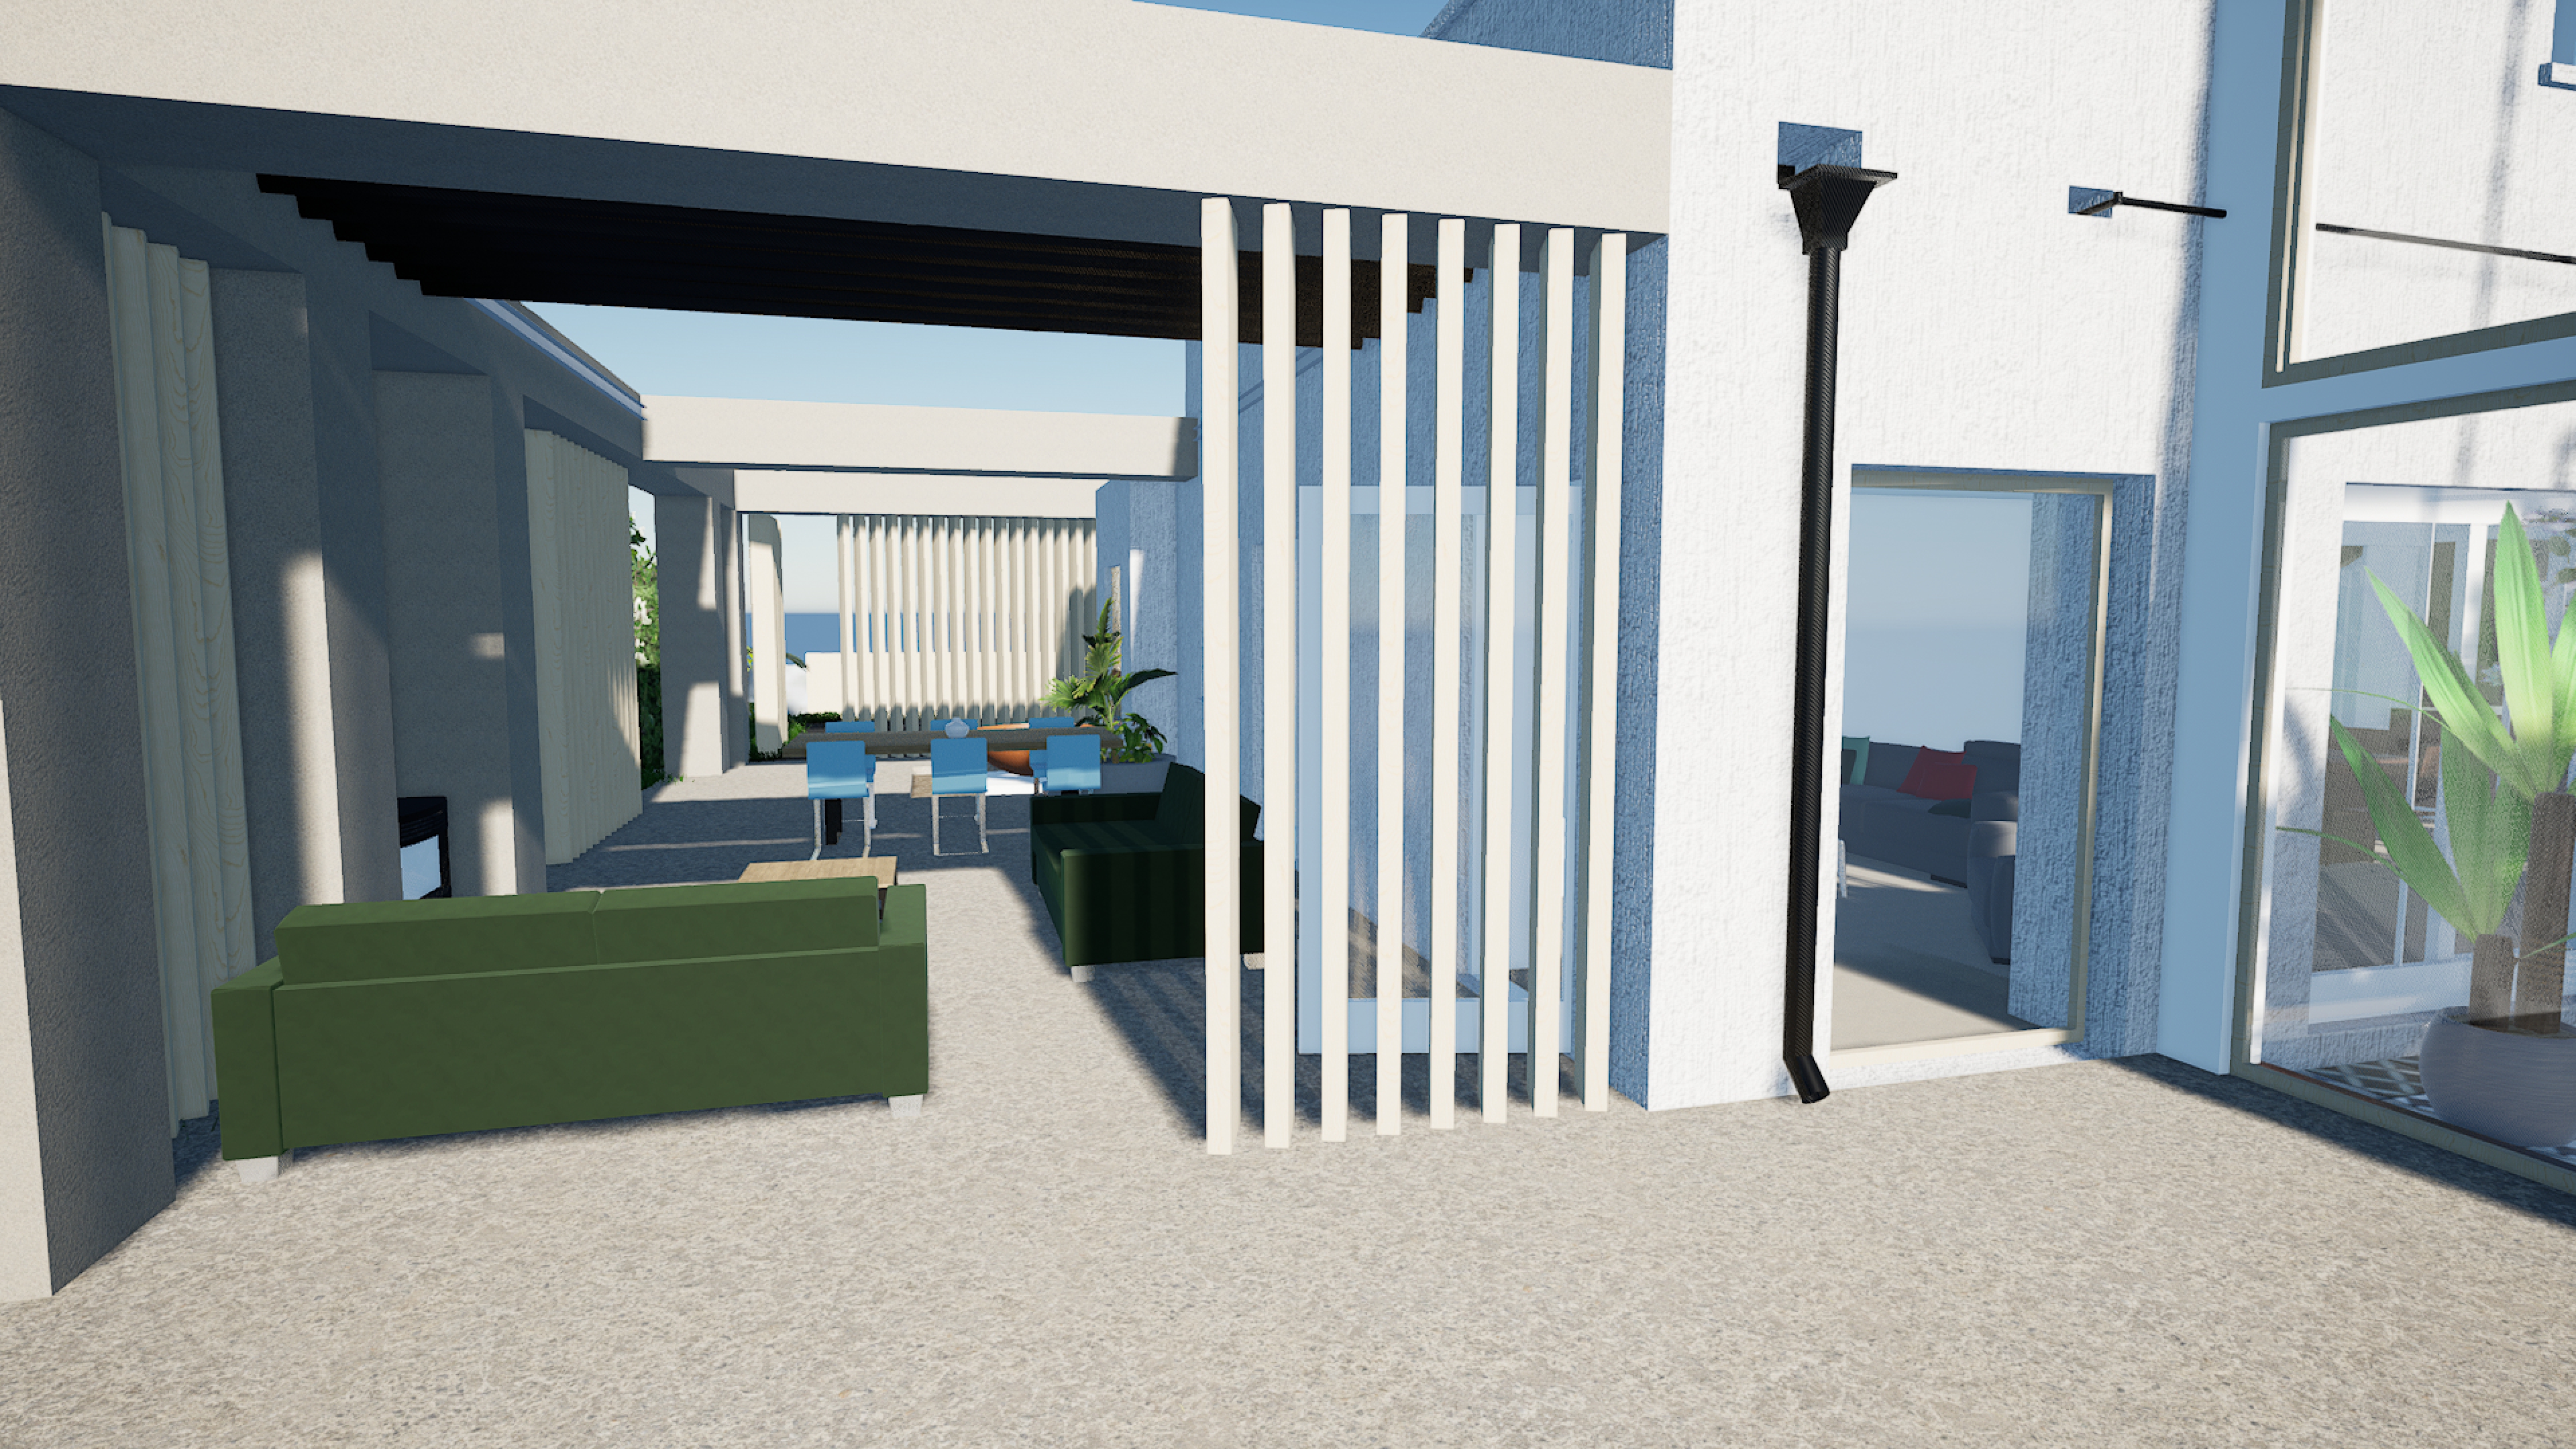
To then round out the protruding bedrooms, we run a cage around the house to encompass the patio outside the living room:
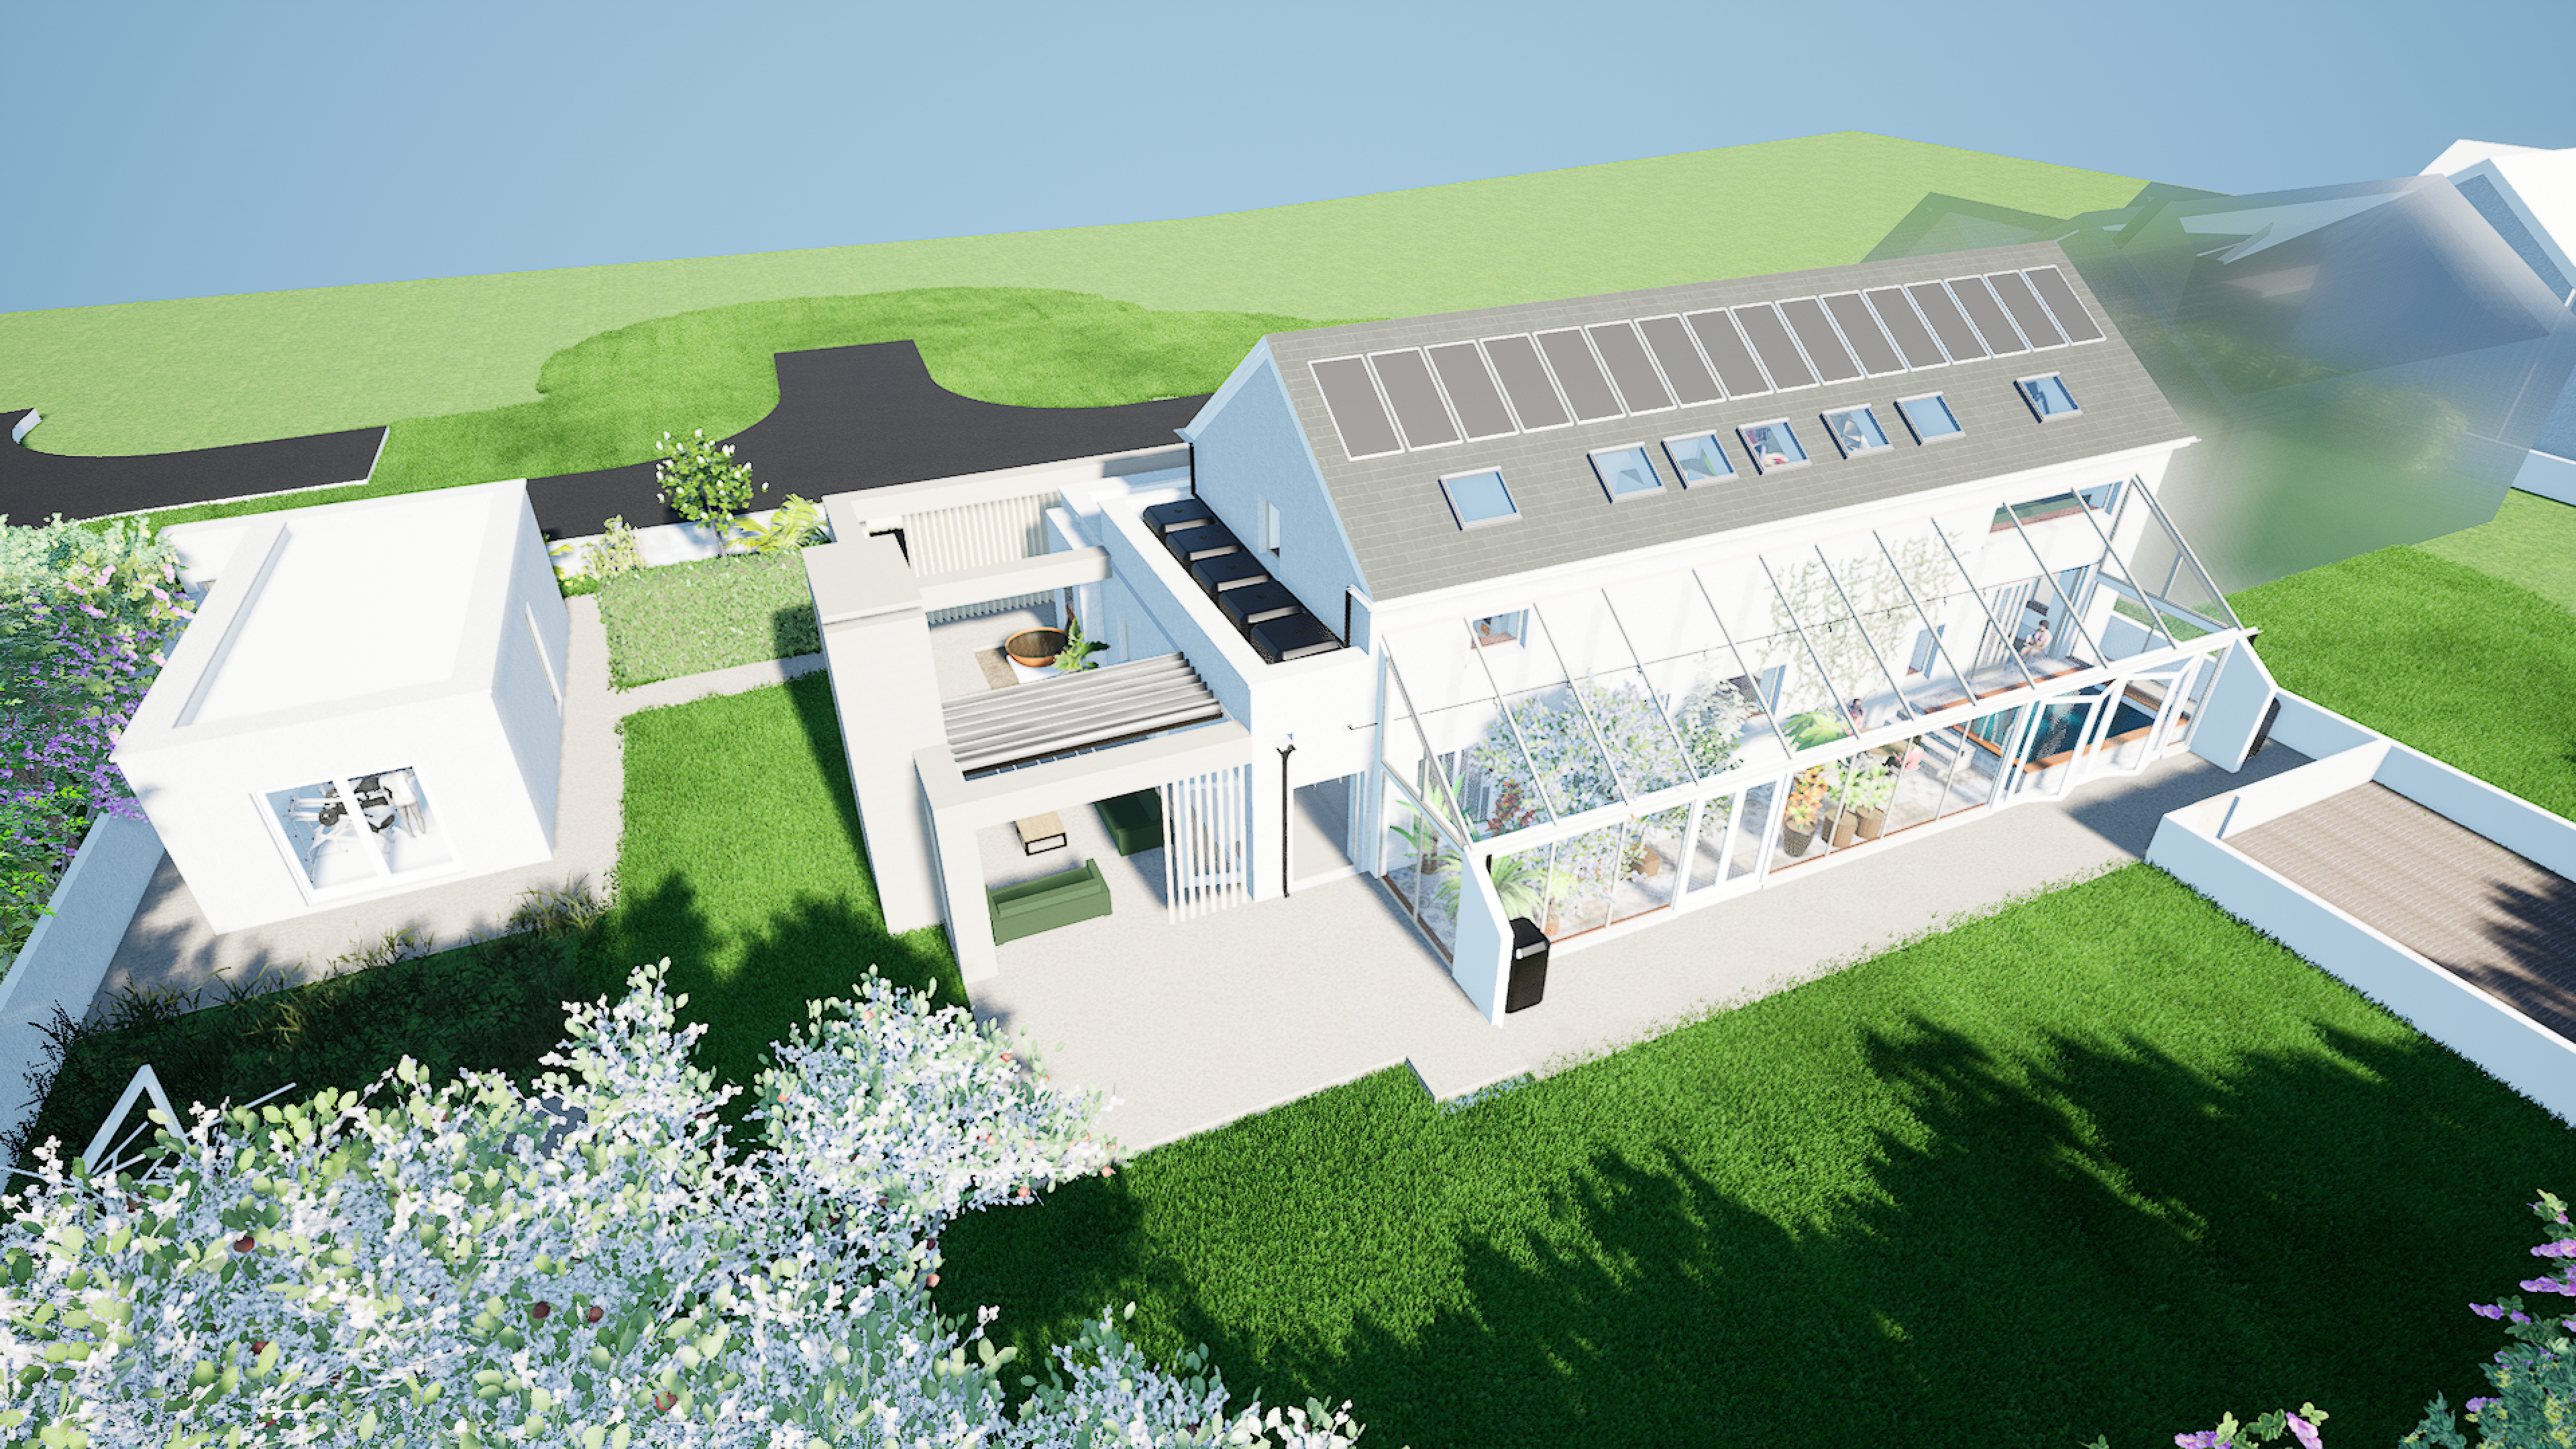
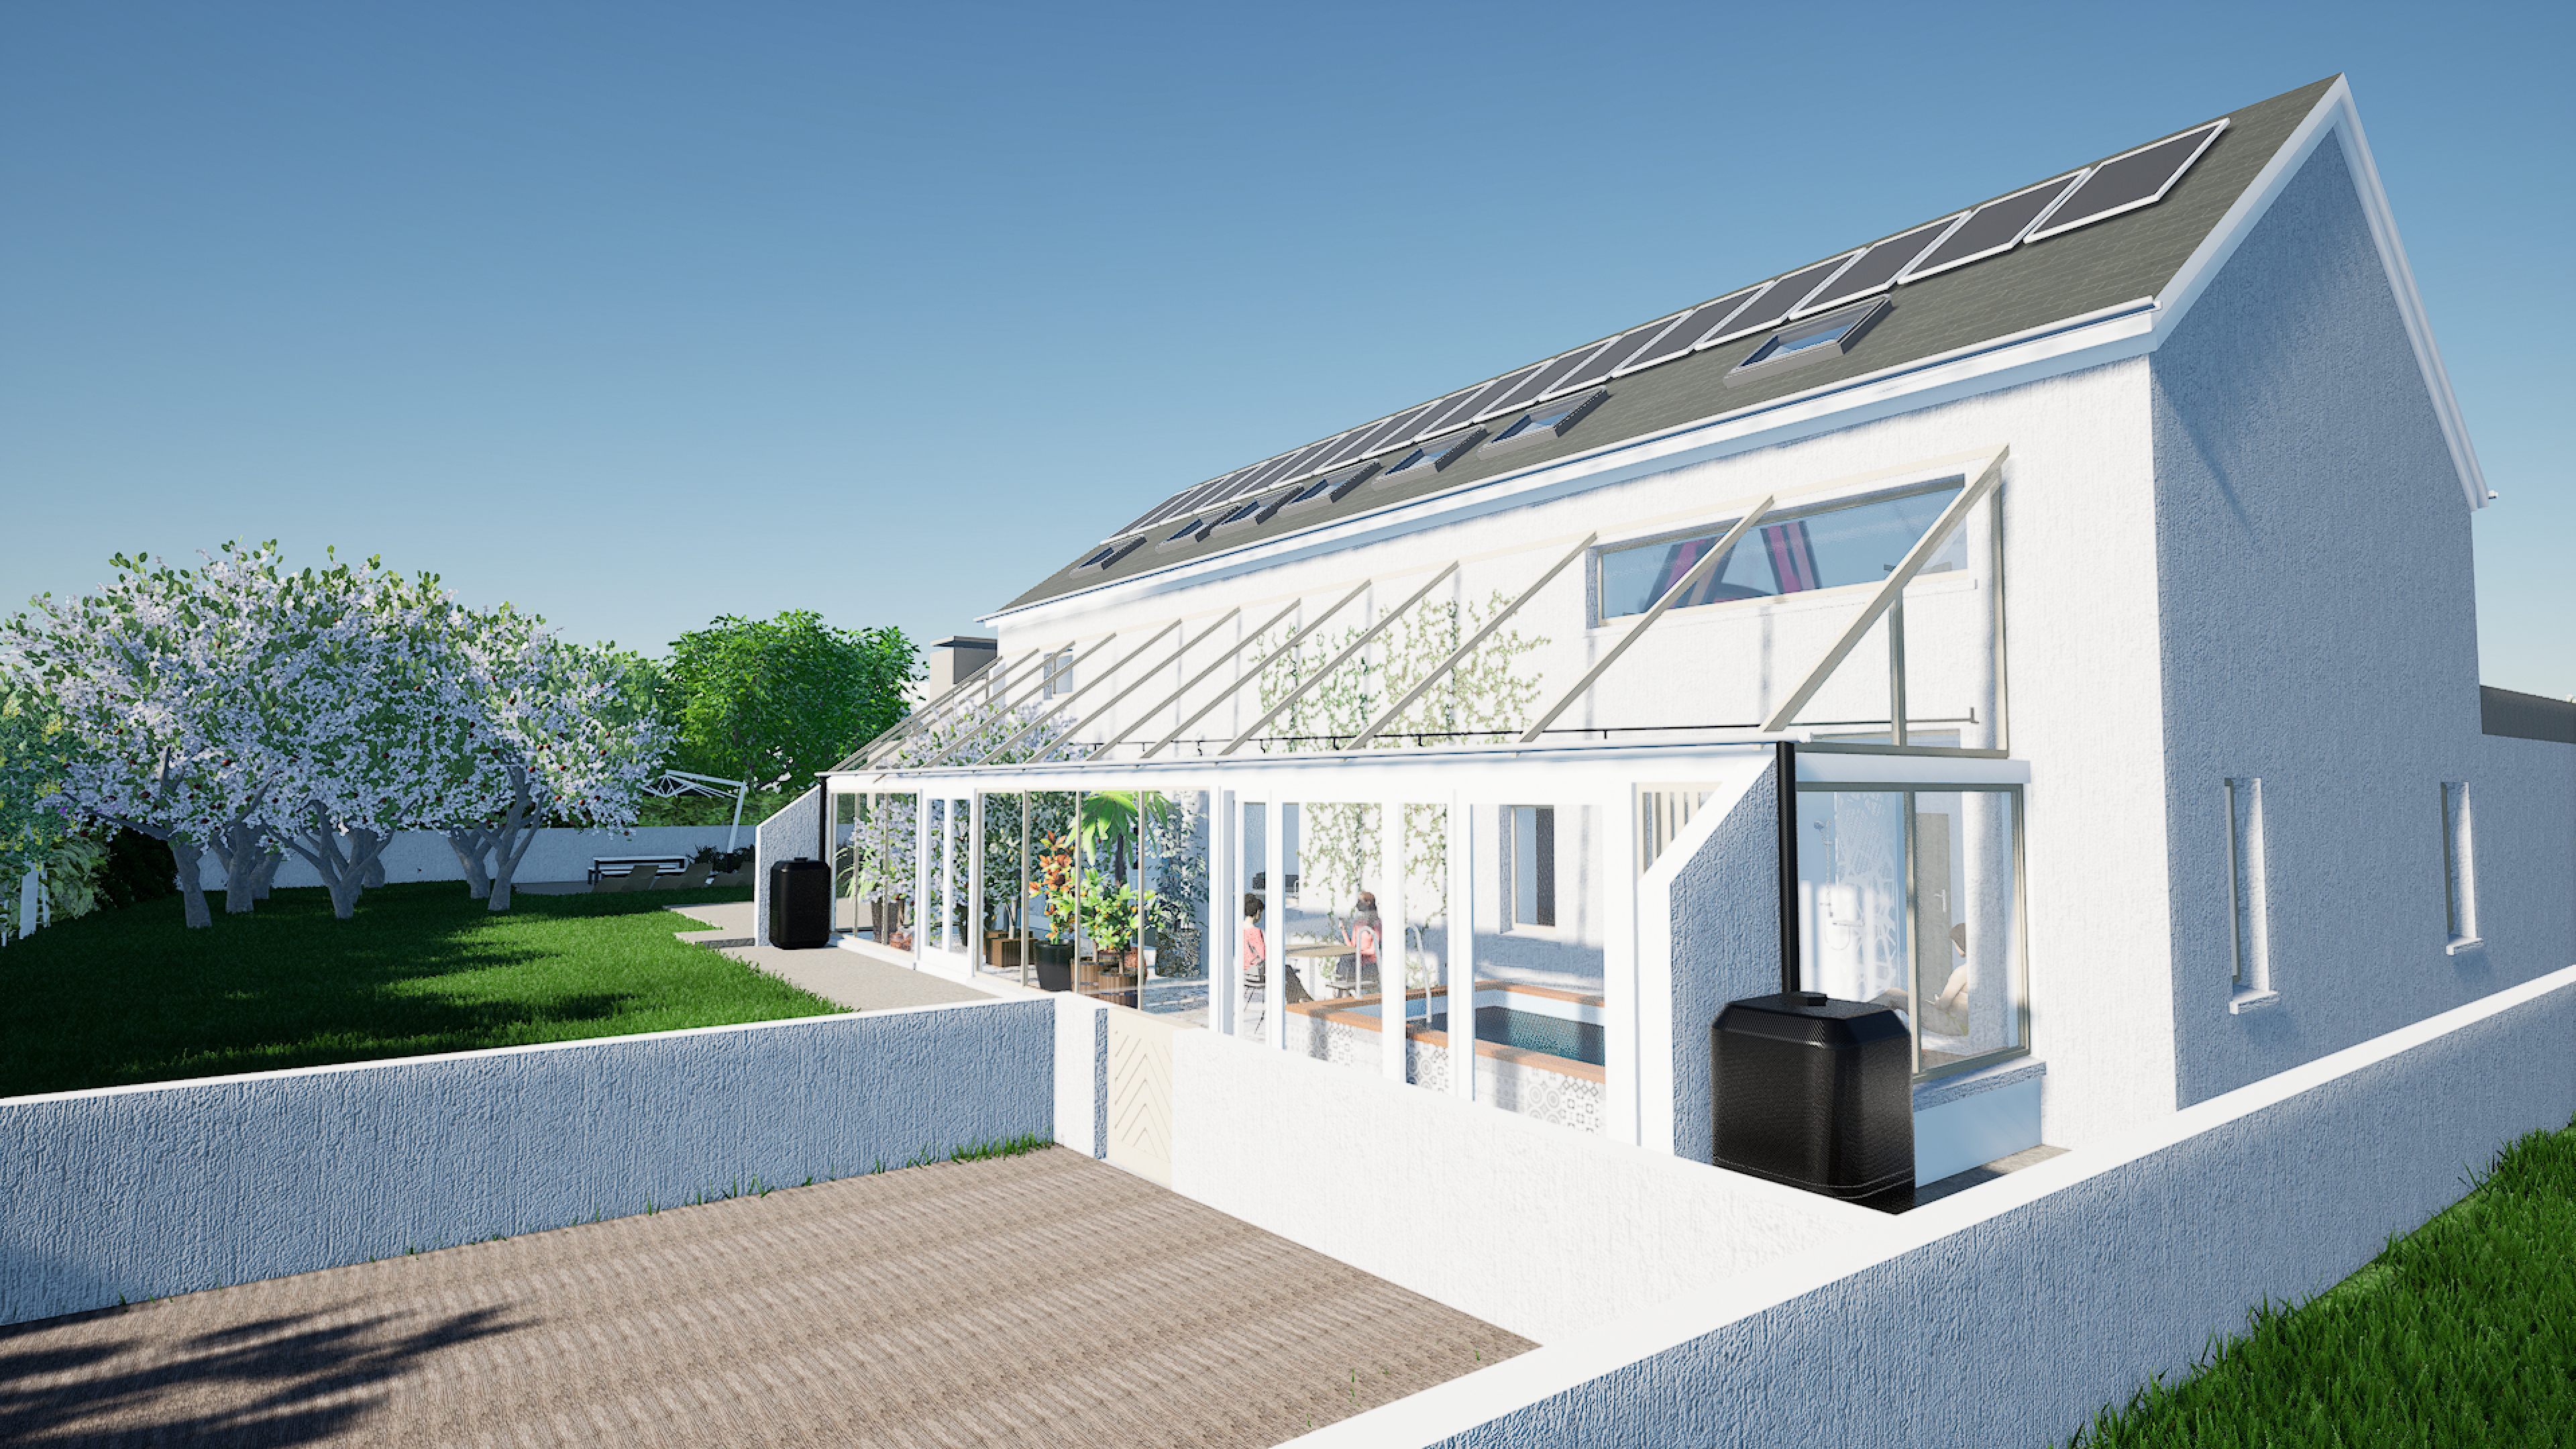
You no doubt notice the greenhouse at the back – myself and Megan are keen on growing a fair proportion of our annual fruit and vegetables, so we have a full house length three metre wide lean to greenhouse. The house’s exhaust air from the MVHR vents into this greenhouse, filling it with extra CO2 and moisture, but also constantly ventilating it. You can see a full house width of raised tanks above the patio, these actually sit above part of the master bedroom and living room – they harvest rainwater from the roof for the greenhouse. It should be possible to store 8000 litres up there, with additional harvesting tanks for the greenhouse as the wind dominates from the south west, and thus it is the south and west faces which receive the most rainfall.
However that large greenhouse comes with a big cost: no direct glazing on the south side of the house, because where the greenhouse joins the house it must be wall. Equally though there is a big benefit: the extensive groundfloor glazing is almost entirely blocked in summer by all those plants, but for the rest of the year it permits significant solar ingress, as is obvious from the sunshine falling through in March. That means solar heating for eight months of the year, but no overheating in summer.
Finally, let’s look at my proposed back garden and the enormous thermal store I want (as explained in in my original post in August):
You may have noticed that the site is actually two sites joined together, yet even with the 0.35 acres that affords, there isn’t really that much of a back garden. The brown walled patch is a walled garden for growing things perfectly happy outdoors and for which valuable greenhouse space is a waste – potatoes and carrots are excellent examples, they grow even better outside than in a greenhouse. That leaves not a massive garden once everything else is considered. It’ll do, but given all the money I spent on two rather than one sites, it does feel a little underwhelming. At least it’ll keep the mowing effort down I suppose.
(Indeed, the most likely reason we think this planning proposal will be rejected is ‘inefficient use of serviced sites’ i.e. we used two serviced sites for one house, which therefore deprives others of a potential house. Never mind how pokey small those sites are!)
Finally, witness my thermal store! It’s really massive. It dominates the utility/plant room. To the left of it will be the MVHR and any heat pump if it turns out we need one of those (we currently think that as a passive house, a heat pump won’t have cost benefit). The remainder will be washing and drying machines. But just look at how big that thermal store is, it’s 2m wide x 2m deep x 3m high including lots of insulation! Contains 5000 litres of water storing approximately 200 kWh of hot water. With the insulation I have planned, it should leak around 40 watts of heat into the house, so about one third of a human adult being in the house i.e. eminently tolerable.
As described in that earlier post, the thermal store gets heated by any excess left over from the solar array on any sunny days. As it’s so massive, and passive houses need so little energy, that thermal store if completely full is enough to provide domestic hot water and space heating in winter for around a week in a worst case scenario e.g. Beast from the East outside temperatures with mains electricity off for the entire week. In normal scenarios, it should be able to carry the energy gathered from a few sunny days in winter for up to a month, thus offsetting the need to top up the thermal store using cheap night time electricity.
It’s a very simple system, albeit highly unconventional when almost everybody else would just fit a heat pump. However my maths says that oversizing this tank only costs a bit more than a grand more, whereas a heat pump costs at least eight grand including commissioning. Sure, the heat pump might deliver up to 5 kWh of heating for 1 kWh of electricity, but because it requires periodic expensive servicing and probable replacement after fifteen years or so, and you really don’t need much heating for a passive house which reduces the return on investment, if you work it out it makes more sense to oversize the tank and solar panels and use cheap nighttime electricity to charge the tank if needed. Also in favour of this is that a heat pump can always be fitted later (ideally when they’ve become cheaper), whereas a tank this large has to be designed in from the beginning.
Anyway this is the design being submitted to preplanning this week. We shall see how it goes!
Incidentally, so later makes sense, we intend to meet the RIBA 2025 challenge for this house:
| Irish 2019 NZEB BER A1 House | German Passive House Classic | RIBA 2025 Challenge | |
|---|---|---|---|
| Heat & Ventilation Energy | ≤ 25 kWh/m2/yr | ≤ 15 kWh/m2/yr (40% better) | |
| Air Leakage | ≤ 3 m3/hr/m2 | ≤ 0.6 air changes per hour (72% better) | |
| Wall & Floor Insulation | ≤ 0.18 W/m2K | ≤ 0.15 W/m2K (17% better) | |
| Window Insulation | ≤ 1.4 W/m2K | ≤ 0.8 W/m2K (43% better) | |
| Total Energy Use | ≤ 120 kWh/m2/yr | ≤ 60 kWh/m2/yr (50% better) | ≤ 60 kWh/m2/yr (50% better) |
| Embodied lifecycle carbon emissions | ≤ 1200 kg CO2e/m2 | ≤ 800 kg CO2e/m2 (33% better) | |
| Potable water consumption | ≤ 125 litres per occupant per day | ≤ 95 litres per occupant per day (24% better) | |
| Indoor CO2 levels | ≤ 900 ppm | ||
| Indoor VOC levels | ≤ 0.3 mg/m3 |
Getting from my original design to this final design
Once it became obvious that Stephen’s design was much superior to my original (hardly surprising!), we dropped my design and focused on bringing into his the essential features we wanted.
Poor Stephen had to work very hard these past few weeks. Our initial round of feedback took me three hours to type out and it was pages and pages of text. As he modified things to meet our feedback, the amount I had to write each round of feedback iteration kept shrinking until it reached zero. There was also quite a fair bit of teaching, as what I’ve designed here is non-standard, and I needed to explain why what I wanted was sensible, or indeed how it even works at all. Because it’s an overall systems based design, everything relies on everything else to make sense, no single item makes sense on its own. Stephen in fairness to him kept plugging at it until we got over the line this past week.
Stephen has taken the Passive House Institute’s design course, but this will be his first Passive House. To be honest, Passive House is a touch overkill for the mild Irish climate, most of the value is their PHPP software for modelling the house which is orders of magnitude better quality than the 2019 NZEB DEAP model. I can see most clients getting the most value from generating a high fidelity PHPP model rather than actually going for full Passive House certification, which greatly limits your construction choices whilst also adding on cost.
Most of the changes to the original concept were induced by the master bedroom. In VR, it was originally obviously too small, and purely to solve that we ended up extending the ground floor house length from 18m to 20m. In order to add in a porch to prevent heat loss when entering and exiting the building, we ended up having to rotate the master bedroom en suite to the middle of the house, and combined with the added two metres that made the master bedroom wide enough and long enough. However in terms of compromise over our original design brief, it has been the master bedroom which has taken the brunt of things. Stephen very much wanted us to move the master bedroom upstairs where there was a lot more design freedom, so in the end we had to choose compromise if we were to stay on the ground floor.
The other significant design change was to raise the mezzanine upwards in order to form storage for the games room next door, but also to raise the reading and library area further away from the living space so it is more separated and peaceful.
Estimated materials cost of this final design
One can fairly easily estimate house shell areas from the plans: Total wall area: 301 m2; Total roof area: 285 m2; Total floor area: 181 m2; Total wall glazing area: 61 m2; Total roof glazing area: 9 m2. Total indoor volume: 1243 m3. Total living floor space: 269 m2.
Straight away from those one can calculate:
- Heat Loss Form Factor (HLFF): 3.11
- Surface to Volume Ration (SVR): 0.674
- Glazing as a percentage of footprint: 39%
- Percentage of roof is flat: 31%
A passive house aims to get HLFF below 3.0 and SVR below 0.8. As you can see, we achieve the latter but not the former thanks to the vaulted ceiling taking away a good deal of floor space, which hurts HLFF. SVR is well below 0.8 however, so the design is ‘compact’ relative to the typical Irish build which is around 1.0. Unfortunately energy requirements are per m2 of living floor space, so as you can see this vaulted ceiling will hurt us.
If one estimates the following materials costs inc VAT: Wall 0.15 W/m2K €250 per m2; Floor 0.11 W/m2K €100 per m2; Roof 0.13 W/m2K €300 per m2; Wall glazing 0.8 W/m2K €700 per m2; Roof glazing 0.7 W/m2K including mechanical external shutter €1,550 per m2, then we arrive at a materials cost estimate of €239,571 inc VAT.
They say for a typical Irish house that materials are usually 40% of the final all-in bill, so that suggests a total build cost of almost exactly €600,000 inc VAT. That is about €200k more than I am able to raise in terms of finance, so I’m really hoping I’ve overestimated my costs here. Another common ratio for passive house builds is that passive house grade materials will be 55% of the final cost excluding professional fees because most builds are manufactured in a factory offsite and assembled onsite in under two weeks which significantly reduces onsite costs. If so that is €436k, which is still €50k more than I can raise. I guess we shall see!
Estimated energy efficiency of this final design
What I’m about to do next will be very inaccurate compared to a DEAP energy model let alone a PHPP energy model, but let’s take a guess at energy efficiency.
Assuming:
- There are 0.1 uncontrolled air changes per hour due to leakage, which for the above indoor volume is an uncontrolled ventilation rate of 124 m3/hr.
- The indoor temperature is 21 C and the outdoor winter and summer temperatures are 2C and 15C respectively.
Then assuming air carries 0.33 W/m3K of energy and the component W/m2K listed above, the shell heat loss in winter would be -3.763 kW and in summer it would be -1.188 kW. Note the lack of time in those numbers: we are saying that if inside is 21 C and outside is either 2 C or 15 C, then that is how much heat is leaked from inside to outside by the shell materials and air leaking through the shell (note that 0.1 ACH for a passive house which cannot exceed 0.6 ACH in a hurricane would be quite a windy day, however don’t forget people opening and shutting doors).
Let’s go a bit further by assuming:
- The MVHR unit has a heat recovery efficiency of 80%.
- It runs at 150 m3/hr.
Then we can calculate that the heat loss due to intentional ventilation will be -0.188 kW in winter and -0.297 kW in summer. That might seem surprising – the reason why is that the MVHR in summer will be in bypass mode i.e. not heat recovering.
Let’s go even further by calculating heat gain from solar radiation. According to the PGIS database for our site location:
- In winter 50 kWh/m2/month lands on the roof, and 10 kWh/m2 will land on a vertical window. As there are 730 hours in a month, and glazing might retain 50% of the heat entering the house, this is 0.034 kW/m2 and 0.007 kW/m2 respectively.
- In summer 140 kWh/m2/month lands on the roof, and 80 kWh/m2/month will land on a vertical window. This is 0.096 kW/m2 and 0.055 kW/m2 respectively.
Applying this to my glazing:
- In winter, the roof and wall glazing would add 0.724 kW to the house.
- In summer, with the external shutters covering the roof glazing and plants in the greenhouse covering half of the ground floor southern glazing, the wall glazing would add 1.19 kW to the house.
What remains now is how much heat the house generates from being lived in. I can tell you that for my current two storey 60 m2 rented house, between cooking and various devices using electricity, we consume 0.534 kW, which excludes showers or heating. Add in five human adults’ body heat 0.38 kW and five 75 litre showers per day with wastewater heat recovery @ 75% = 0.182 kW, I reckon there is a minimum baseline heat generation of 1.096 kW, which may be an underestimate given just how much illumination I plan to fit to this future house.
If you now tot up this baseline internal heat generation with the solar heat gained by the glazing, the shell heat loss, and the ventilation heat loss, you get:
- In winter, there is a negative 2.13 kW.
- In summer, there is a positive 0.802 kW.
Or, put another way, in winter we must add 2.13 kW, and in summer we must remove 0.802 kW, to keep the house at 21 C.
You now may understand why I intend to fit an earth tube which I reckon will subtract -0.97 kW in summer, thus turning an overheat into a negative 0.168 kW. Most will point out that a heat pump can just as easily run in cooling as in heating, however note that my cooling here comes completely free of electricity cost, it’s just the considerable capital cost of installing an earth tube here (they cost only a bit less than a heat pump, though as a dumb pipe in the ground their service life well exceeds my lifetime).
It’s an interesting question whether a thermal store + earth tube + wastewater heat recovery will beat a heat pump. I think it will, which is why I chose this design, but for a BER A1 Irish house, because it uses twice as much energy, a heat pump really does make sense as its return on investment is much better. A heat pump does deliver up to five free kWh for every one kWh of electricity used, however a thermal store lets you capture all those occasional sunny days you get even in winter in Ireland, and an earth tube lets you cool your house without any electrical cost at all. Wastewater heat recovery means long showers aren’t dumping energy down the drain. So once you factor in how hideously expensive periodically topping up the refrigerant gas in a heat pump is vs the added expense on night rate electricity, and given a thermal store + earth tube + wastewater heat recovery unit has identical capital cost to a heat pump, I reckon they’ll come out pretty close in terms of total lifetime financial cost.
Indeed, from a passive house calculation perspective, the heat pump is definitely preferable because its embodied carbon cost (which is very significant) isn’t included, nor is the fact its refrigerant gas which slowly leaks out is a known climate warming gas. This is why the RIBA challenge is important – it makes you consider that exchanging improved energy efficiency for much worse impact on the planet is not a good deal.
Note in all of the above that our site is unusual for Ireland in that having two river deltas to either side makes an earth tube unusually effective, most sites in Ireland would see nothing like as much benefit from an earth tube. This made my choice here much easier than it would be for most other sites.
Note also that wastewater heat recovery makes sense only in a passive house where domestic hot water consumption is a large proportion of the total annual energy consumption. In an Irish BER A1 house, you effectively get hot water as a side benefit from the heat pump. It’s a different set of tradeoffs.
Estimated annual bills for this final design
Firstly, 31% of the roof being flat puts a fairly heavy loading on home insurance. One might expect to pay 40% more annually, maybe +€160 a year.
The baseline electricity load is what it is, including standing charge of €300 and assuming more of it lands in the expensive daytime rate (€0.25/kWh daytime vs €0.10/kWh at night) I’d estimate the baseline electricity bill at €1,118 inc VAT per year.
If it were winter constantly for three months of the year i.e. 2C throughout, and no space heating were needed for the rest of the year, and solar diversion from occasional sunny days supplemented 20% of the space heating during that time, I’d estimate the electricity needed for space heating charged at night time rates to cost €501. This gives an estimated annual bill of €1,619 inc VAT.
To put this into perspective, for my current two storey 60 m2 rented house I spend €840 a year on electricity and about the same again on kerosene for space heating, which is about 11,500 kWh in total giving 192 kWh/m2/yr which is a BER C2 rating, and I can absolutely guarantee you that the indoor temperature is nowhere near 21 C in winter e.g. as I type this right now at 3am it is 18 C in this room. This, incidentally, includes a solar domestic hot water collector which they say reduces your annual heating bill by 10-15%, without that this house might be BER D1 rated.
Can this design be passive house certified?
If any of the estimates above are anywhere close to correct, primary energy demand for the proposed house would be around 11,000 kWh, almost the same as for my current rented house. However, this is for 260 m2 of living space instead of 60 m2, which gives a 41 kWh/m2/yr which is well below the limit of 60 kWh/m2/yr required for Passive House Classic, and is even below the 45 kWh/m2/yr limit required for Passive House Plus.
That no doubt it an underestimate. If preplanning smiles on this proposed design, I look forward to seeing what PHPP returns for this house and how it compares to my very rough workings above!
| Go to previous entry | Go to next entry | Go back to the archive index | Go back to the latest entries |