Word count: 5215. Estimated reading time: 25 minutes.
- Summary:
- The design goals for the Outhouse were met with a nearly complete set of construction detail, allowing for a long post. The architect’s original design was modified to meet minimum legal habitable standards in Ireland while minimizing costs per square meter. The use of bulkier and cheaper insulation, such as white EPS70 board, was chosen to reduce thermal bridging and simplify calculations.
Tuesday 7 October 2025: 18:15.
- Summary:
- The design goals for the Outhouse were met with a nearly complete set of construction detail, allowing for a long post. The architect’s original design was modified to meet minimum legal habitable standards in Ireland while minimizing costs per square meter. The use of bulkier and cheaper insulation, such as white EPS70 board, was chosen to reduce thermal bridging and simplify calculations.
As I now have a nearly complete set of construction detail for the outhouse, this post will be necessarily quite long. My apologies in advance, however never let it be said that you won’t be getting the full plate on my temporary foray into architect-engineer-builder engineering. As this post is so long, I’ll be making my first ever use of Hugo’s Table of Contents feature:
Table of Contents
The design goals for the Outhouse
As described in further detail back eighteen months ago, my architect had done up a basic design for the outhouse for planning permission purposes. He had it 5.1 metres wide (4.0 metres internal) and 10.36 metres long (8.71 metres internal), with a flat roof. Those 550 mm thick walls look passive standard thickness, and in that you’d be correct. However I actually only wanted NZEB build standard i.e. that this outhouse would meet minimum legal habitable standards in Ireland, but for it to cost the absolute minimum possible per sqm possible. The reason for the very thick walls is actually so I can use the cheapest possible insulation, which is bulkier than the expensive stuff. And because it’s better to submit thicker and bigger for planning permission, as you’re allowed build smaller but not larger.
To remind everybody of the architect’s design:

And to further remind everybody of the minimum legal build standard requirements in Ireland between 2019 and 2029:
- Floor: <= 0.18 W/m2K
- Walls: <= 0.18 W/m2K
- Flat roof: <= 0.20 W/m2K (but any other kind of roof is <= 0.16 W/m2K)
- Glazing: <= 1.4 W/m2K
- Primary energy: <= 43 kWh/m2/yr
- Of which at least 24% must be ‘renewable’
- CO2 emission: <= 8 kg/m2/yr
- Air tightness: <= 5 m3/hr/m2
These aren’t that much laxer than Passive House – apart from the air tightness – so as you will see, a fair thickness of insulation will be needed.
Some more reminding: here are approx costs at the time of writing (Oct 2025) for various insulation types in Ireland per 100 mm thickness per m2:
- €10.07 inc VAT white EPS70 board, 0.037 W/mK thermal conductivity, score is 0.373.
- €12.80 inc VAT graphite enhanced EPS70 board, 0.031 W/mK thermal conductivity, score is 0.397.
- €18.60 inc VAT PIR board, 0.022 W/mK thermal conductivity, score is 0.409.
- €49.18 inc VAT phenolic board, 0.019 W/mK thermal conductivity, score is 0.934.
The score is simply the price multiplied by the thermal conductivity with the lowest being best (i.e. lowest thermal conductivity for the least money). The white EPS is approx 19.4% worse an insulator than the graphite enhanced EPS, however it is 21.3% cheaper so it is better bang for the buck. Therefore, using more thickness of white EPS is cheaper than using better quality insulation which is exactly why I instructed my architect to use 550 mm thick walls for the outhouse in the planning permission.
The latest design for the Outhouse
This has changed a bit since my last post on the outhouse, but is essentially the same idea: as simple and as cheap as possible:
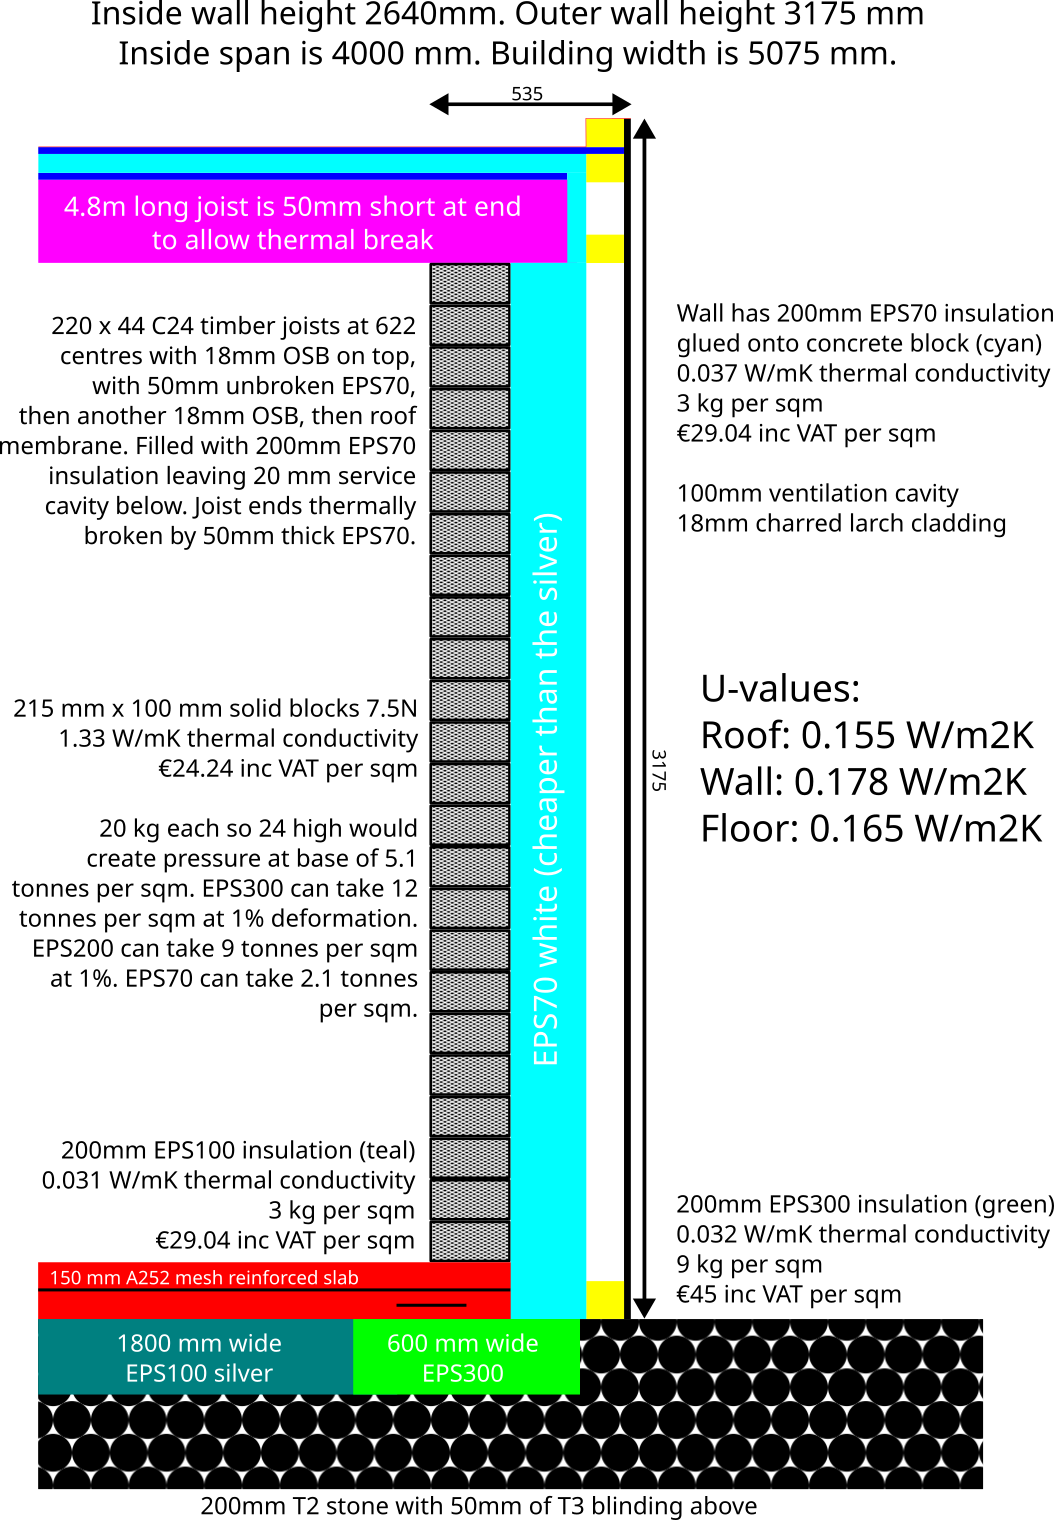
As you can see, the u-values are just below the Irish legal maximums, except for the floor. You’ll also see the more expensive graphite enhanced EPS100 in the floor. This is to match thermal conductivity with the EPS300, which while a bit more expensive it does makes things easier as you don’t need to care about potential interstitial condensation differentials etc. There is another motivation: the walls and roof can be easily upgraded later if needed, whereas the floor that’s likely there forever. In fact, that’s the motivation behind the perhaps excessive 100 mm ventilated cavity, if down the line we want to add +50mm of EPS to the walls without changing the outside, it should be very easy to do so.
This isn’t the only place where I’ve spent more than absolutely necessary out of a desire to make calculating and building the thing easier – the foundations are fully wrapped with insulation instead of being traditional strip foundations, which would be cheaper. This is the difference, picture courtesy of KORE:
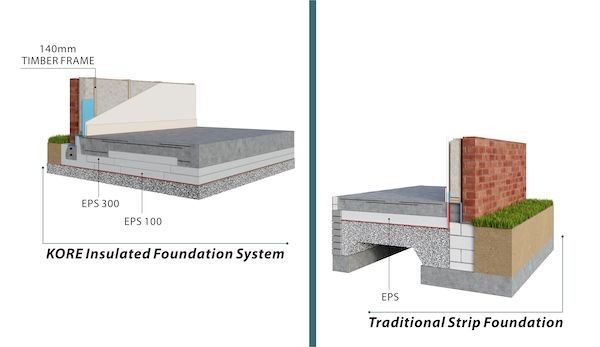
Strip foundations require trenches to be dug under all walls, the bottom filled with liquid concrete, then underground walls of blockwork built (called ‘deadwork’) with underneath the floors filled with rubble, then a layer of EPS or PIR, then the concrete floor. Whilst cheaper and by far and away the most commonly employed in Ireland, I decided to go for a simplified edition of the KORE insulated foundation instead, despite it costing a bit more. The reasons are similar to putting better than necessary insulation into the floor – once it’s done, it can’t be amended later – but also because a fully EPS wrapped insulation is far simpler to calculate structural loadings, and to construct it’s just levelling gravel and running a whacker over it, something I could do myself if I needed to (whereas strip foundations are a two man job). I therefore reckoned, on balance, it was worth spending a little more money for ease of everything else, plus the guaranteed lack of thermal bridging simply makes this type of foundation superior by definition.
The roof and walls are as cheap as I could make them. They are also easy to construct, and again 100% doable on my own if necessary (though an extra pair of hands would make some parts much quicker). The roof, being just timber and polystyrene, is nearly light enough that I could lift one end of it. So by far the main loading on the foundations is the single layer solid concrete blocks solely chosen because they’re cheap and easier than me having to manually construct timber frames. Twenty four solid concrete blocks laid on flat at 20 kg each is 5.1 metric tonnes per m2, which is almost exactly 50 kPa of pressure on the concrete slab at the base. EPS300 is called that because it will compress by 10% at 300 kPa loading – it will compress by 2% at 90 kPa. So even if the blocks were directly upon the EPS300, they would be absolutely fine as this is such a light structure.
I have them on a 150 mm thick concrete slab however, and this is the main deviation from the KORE agrément requirements. KORE require this:
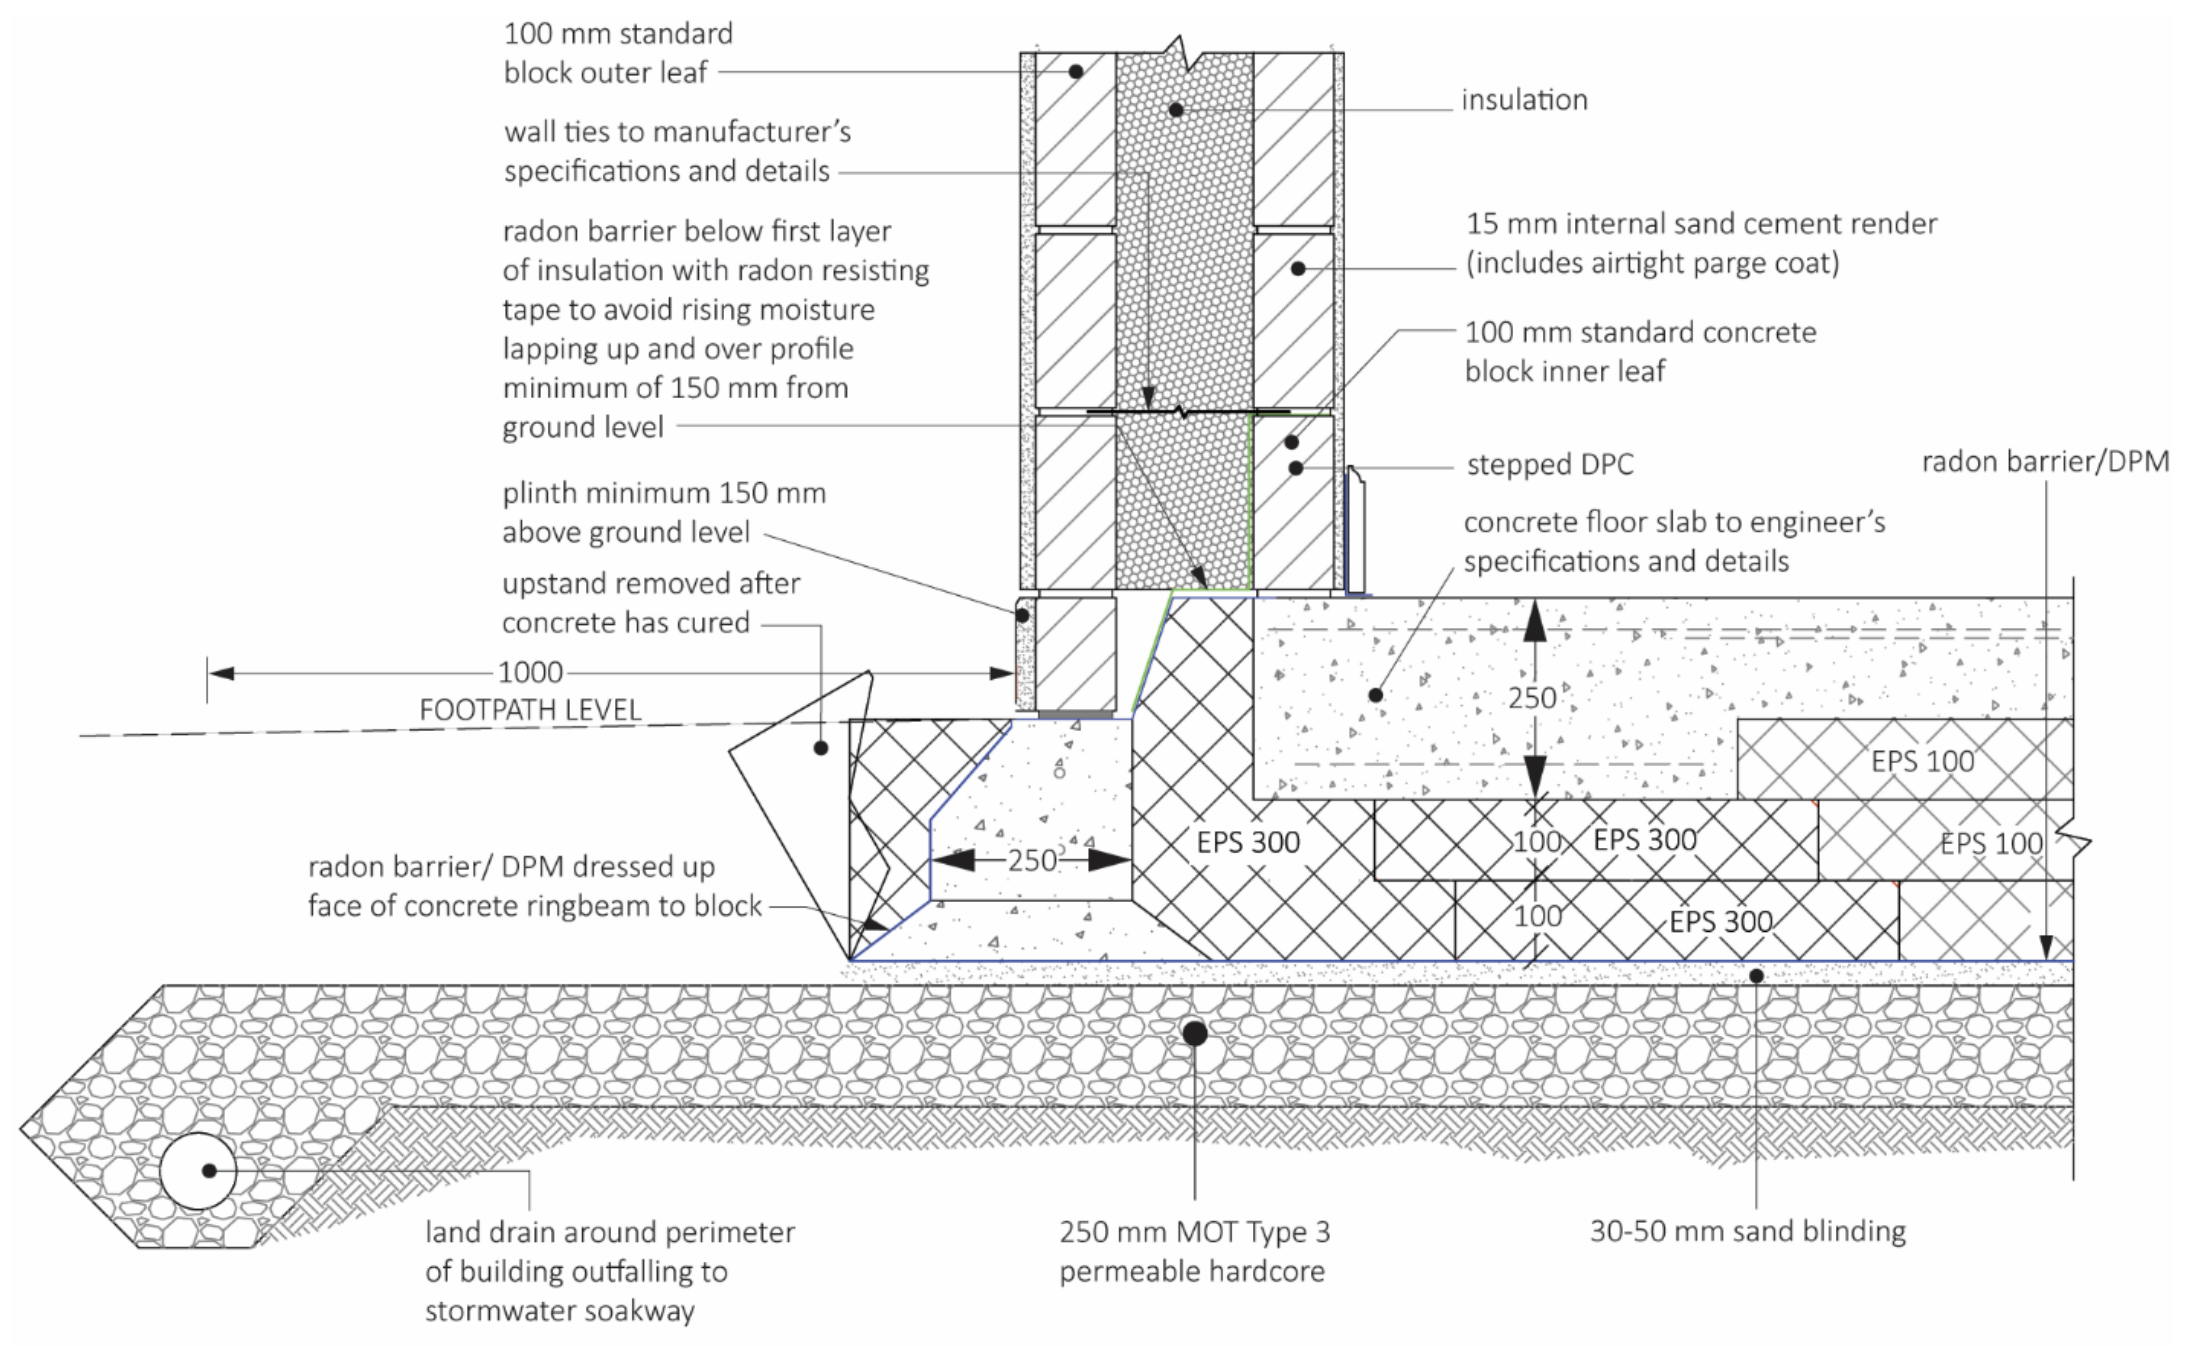
… which has the block leaf wall bearing down on 250 mm of concrete reinforced with two layers of A393 mesh, which is 10 mm diameter steel at 200 mm centres. And if my walls were loading as much pressure as a two storey house with a slate roof on top, I would absolutely agree. However mine is a single storey with a timber + EPDM flat roof on top. I think the KORE requirements excessive for my use case, so I told my engineer to not worry about including the insulation for the outhouse in the KORE order, I’ll sort out loose sheets from a building supplies provider (more on that below).
Is it actually safe to ignore the KORE agrément requirements for this use case?
Just to make absolutely sure I’m right on this, is a 150 mm thick RC slab with A252 steel mesh sufficient? The slab will be subject to these forces:
- Compression, from the weight bearing down.
- Stretching, from the bottoms of the walls trying to splay outwards (this is called ‘tension’).
- Bending, from the weight bearing down in some parts but not in others (this is called ‘flex’).
- Shear, from the forces in one part of the slab being opposed to forces in other parts of the slab.
Concrete is great at compression on its own, but needs reinforcing to cope with bending or shear. For C25 concrete:
- Compressive strength: 25-30 MPa.
- Tensile strength: 2.6-3.3 MPa.
- Flexural strength: 6.6 MPa.
- Shear strength: 0.45 MPa (yes, this is particularly weak).
One must therefore particularly worry about shearing concrete (which I’ve personally witnessed many a time occurring, indeed if you whack any concrete with a hammer it’ll readily shear off chunks without much effort), and to a lesser extent stretching concrete. To solve those issues, one usually adds fibres or steel into the concrete mix to improve the durability of concrete under load.
A252 steel mesh, as I specified above, is 8 mm steel at 200 mm centres. The type of steel is usually B500A:
- Tensile strength: >= 500 MPa.
- Shear strength: >= 125 MPa.
I reckon that there is 0.00005 m2 of steel per strand, 4.5 strands per metre, so 0.000245 m2 of steel per 0.15 m2 of slab in the horizontal, or 0.163%. In the vertical, you would have twenty strands per metre, so 0.001 m2 of steel per m2 of slab in the vertical, or 0.1%.
Therefore, for A252 steel mesh alone, we would have 500 kPa of tensile strength in the vertical, and 123 kPa in the horizontal. Therefore, the mesh on its own could happily take the full load of both of the walls hanging off it horizontally, never mind vertically.
You are now about to ask what is the strength of concrete with reinforcing steel combined might be? I thought that there would be a table somewhere with thickness of concrete, grade of concrete, type of mesh and location within the concrete slab. If there is such a table, I cannot find it. The best I can find are reinforced concrete beam calculators, which put the steel at the tensile side of the load and optionally another steel at the compressive side of the load. These are for beams which span a distance unsupported, not for slabs which are fully supported their entire length (and therefore by definition cannot deform under loads). I’ll have to admit defeat on that.
The naïve calculation to combine the steel and the concrete is to just add them, though I think that too naïve. Fairly obviously, the steel will distribute point loads more evenly across a wider area of concrete, because it’s ‘stretchy’ relative to concrete. Big point loads should become lots of small point loads inside the slab. So almost certainly the naïve calculation is a lower bound. For a 150 mm RC slab along the length of the slab:
- Compressive strength: 3750 kPa.
- Tensile strength: 513 kPa.
- Flexural strength: 990 kPa.
- Shear strength: 98 kPa.
Which seems to me more than plenty for a 50 kPa load tugging on the ends, never mind bearing down onto the top of the slab:
- Compressive strength: 25-30 MPa.
- Tensile strength: 2.6-3.3 MPa.
- Flexural strength: 6.6 MPa.
- Shear strength: 192 kPa.
… which is a shear strength nearly 4x stronger than needed.
Assuming that my maths and understanding of structural engineering is just plain wrong, let’s also take a common sense approach. I note that in the KORE agrément internal heavy load bearing walls are also on A252 steel mesh, but they deepen the concrete from 150 mm to 250 mm and add a second layer of A393 steel mesh at the bottom to act as the tension side reinforcement. If a wall is not load bearing, they don’t use thickening and a single 150 mm layer of concrete with A252 steel mesh is enough.
For that reason, I put the 205 mm of excess mesh off each side of the 4.8 metre wide A252 sheet under the outer walls. It is redundant I think, but as it would have to be folded under or cut off and wasted, I reckoned might as well use it for tension reinforcement. KORE think that the A252 steel mesh ought to run with 75 mm spacers underneath. The smallest RC spacer appears to be 35 mm, so 35 - 43 mm would be the bottom mesh, and 75 - 83 mm would be the upper mesh, giving 32 mm of concrete between the meshes. That’s less gap than ideal, but it’ll have to do I think.
Just for completeness, if the building were two storey, you would have 100 kPa from the walls and maybe another 50 kPa from a slate roof, plus perhaps another 50 kPa from upstairs walls and floor. So let’s assume 200 kPa of load on the slab edges. If one has 250 mm of concrete with two layers of A393 mesh and a third layer of A252 mesh (as per the KORE agrément diagram):
- Compressive strength: 6250 kPa.
- Tensile strength: 1078 kPa.
- Flexural strength: 1650 kPa.
- Shear strength: 548 kPa (wow!).
Which has a 2.75x safety margin for a 200 kPa load, and that’s assuming all the upstairs floor bears onto the side structure and there are zero load bearing internal walls. In reality, you would have downstairs load bearing walls to offload from the sides and better spread loads across the slab evenly. So I think that my maths and how to calculate this stuff adds up.
Before moving on, I should repeat my caveat above that I am not a structural engineer, I don’t really know what I’m doing here, and all these numbers may be unsafely wrong. Please don’t trust anything I’ve done here, and instead hire a proper structural engineer!
The changes from the architect’s design
Because we now know that we are using solid concrete blocks which have dimensions 440 x 215 x 100, I slightly tweaked the architect’s layout:
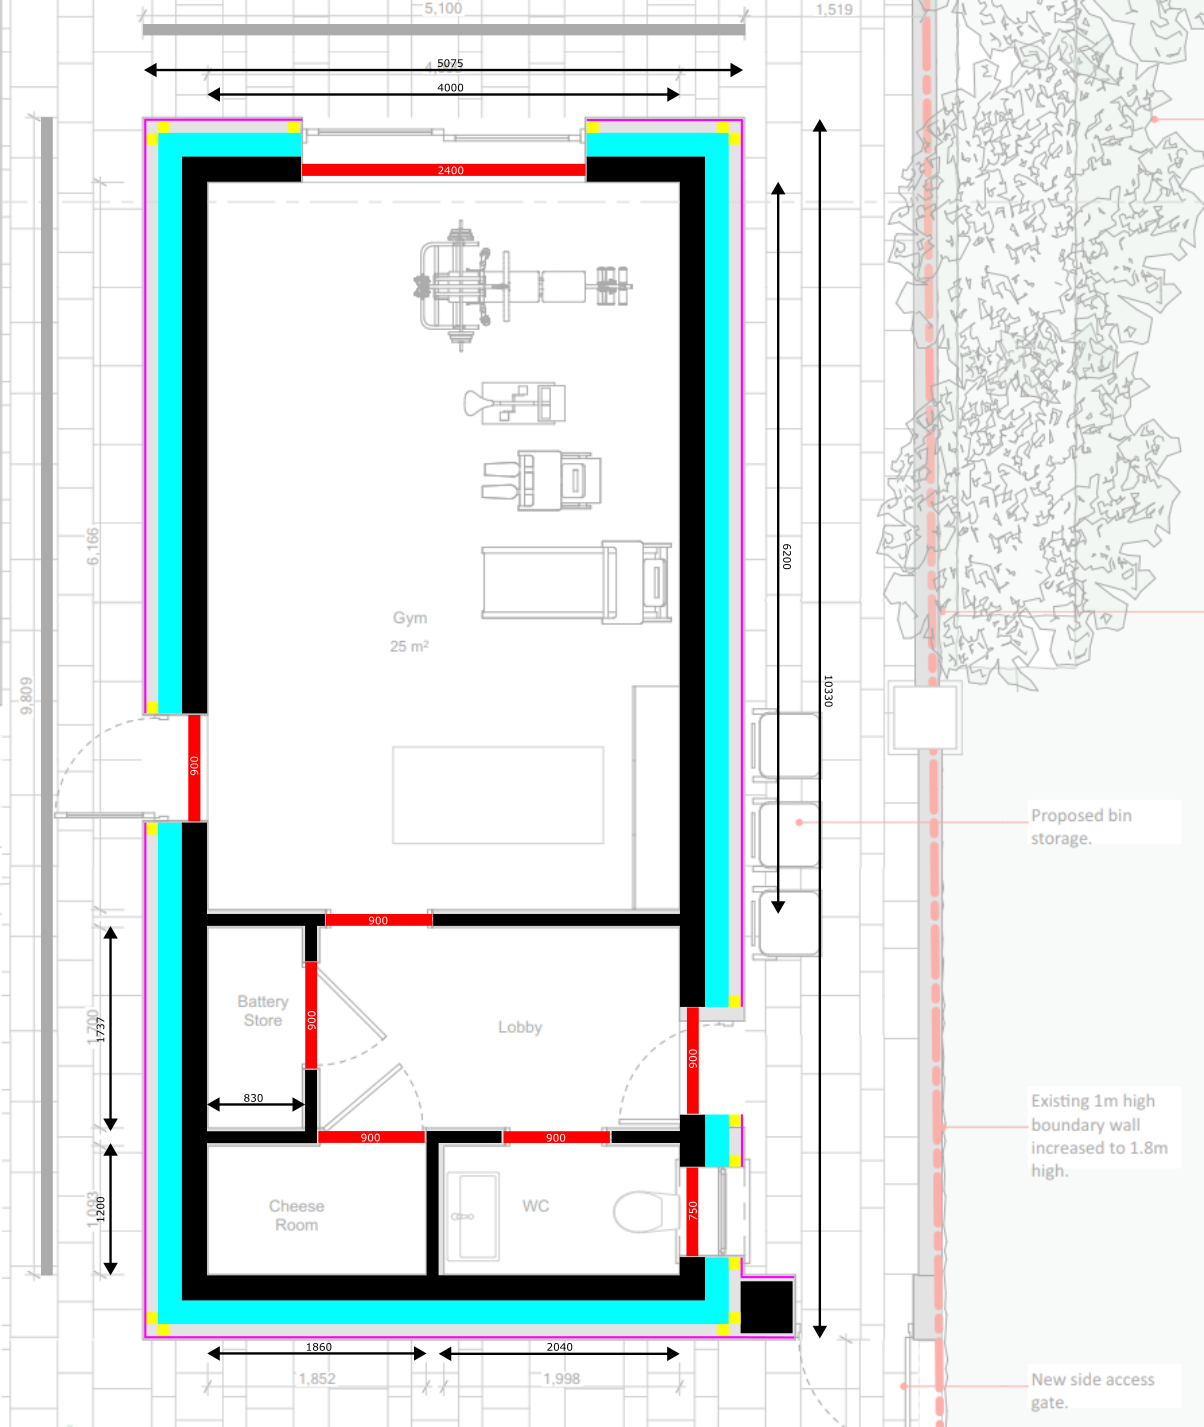
The changes are:
- The width and length of the building are slightly reduced to reflect the 535 mm thick walls instead of 550 mm thick walls.
- The internal walls are now all 100 mm thick as that is a single concrete block on edge. I expect to directly paint those blocks and not finish them further than that.
- The door into the lobby on the right has been slightly moved upwards so the wall between the toilet’s window and the door is a little over one concrete block long.
- The wall at the bottom of the main gym open area is moved slightly downwards to make the gym space exactly 6.2 metres long, only because I like round(er) numbers.
Total internal floor space is 36.25 m2, which is more than the entire ground floor of my current rented house if all the internal walls were removed!
The insulation under the concrete slab
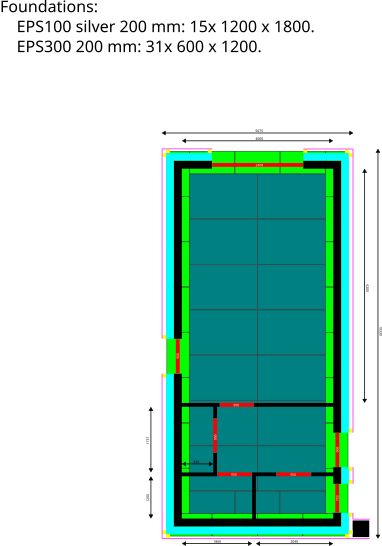
KORE supplies its EPS sheets in these sizes:
- 600 x 1200
- 1200 x 1800
- 1200 x 2400
As you will have noticed in the KORE agrément above, they want you to lay multiple layers of 100 mm thick EPS ensuring that the joins don’t overlap. As Irish NZEB doesn’t require you to do that, I’ll be making my life much easier and laying sheets of 200 mm thick EPS, and gluing each sheet together. This is inferior, but it’s also much quicker and easier.
There isn’t much more to say here: I explained above why EPS300 is needed for the outer walls. I suppose I should mention why EPS100 is sufficient for the internal walls: EPS100 will compress by 10% at 100 kPa loading, and by 2% at 30 kPa loading. The inner walls are on edge rather than on flat, so that is a load of 24 kPa. The concrete slab is a further 3.42 kPa, so a total load of 28 kPa on EPS100 would be fine.
In practice, the concrete slab will spread the load of the inner walls across a much wider area, well below 30 kPa. The edges of the building are different, the slab can spread load only inwards, hence the smallest sheet possible of (expensive) EPS300 only around the outside edges.
If the building height doubled, you would get 100 kPa load on the outer edge of the slab. A 250 mm thick slab with added A393 mesh at the edges would add 6 kPa. You need to keep the distributed load on the EPS300 below 90 kPa, however the walls bear on 215 mm whereas the EPS300 is 600 mm wide, so that’s okay so long as the load is distributed across the 600 mm wide sheet (which is the point of the added bottom A393 mesh). Internal walls of solid concrete block on edge, so long as they don’t rise more than 2.5 meters and don’t support load from any ceiling above, should be fine on EPS100 internally. If they support the floor above in any way, then they would need EPS300 underneath them too.
The insulation for the walls
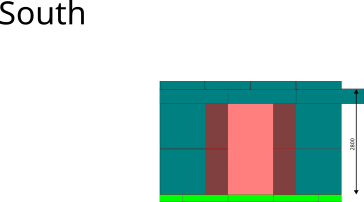
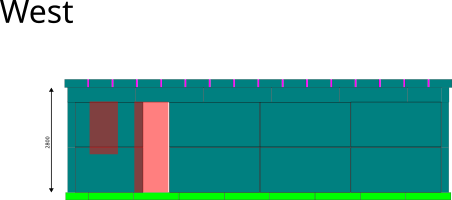
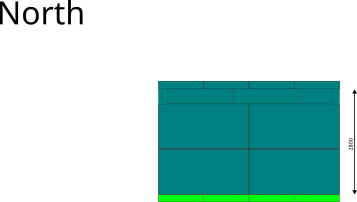
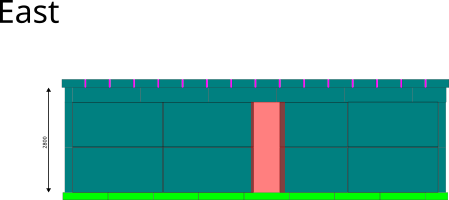
We make use of the big 1200 x 2400 sheets here to save on glue and effort. Above the two sheets we chop sheets into thirds to fill the gap at the top. You can see the glazing openings as red regions, again there the EPS sheets would need to be trimmed down.
As should be obvious, internally the floor to ceiling height should be 2.8 metres, consistent with the typical room height in the main house.
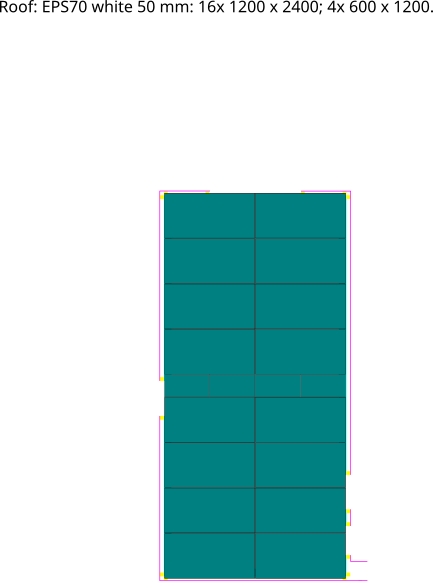
The insulation for the flat roof joists
As shown in the outhouse buildup above, the 4800 x 225 x 44 flat roof joists are spaced at 622 centres to avoid having to cut the 200 mm EPS sheets in between them. Yes this is a little too wide for walking upon, there will be a fair bit of flex, but I don’t expect to walk on the outhouse roof much.
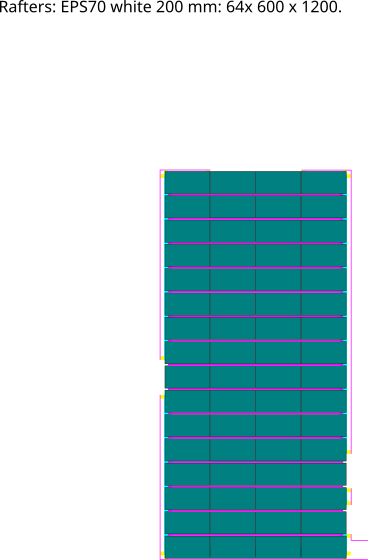
Only at the sides are there additional 25 mm EPS sheets to close the gap between 200 mm EPS and the walls. Screwed onto the top of the joists is 18 mm of OSB, followed by a further 50 mm of EPS to thermally break the joists from the outside which is shown on the right. The ends of the joists also get 50mm of EPS thermally breaking them from the outside. There is, therefore, a continuous, unbroken, layer of EPS around the entire building. Rough white deal timber (spruce) and OSB isn’t too bad as a thermal bridge (~0.13 W/mK), but it’s still four times worse than EPS. Also, the EPS is vapour open, so it lets any interstitial condensation which might build up under the EPDM layer to transfer away.
Above the 50mm of EPS is another 18 mm OSB board to spread the load of walking over the EPS more evenly, and then the EPDM layer which is the standard flat roof layer nowadays. It isn’t quite as cheap as bitumen felt, but it is much easier to work with and lasts longer. I’ll simply glue the EPDM to the upper OSB board.
The vapour open insulation design is important for this specific site’s climate. I paid for a moisture buildup analysis many years ago now and we discovered to our horror that our PIR board based external insulation when within a double leaf concrete block wall would be prone to experiencing runaway moisture buildup given the humidity and weather at our specific location. That led to a very expensive and very delaying refactoring of the main house to use cellulose insulation instead. EPS, unlike PIR, is much more vapour permeable and shouldn’t have the runaway moisture build up problem. This nasty shock did also play into my decision to choose a 100 mm instead of 50 mm ventilation cavity – also, by keeping the EPS further away from the driving rain outside, it should further reduce moisture buildup.
What does PHPP think?
There is absolutely zero chance that this building will meet Passive House. But I thought it would be useful if I fed this building into PHPP to see how it might fare in terms of energy modelling.
I gave PHPP the buildups, dimensions etc and told it to assume Munster Joinery’s cheapest triple glazing on the basis that I believe it is now very similarly priced to their cheapest double glazing, but you get 1.2 W/m2K u-values instead of 1.4 W/m2K with the double glazing. I told it about the heat recovering ventilation, and told it that would ventilate at 10 m3/hr (see below). There is no hot water generation, nor heating system, nor internal heat gains from occupancy, so I zeroed those and then I reduced the winter indoor temperature until no space heating was needed, which turned out to be 11 C. It thinks 106 kWh will be used per year to run the ventilation unit, particularly in summer to prevent overheating which it successfully does (maximum temperature is 22 C in July).
Out of curiosity, I then restored the winter indoor temperature to 20 C, and it now thinks that 977 kWh of space heating would be needed. This is 27 kWh/m2/yr which is well below the Irish NZEB maximum of 43 kWh/m2/yr.
I effectively get free electricity except for Nov-Dec-Jan-Feb, so for just those months the space heating needed would be 729 kWh. Therefore 25.4% of the primary energy requirement would be renewable, which is above the Irish NZEB maximum of 24%.
Finally, PHPP calculates u-values a little differently to conventional, so I’ll list here what it thinks the assembly u-values are:
- Floor: 0.152 W/m2K
- Walls: 0.16 W/m2K
- Roof: 0.149 W/m2K
The reason these are better is because PHPP doesn’t include an adjustment factor for thermal bridges, because you tell PHPP about each one individually. Because the building is wrapped with EPS, my main thermal bridges will be around the glazing specifically where the frame meets the concrete blocks.
I may ‘solve’ this cheaply by wrapping every window opening with 25 mm of EPS, though to be honest PIR board would be better here as it’s much better performing at this thickness, and has a compressive strength of 150 kPa or so. You then fasten the windows through the board into the concrete. Normally you can’t use PIR board for this because it can’t stay damp and it doesn’t like the alkalinity of the cement in render, but because I’m timber clad I can get away with it here. The main house uses the very expensive Bosig Phonotherm board to thermally break the timber studs around the glazing reveals precisely because it is compatible with being rendered, but I think I can avoid using such expensive material here.
Bill of materials, and estimated cost
Totalling up all of the above:
Foundations
- EPS100 silver 200 mm:
- 11x 1200x1800
- 4x 600x1200
- EPS300 200 mm:
- 31x 600x1200
- A252 mesh 2400x4800
- 5x
Walls
- East:
- EPS70 white 200 mm:
- 6x 1200x2400
- 2x 1200x1800
- 2x 1200x1800 in thirds = 6x 400x1800
- Pressure treated battens 50 x 35 x 4800:
- 4x vertical
- 4x horizontal
- Glazing reveals 25mm PIR board:
- 3x 300 x 2400
- EPS70 white 200 mm:
- North:
- EPS70 white 200 mm:
- 4x 1200x2400
- 1x 1200x1800 in thirds = 3x 400x1800
- Pressure treated battens 50 x 35 x 4800:
- 2x vertical
- 2x horizontal
- EPS70 white 200 mm:
- West:
- EPS70 white 200 mm:
- 6x 1200x2400
- 2x 1200x1800
- 2x 1200x1800 in thirds = 6x 400x1800
- Pressure treated battens 50 x 35 x 4800:
- 4x vertical
- 4x horizontal
- Glazing reveals 25mm PIR board:
- 3x 300 x 2400
- 2x 300 x 2400
- EPS70 white 200 mm:
- South:
- EPS70 white 200 mm:
- 4x 1200x1800
- 1x 1200x1800 in thirds = 3x 400x1800
- Pressure treated battens 50 x 35 x 4800:
- 2x vertical
- 1x horizontal
- Glazing reveals 25mm PIR board:
- 4x 300 x 2400
- EPS70 white 200 mm:
Joists
- EPS70 white 200 mm:
- 64x 600x1200
- EPS70 white 50 mm:
- 2x 1200x2400 in quarters = 8x 300x2400
- Rough white deal 225 x 44 x 4800:
- 15x
- EPS70 white 25 mm:
- 36x 600x1200
Roof
- EPS70 white 50 mm:
- 16x 1200x2400
- 4x 600x1200
- OSB 18 mm:
- 36x 1200x2400
I get:
- EPS300 200 mm @ €45 inc VAT per sqm:
- 31x 600x1200
- EPS100 silver 200 mm @ €36 inc VAT per sqm:
- 15x 1200x1800
- EPS70 white 200 mm @ €20 inc VAT per sqm:
- 16x 1200x2400 = 6x + 4x + 6x
- 14x 1200x1800 = 4x + 1x + 4x + 5x
- 64x 600x1200
- EPS70 white 50 mm @ €5 inc VAT per sqm:
- 18x 1200x2400 = 2x + 16x
- 4x 600x1200
- EPS70 white 25 mm @ €2.50 inc VAT per sqm:
- 36x 600x1200
- PIR 25 mm @ €10.86 inc VAT per sqm:
- 3x 1200x2400 = (3x + 3x + 2x + 4x) / 4
- 15x rough white deal 225 x 44 x 4800 @ €27.45 inc VAT each
- 16x EPS glue @ €17 inc VAT each
- 5x A252 mesh @ €55 inc VAT each
- 36x OSB 18mm board @ €26 inc VAT each
- 23x Pressure treated battens 50 x 35 x 4800 @ €5.38 inc VAT each
- 40 pales of solid concrete blocks @ €58 inc VAT each
- 40x bags of cement @ €8.75 inc VAT each
- 3.5 tonnes of sand @ €65 inc VAT each
- 12 m3 of T2 stone @ €46 inc VAT per m3
- 15x white paint 10 litres @ €24.95 inc VAT each
- 18x plasterboard 12.5 mm @ €16 inc VAT each
Which comes to €11,181 inc VAT. Add PC sums for these:
- Approx €6k inc VAT for the charred larch outer cladding
- Approx €8k inc VAT for the glazing
- Approx €1k inc VAT for wiring
- Approx €500 inc VAT for toilet + sink + mirror
- Approx €500 inc VAT for internal doors
I reckon total materials cost is approx €27k inc VAT. I left off a few things like damp proof course, radon barrier, air tightness tape and fixings, never mind machine rental, so let’s call it €29k inc VAT. Which is 1k more than the last time I estimated this back in April 2024 using much less accurate calculations – well done me!
At 36.25 m2 of internal floor space, I make that €800 inc VAT per sqm fully finished excluding labour.
Obviously this isn’t a habitable building, you would need to add at least a shower and a cooking area. But even if that took the price to €31k, you’re still looking at €855 inc VAT per sqm. That is way, way, way cheaper than a typical Irish new build right now which is coming in north of €2,500 inc VAT per sqm. The reasons why are:
- To grant a mortgage, the banks insist on a non-flammable outer leaf, so you end up installing a completely unnecessary outer block leaf like I had to for the main house. That adds considerable complexity that this ‘non-standard’ buildup avoids, plus you have to add render and usually paint to that outer block leaf.
- A flat roof is very considerably cheaper than a tiled roof, especially as it can be made so lightweight that it reduces the cost of everywhere else in the house.
- By using passive house thick walls, I could use the cheapest possible insulation even though I’m only targeting NZEB levels of insulation. Thicker is cheaper, in other words.
- In most places land space is constrained by zoning, so two storey houses make more sense. You could extend this buildup to two storeys very easily, you would need a 250 mm base slab or use strip foundations instead. That would increase the foundation costs, but as you would get nearly twice the internal floor space, it would likely be even lower cost per sqm again.
- Finally, the chances of getting planning permission for an entirely flat roofed building are going to be low in most parts of Ireland. Your very expensive Irish new build is in part that way due to planning permission constraints and requirements.
I suppose I have left off one big thing: this building on its own wouldn’t meet the renewable energy requirement, so you’d need to fill the roof with solar panels, so that’s another few thousand of cost. There isn’t a heating system, though with this level of insulation electric heating is probably acceptable at around €200 of cost per year. I am actually going to fit a MVHR unit for ventilation which I already have purchased (so I didn’t include it above), it’s a small Mitsubishi VL-100EU5-E unit which can move either 60 or 105 m3/hr which should be plenty even during a gym workout. It doesn’t have the best heat recovery, only 80%, but it is ESP32 controlled and so will only turn on for short periods during the day if nobody is there. You might only need 0.33 m3/hr/m2 if a building is unoccupied, therefore 12 m3/hr should be plenty to prevent staleness. One might therefore run the unit for ten minutes each hour.
In a proper habitable building, due to the airtightness you would need a much better MVHR system, so that plus its associated ducting would be another few thousand of cost. Still though, around €1000 inc VAT per sqm fully finished but excluding labour is probably doable.
How much might labour cost? Thanks to its extreme simplicity, two people should be able to complete this building in four weeks I reckon. At €300 per day each, that is €14,400. That would take the cost up to €50k, which is pretty much spot on what the Quantity Surveyor estimated that this outhouse would cost. That is €1,400 inc VAT per sqm incidentally, which still looks great compared to a current Irish new build.
What’s next?
Next weekend myself and Megan will be going to London for a single night for a birthday party. After that I expect no more travel until Thanksgiving, where we shall be visiting Megan’s brother in England for the annual turkey dinner.
I’ve spent almost all of three days writing up the above, so I’m pretty sick of writing virtual diary entries. I think the entry about GrapheneOS will therefore almost certainly occur after I get back from London. The remainder of this week will go on open source project work, and trying to get out to get some exercise – the weather has been very unhelpful on that recently.
After the virtual diary entry on GrapheneOS, I don’t expect further entries until the insulated foundation design for the main house is complete. I have plenty to be getting on with after this recent blast of writing on this website: I need to circle back onto my WG14 standards papers first, then force myself to complete the 3D house services layout. If I can get both done before new employment begins I would be very pleased, but if unemployment continues I have many more months of items on my todo list to iterate through. I would be surprised if I could complete that todo list before Spring 2026.
| Go to previous entry | Go to next entry | Go back to the archive index | Go back to the latest entries |