Word count: 4187. Estimated reading time: 20 minutes.
- Summary:
- The proprietary cloud solutions used by the site were replaced with a custom infrastructure to run GrapheneOS on the new phone, which requires segmenting Google Play Services and only running necessary apps. This means notifications cannot be pushed through Google Firebase, necessitating a separate notification push solution. Ntfy was chosen for its large user base and reliability, offering simple text message pushing with optional attachments and configuration options for access control and TLS certification.
Sunday 14 September 2025: 16:35.
- Summary:
- The proprietary cloud solutions used by the site were replaced with a custom infrastructure to run GrapheneOS on the new phone, which requires segmenting Google Play Services and only running necessary apps. This means notifications cannot be pushed through Google Firebase, necessitating a separate notification push solution. Ntfy was chosen for its large user base and reliability, offering simple text message pushing with optional attachments and configuration options for access control and TLS certification.
My mobile phone push solution: Ntfy
Thankfully, the DIY solution space here is quite mature. In fact, it’s so mature that there are many competing solutions all with their own pros and cons. I ended up choosing Ntfy as the mobile push solution, though I could find absolutely nothing wrong with Gotify. I only chose Ntfy because it has many times more the userbase than Gotify, which usually means it will be more mature, more debugged, and more optimised. From a thorough reading of the bug trackers of the various solutions, and reading the source code for Ntfy, I reckoned they’d done the most empirical testing on ensuring a minimum battery consuming solution which is reliable.
Ntfy is about as simple as you could get for this solution – it does exactly one thing only. You can push text messages with optional attachments like images to a channel name of your choice. Anybody subscribed to that channel gets notified. And that is literally it – you can even configure it only use RAM for storage, which is perfect for a embedded grade computer with limited storage write cycles and a high likelihood of sudden power loss.
You can, of course, configure it with usernames and passwords and access tokens and all the other usual REST access control. You can closely configure what users can push what to which channels if you like. You can set a TLS cert on the public API endpoint so no passwords nor access tokens can get sniffed. In short, it does exactly what it says on the tin and to date I have found it ‘just works’.
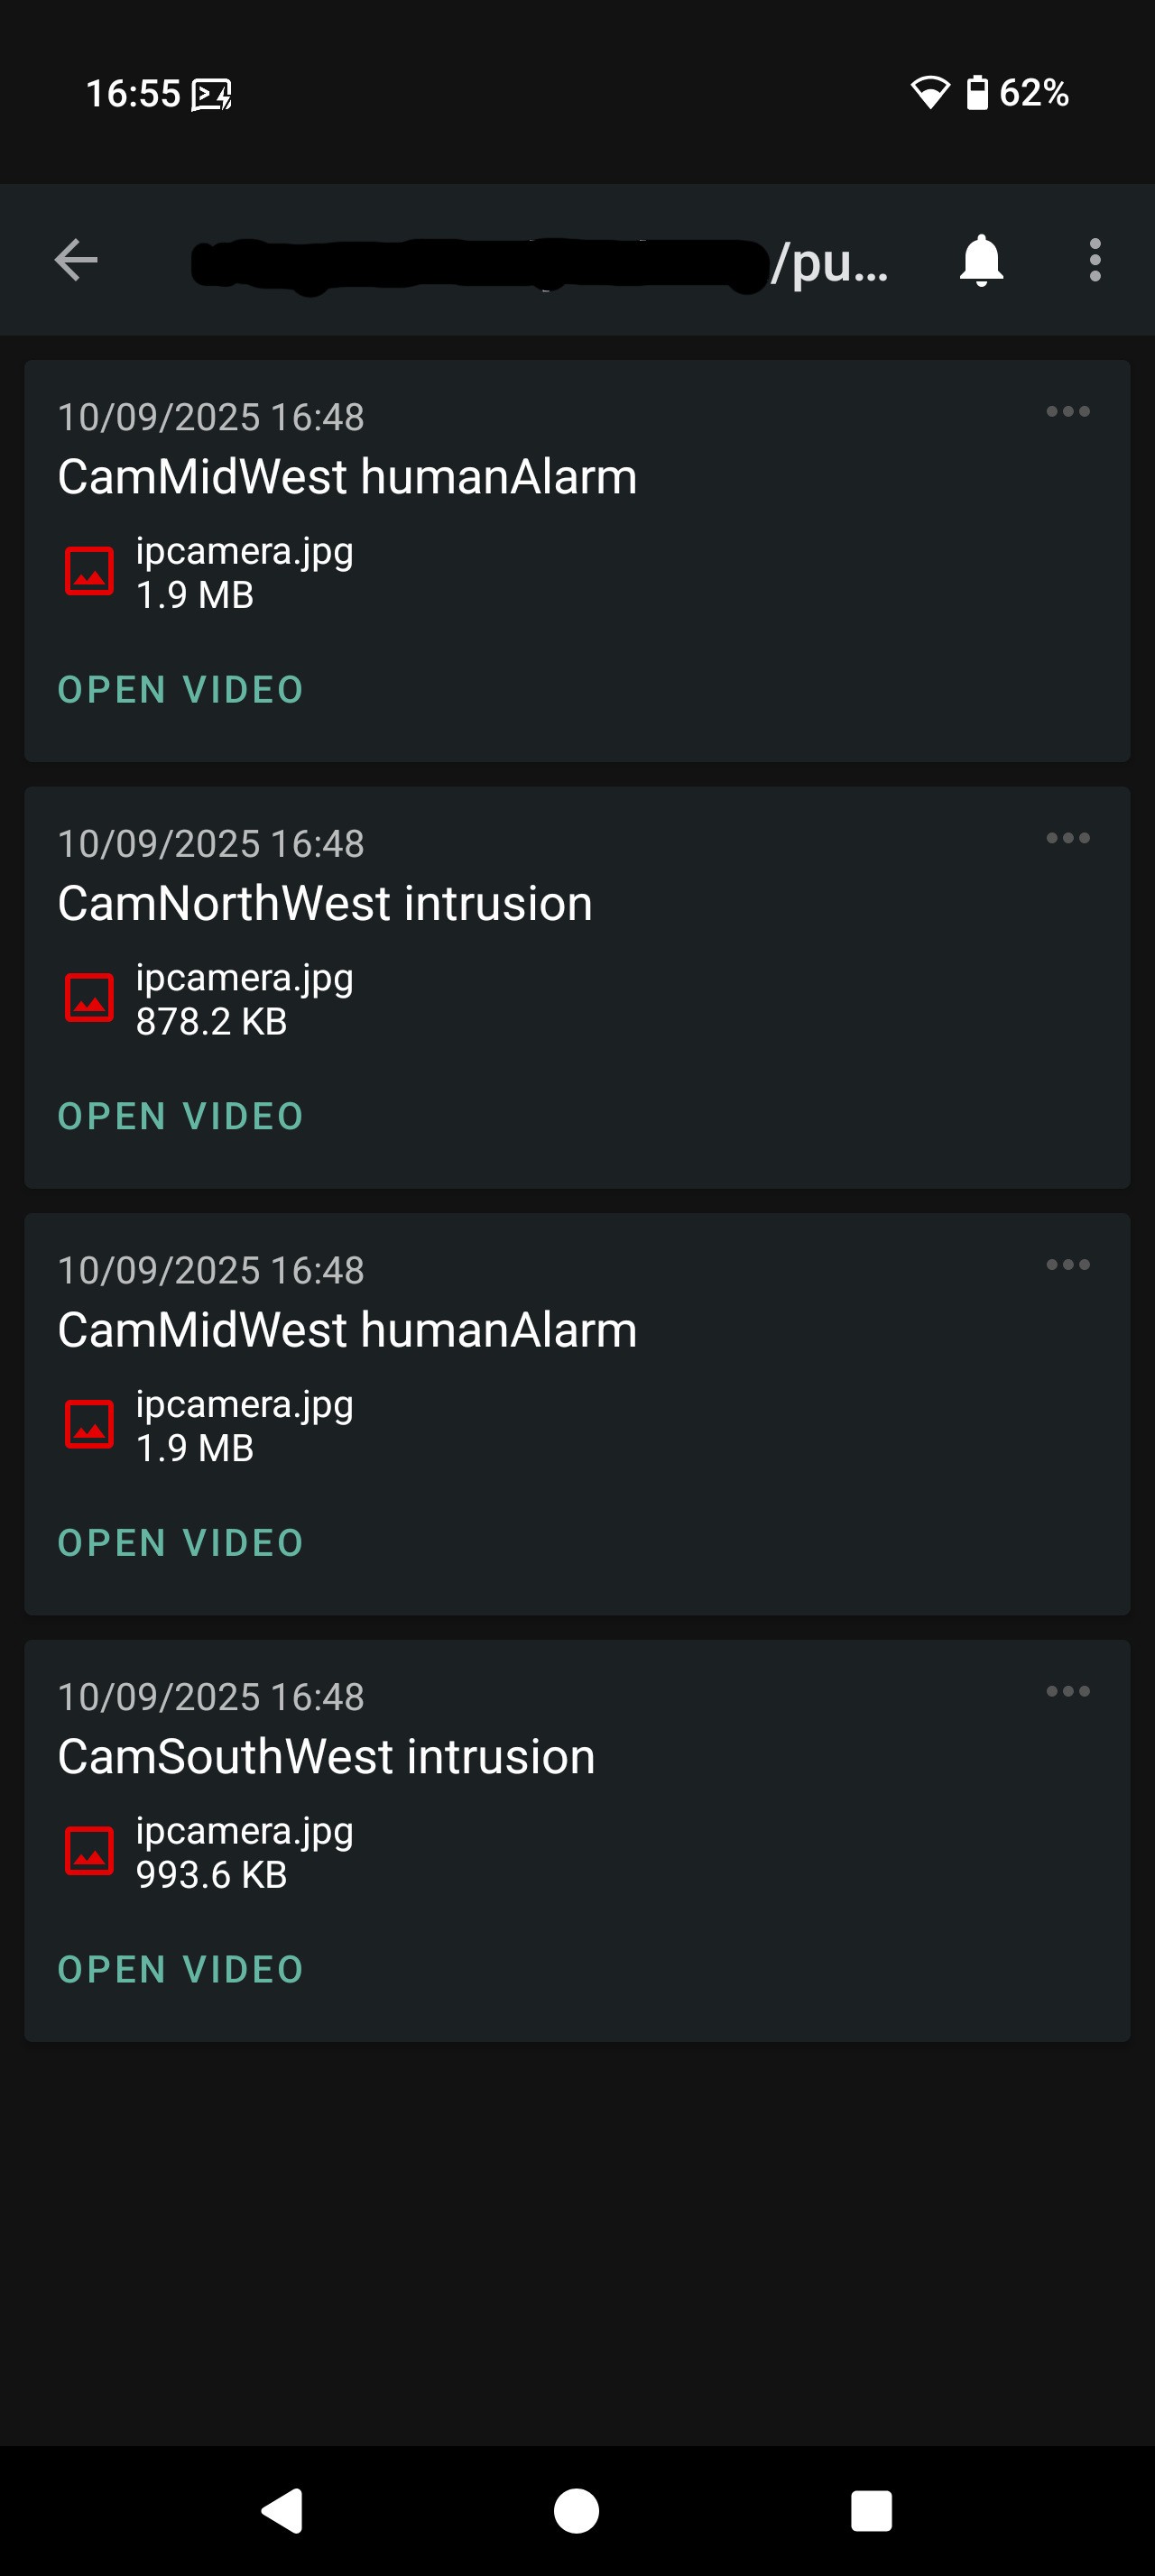
Another neato feature it has is you can provide up to a three button menu with actions per button press. So, for example, you could send a picture still from the camera with a push button for ‘view the video around this time’ and another for ‘set off the alarm’. Pressing them pushes messages at other channels or performs arbitrary REST API invocations, which lets you configure simple bidirectional communication. Here it is in action:
I didn’t personally test it, but Ntfy can also optionally push to mobile phones via Google Firebase or Apple’s equivalent. So if you’re somebody running Google Play Services all the time, you can vector Ntfy via that instead of replacing Google Play Services with Ntfy. There is an open source unified push notification service called UnifiedPush, which Ntfy can also use instead on request. There are plenty of config options likely to suit most people. See below for measurements of mobile battery consumption, which is for Ntfy directly listening to a custom Ntfy broker running at the site.
Upgrading OpenWRT
To use the Ntfy Android app, you need to have the Ntfy message broker running somewhere public. I couldn’t see any good reason to not run it at the site, especially as failure to connect would then get reported and that is also something I want to know about i.e. power or internet loss at the site. And the site’s IP address is stable over time, and Eir don’t impose any restrictions on inbound connections, so you can absolutely run a public server there.
With the AI PC removed, the main sources of compute out there are the two hand built Banana Pi R3 boxes which provide the Wifi, firewall and routing. They run OpenWRT, and they’re fairly well endowed with specs: 2 Gb of RAM, four ARM Cortex A53s running at 2 Ghz, and 8Gb of MMC storage. Until this week, they were running the original very first OpenWRT firmware which was compatible with their hardware, which is a couple of years old now – after all, I started work on making those boxes back in early 2023. But that edition of OpenWRT couldn’t run Docker, and I needed Docker to get Ntfy (amongst other services) running. And of course that edition of OpenWRT was also too old to be able to self upgrade to the latest OpenWRT, so I ended up spending the entire day at the site Wednesday two weeks ago getting those two boxes onto the latest OpenWRT with everything reinstalled and reconfigured exactly as they were originally. Painful, but hopefully I’ll never have to do that again.
Now that I am on the latest OpenWRT, standard Docker Compose more or less ‘just works’. I say ‘more or less’ because you will need a custom network configuration in your compose files to make it work on OpenWRT (see below), but once I’d figured that part out, to be honest it’s been exactly the same as on a full fat Linux installation and all the Docker stuff I’ve installed has pretty much just worked. This is despite how barebones OpenWRT is in comparison to a normal Linux distro, and the very limited 6.5Gb storage partition (which runs the F2FS filesystem as it operates on MMC storage). Performance is acceptable, YABS reports as follows:
| Banana Pi R3 on my site | My colocated Raspberry Pi 5 | A very budget VPS I rent | |
|---|---|---|---|
| Location | Cork, Ireland | Mratín, Czechia | Amsterdam, Netherlands |
| CPU | ARM Cortex A53 @ 2.0Ghz | ARM Cortex A76 @ 2.4Ghz | Intel Xeon Gold 6122 CPU @ 1.80GHz |
| Storage | eMMC running f2fs | NVMe SSD running ZFS | Shared NVMe SSD running ext4 |
| YABS Single Core | 194 | 772 | 569 |
| YABS All Cores | 525 | 1368 | 1792 |
| YABS Disk Read | 58 Mb/sec | 232 Mb/sec | 111 Mb/sec |
| YABS Disk Write | 65 Mb/sec | 239 Mb/sec | 112 Mb/sec |
| YABS Download speed | 930 Mbps | 929 Mbps | 1946 Mbps |
| YABS Upload speed | 102 Mbps | 928 Mbps | 2089 Mbps |
| YABS worst download locations (< 50% capacity) | Sao Paulo (419 Mbps) | Sao Paulo (146 Mbps) Los Angeles (245 Mbps) Tashkent (250 Mbps) Singapore (537 Mbps) | Sao Paulo (271 Mbps) Los Angeles (447 Mbps) |
| YABS worst upload locations (< 50% capacity) | None | Los Angeles (219 Mbps) | Los Angeles (112 Mbps) Sao Paulo (158 Mbps) |
For a box consuming around five watts, that is decent performance. Sure, one of my Raspberry Pi 5 colocated boxes idles at the same wattage, but if you max out its cores it’ll jump to twelve watts. The RPi5 delivers approx 4x the compute for 2.4x the power, as you’d expect from a superscalar CPU. Indeed, as mentioned in the article about my colocated Raspberry Pi 5s, the benchmarks above again demonstrate that clock-for-clock the ARM Cortex A76 matches an Intel Xeon Gold 6122 CPU. The latter is faster in multicore only because it has far more memory bandwidth to avoid stalling the four CPUs.
Anyway, the four ARM Cortex A53s are plenty to run lightweight programs. What we need next is to plug the Dahua IP cameras into Ntfy. Before we get into how I solved that, here is the custom docker compose network stanza for OpenWRT, because it is not documented in an obvious nor easy to find place:
networks:
  default:
    driver: bridge
    driver_opts:
      com.docker.network.bridge.enable_icc: "true"
      com.docker.network.bridge.enable_ip_masquerade: "true"
      com.docker.network.bridge.host_binding_ipv4: "openwrt_ip_address"
      com.docker.network.bridge.name: "docker-lan"
      com.docker.network.driver.mtu: "1500"
docker compose up will create in OpenWRT a new bridge device docker-lan.
You need to adjust its settings to say it is always up, then add a
new OpenWRT interface which I called dockerlan for the docker-lan
bridge. Add that interface into the docker firewall group.
Finally, in the OpenWRT firewall, add the docker firewall group
so lan => docker is permitted as is docker => lan. Do docker
compose down to destroy the container, then docker compose up
and you should find your container can now see the network.
One thing to be VERY aware of with this configuration is that ports listening within the docker container are ALSO listening on the OpenWRT LAN at the OpenWRT LAN address. If you wish to expose one of those ports to the WAN, you can add a port forward to the OpenWRT firewall. This is very convenient, but be careful as the port number space is shared between docker containers and host which makes it easy for ports and services to collide or otherwise interfere with each other.
Replacing the Dahua & Sungrow cloud integrations
Dahua provide a free of cost proprietary cloud based notification push service which can be configured as ‘full fat’ (everything goes via the Dahua cloud), ‘notification only’ (only the event notification goes to Google Firebase) and ‘camera does nothing’ (your local software e.g. Blue Iris, actively subscribes to events on each camera using Dahua’s REST API). Using the Dahua Android app, you can have the app tell the camera to push notifications to Google Firebase for the app if you don’t create a Dahua cloud account. Yes the Dahua app does have some bugs, but it works surprisingly well considering. All you need to do is to remember after a push notification to enable the Wireguard VPN before opening the Dahua app because any images or video will be fetched directly from the camera, and it usually ‘just works’ about as well as that Dahua app ever works well.
The Sungrow inverter also provides a free of cost proprietary cloud based monitoring solution, and you can opt in or out as you choose. If you opt in, your Sungrow inverter will push quite detailed metrics to your Sungrow cloud account. You can also remotely manage the inverter to a very detailed degree from the Sungrow web interface or Android app. When I say ‘very detailed’ I mean it, there are esoteric config options available there that there are no other means of accessing. Whilst all that is great, it is an enormous security vulnerability. A bad actor could cause thousands of euro of damage if they got access to that management interface. Plus, there are the usual concerns with such personal and intimate data going out into the cloud in any case.
I have used the Dahua and Sungrow cloud integrations in the nearly two years they’ve been running now simply out of convenience. But I always intended to move them onto my own, private, infrastructure and I deliberately and intentionally made sure before I bought them that it would be straightforward to integrate both into Home Assistant when the time came. Home Assistant, unfortunately, is quite resource hungry. It might plod along with these slow CPUs, but it definitely needs at least 4Gb of RAM and 20Gb of storage. As my Banana Pi boxes have 2Gb of RAM and 6Gb of storage, Home Assistant just isn’t possible on this lower end hardware.
So what else? The next most popular open source home automation software after Home Assistant is probably OpenHAB which predates Home Assistant by a few years, and has retained a slimmer resource footprint. Using their Alpine based docker image, I got it installed and working surprisingly quite well in 5.5Gb of storage. It raises the RAM usage on the Banana Pi to about 800 Mb with the rest of RAM filled with disc cached data, so it’s pretty heavy for this class of hardware. Still, it does seem to work and without much impact on the board as a Wifi router and public facing internet endpoint.
The Sungrow Inverter part was dead easy as there is a built in out of the box integration, albeit it is not initially obvious because it’s part of the ‘Modbus over IP’ module:
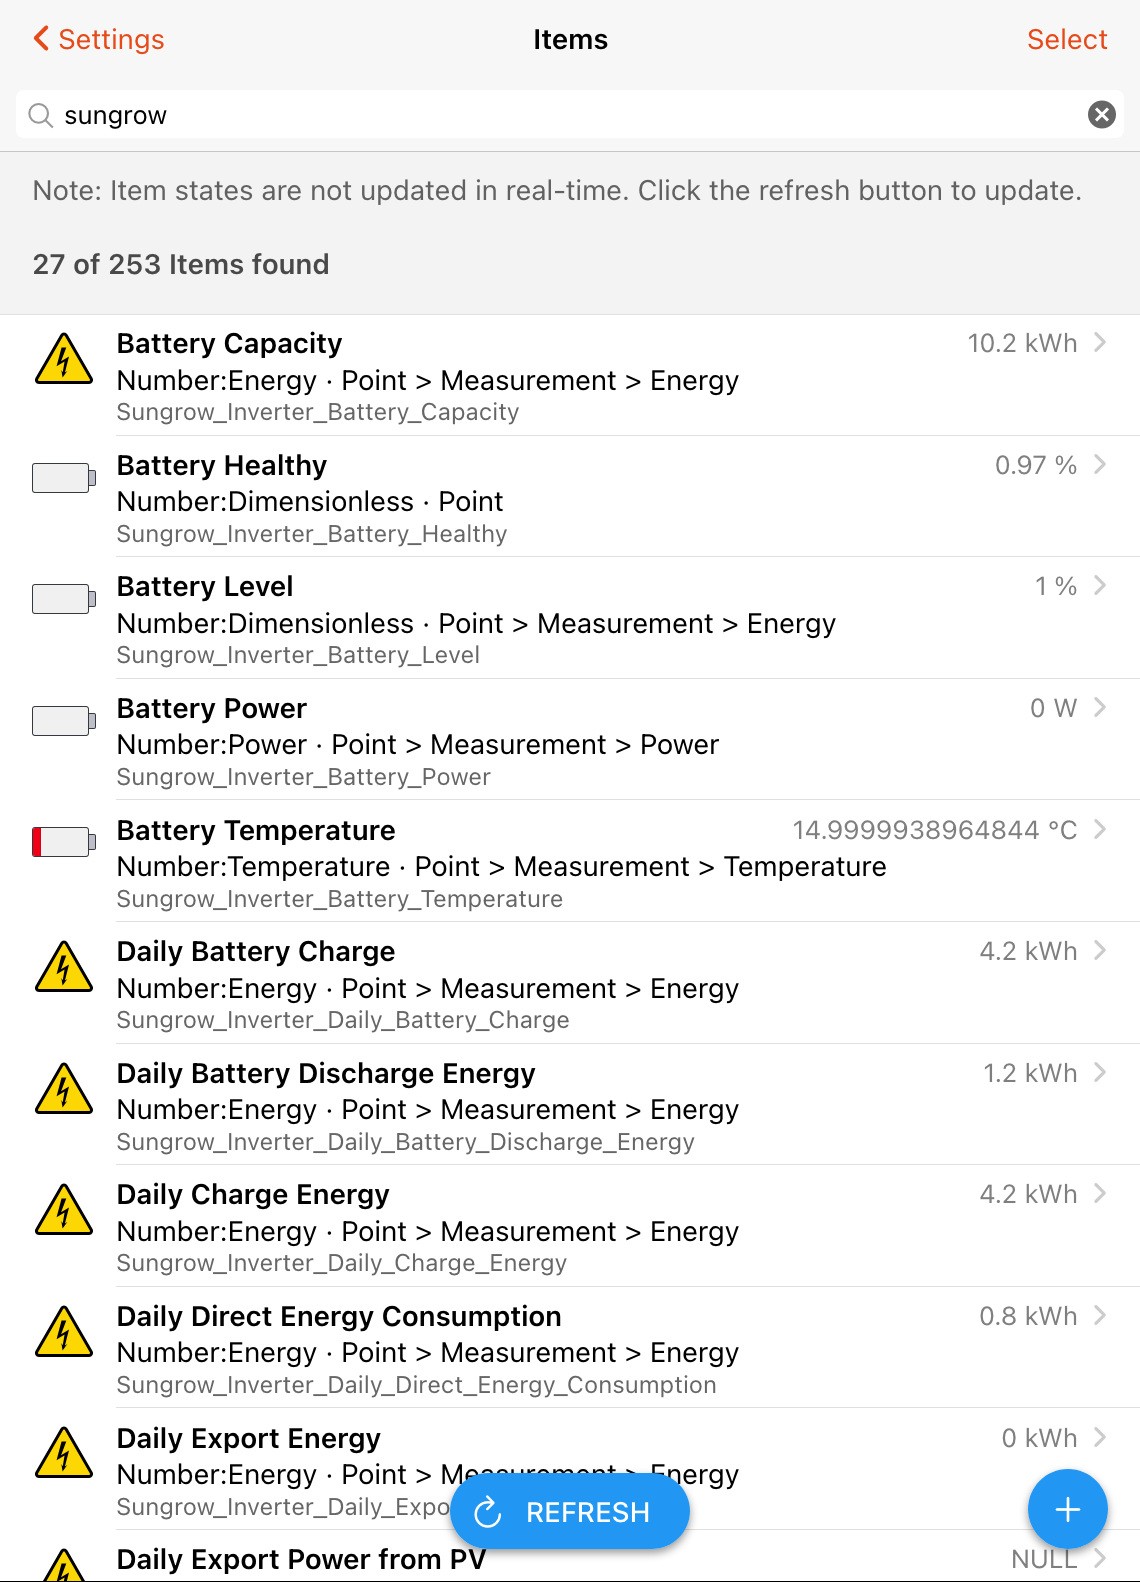
The values in percentages are off by a factor of 100, but that’s easy to work around in automations etc. The Sungrow integration provides both control and lots of values to read – you can, if you wish, override the Sungrow firmware configuration and have the inverter behave any way you like.
Configuring the Dahua camera OpenHAB integration
OpenHAB also comes with a Dahua camera integration, but it’s rather
more effort to configure because it supports a vast range of Dahua
camera models and configurations over well over a decade of multiple
firmware changes. As a result, it exposes a vast number of fields,
most of which will forever read NULL because your camera’s firmware
and/or current configuration won’t emit that field.
Solving this took a bit of thinking cap time, but I did figure out a solution. Here is the correct way of adding a Dahua camera to OpenHAB:
In Things, hit Plus => IpCamera Binding => Dahua Camera with API => Enter the IP address and username-password, Create Thing. Don’t forget to give it a suitable name!
Back in Things, enter the Camera just created, choose the Channels tab, at the bottom tick ‘Add Equipment to Model’, tick ‘Show Advanced’, then ‘Select All’, then ‘Add to Model’.
Go outside, and do everything to trigger everything your cameras are configured to trigger upon.
In Items, enter the name of your camera in the filter. You need to examine all the input Switches – if all these are
NULL, then your camera needs to be reconfigured (I suggest making sure your ONVIF username and password match your main username and password, because for some reason they are set separately).If some Items are either
ONorOFF, write those down now as those are the only ones we need to subscribe to. These WILL differ based on per-camera configuration even if your cameras are all identical models.Return to Things and enter your Camera. In the Channels tab, at the bottom, click ‘Unlink and Remove Items’. This will remove all the items. You can now tick exactly the ones you wrote down before, and only subscribe to those alone.
I currently have three security cameras on the site: CamNorthWest,
CamMidWest and CamSouthWest. CamNorthWest is configured with an
intrusion detection boundary so it alerts if something crosses that
boundary:
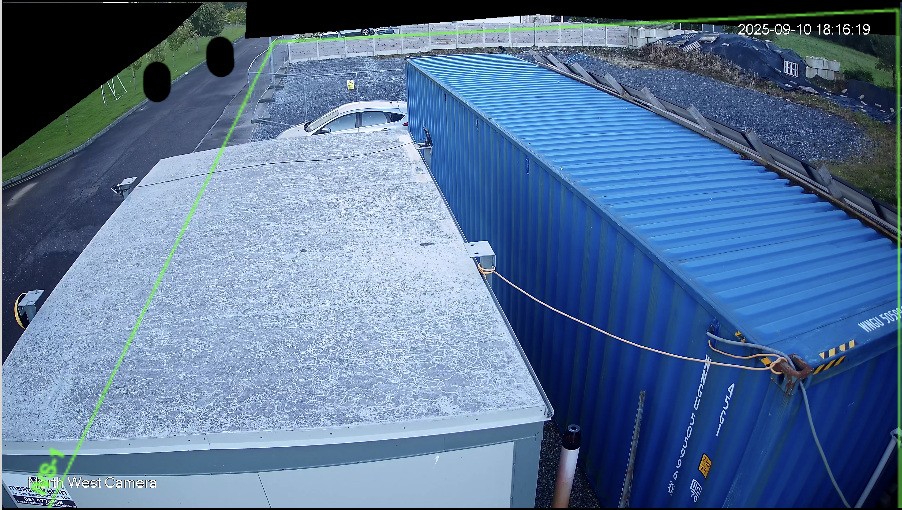
(in case you’re thinking that green line is down the middle of the footpath, no that is not intentional – a storm pushed the camera slightly to the left and I haven’t gotten around to redrawing the boundary)
I can tell you that for the Dahua IPC-Color4K-X, intrusions appear
in OpenHAB as Field Alarm, Last Motion Type is fieldDetectionAlarm,
and these fields appear to be active for this camera model, firmware,
and current configuration:
Enable Motion AlarmisOFF.Audio Alarm Threshold, set to50.Enable Audio AlarmisOFF.Enable Line Crossing AlarmisON.- yet
Line Crossing Alarmseems to remainNULL?
- yet
Motion Detection Level, set to3.Poll ImageisOFF.Start HLS StreamisOFFbut appears to goONif you try to watch a HLS stream from OpenHAB.
CamSouthWest is the exact same model as CamNorthWest, and is also
configured with an intrusion detection boundary so it alerts if
something crosses that boundary:
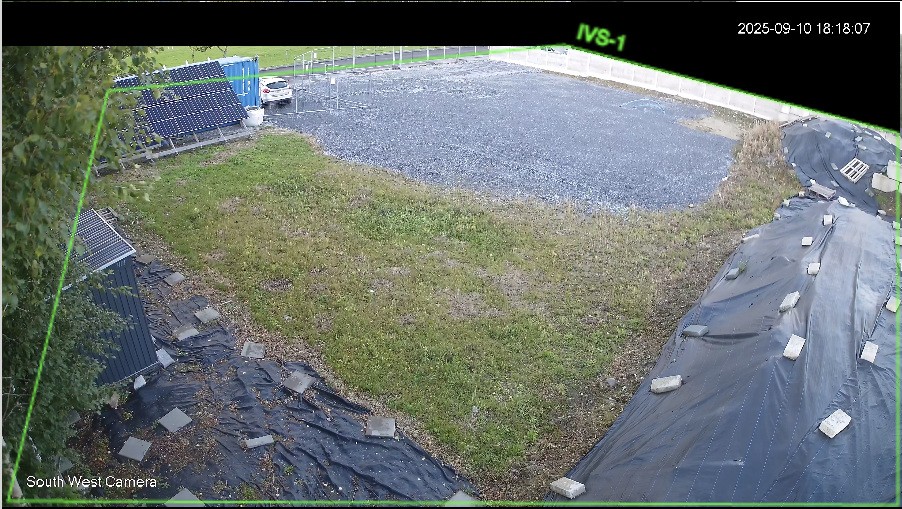
There is one configuration difference: there is an additional post
filter on intrusion that the object must be a human or a vehicle.
This camera model, firmware and current configuration appears in
OpenHAB as Field Alarm, Last Motion Type is fieldDetectionAlarm
and:
Enable Motion AlarmisOFF.Audio Alarm Threshold, set to50.Enable Audio AlarmisOFF.Enable Line Crossing AlarmisON.- yet
Line Crossing Alarmseems to remainNULL?
- yet
Motion Detection Level, set to3.Poll ImageisOFF.Start HLS StreamisOFFbut appears to goONif you try to watch a HLS stream from OpenHAB.
In other words, identically to CamNorthWest, but I have manually
verified that Field Alarm only triggers with humans and vehicles,
unlike for CamNorthWest which also triggers for birds, cats etc.
CamMidWest is very different to the other two. Firstly, it is
a Dahua IPC-Color4K-T180 so very different hardware which ships
with the latest generation of Dahua firmware, whereas the previous
two cameras are on the preceding generation of Dahua firmware (most
of the changes are to the UI, but there are a few feature changes too). Secondly, it is
configured with Motion Detection with a post filter that the object
must be a human or vehicle. This appears in OpenHAB as Motion Alarm
with a separate Human Alarm, and these fields appear to be active
for this camera model, firmware, and current configuration:
Last Motion TypeismotionAlarmorhumanAlarm.Field AlarmisNULLhere.Enable Motion AlarmisON.Audio Alarm Threshold, set to50.Enable Audio AlarmisOFF.Enable Line Crossing AlarmisON.- yet
Line Crossing Alarmseems to remainNULL?
- yet
Motion Detection Level, set to3.Poll ImageisOFF.Start HLS StreamisOFFbut appears to goONif you try to watch a HLS stream from OpenHAB.
Subscribing to motionAlarm will get you lots of false positives
by definition, so humanAlarm is a much better choice.
Additional fields common to all models which are read-only:
Last Event Datais whatever the camera did last e.g. ‘user logged out’, ‘synchronised time to NTP’ etcHLS URL, but its addresses don’t seem to work?Image URL, which returns a JPEG of the current view. Note this also stores a snapshot on the camera’s storage.MJPEG URL, which is a MJPEG video feed of the current view.
Finally, I only really trialled it a bit so I didn’t spend much time on it, however you can create a custom dashboard for OpenHAB:
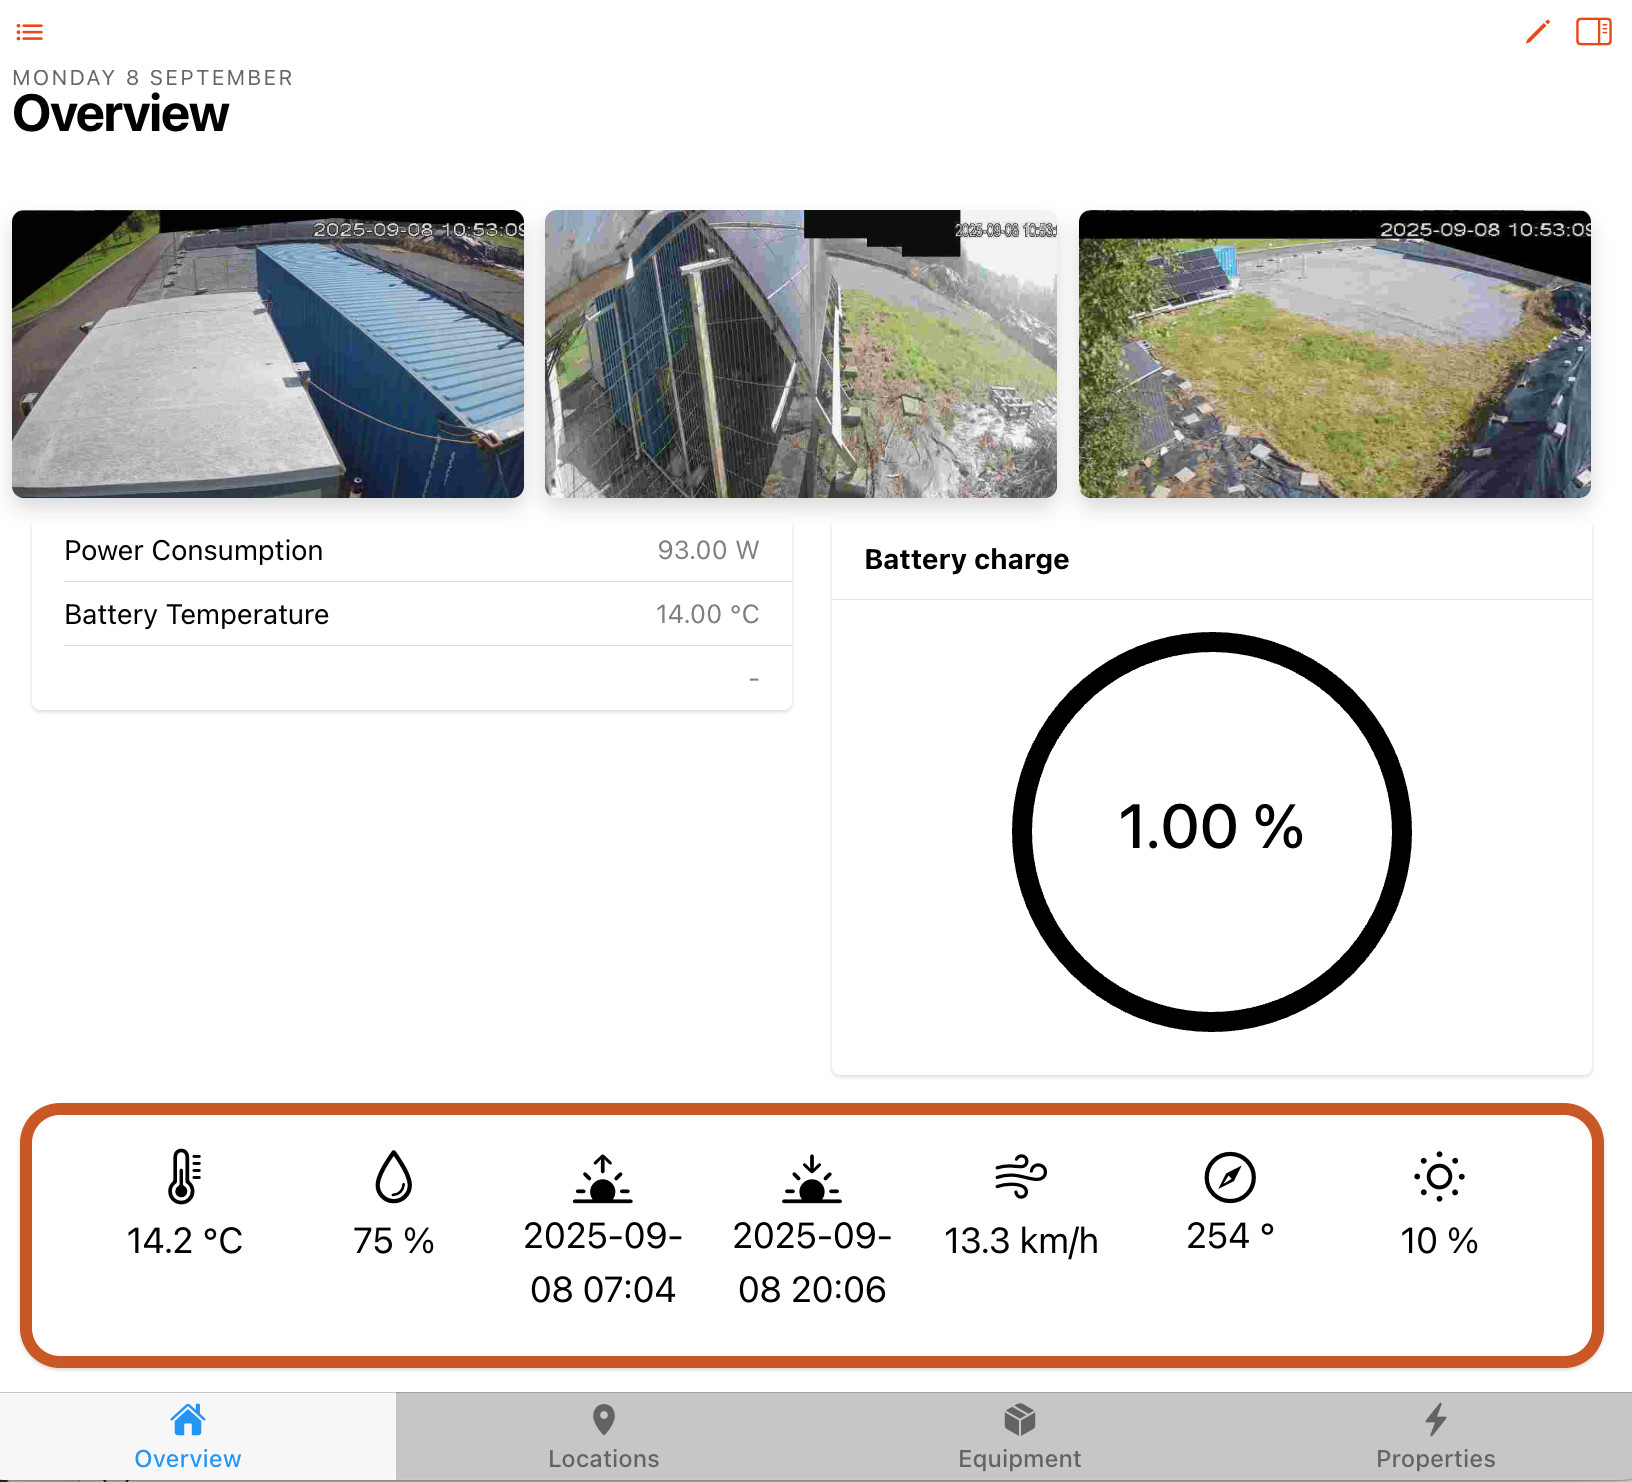
The weather forecast is simply more sensor data, so you could do rules like ‘if the batteries are low, but there will be sunshine later today, charge the EV first’ or ‘if the weather tomorrow will be heavy rain and cold, charge the thermal store to full using cheap night rate electricity; but if the weather tomorrow will be sunshine all day, only charge the thermal store up to 50%‘. There are lots of possibilities here, and OpenHAB is probably as powerful as Home Assistant at this sort of stuff, except it will happily run on your Wifi box with a five watt power budget!
Having camera alerts send a message via ntfy
There is a dedicated section in OpenHAB for rules which are variations on ‘if this (and/or this …), then that’. You can have rules be conditional on any event, time, system event (e.g. start up etc) with any arbitrary logic between them. Any programmer will find it very straightforward.
To define scripts to execute as a result of a rule, you have your choice of writing the script in Javascript, a dedicated DSL, YAML or a visual programming IDE called ‘Blockly’ which looks like this:
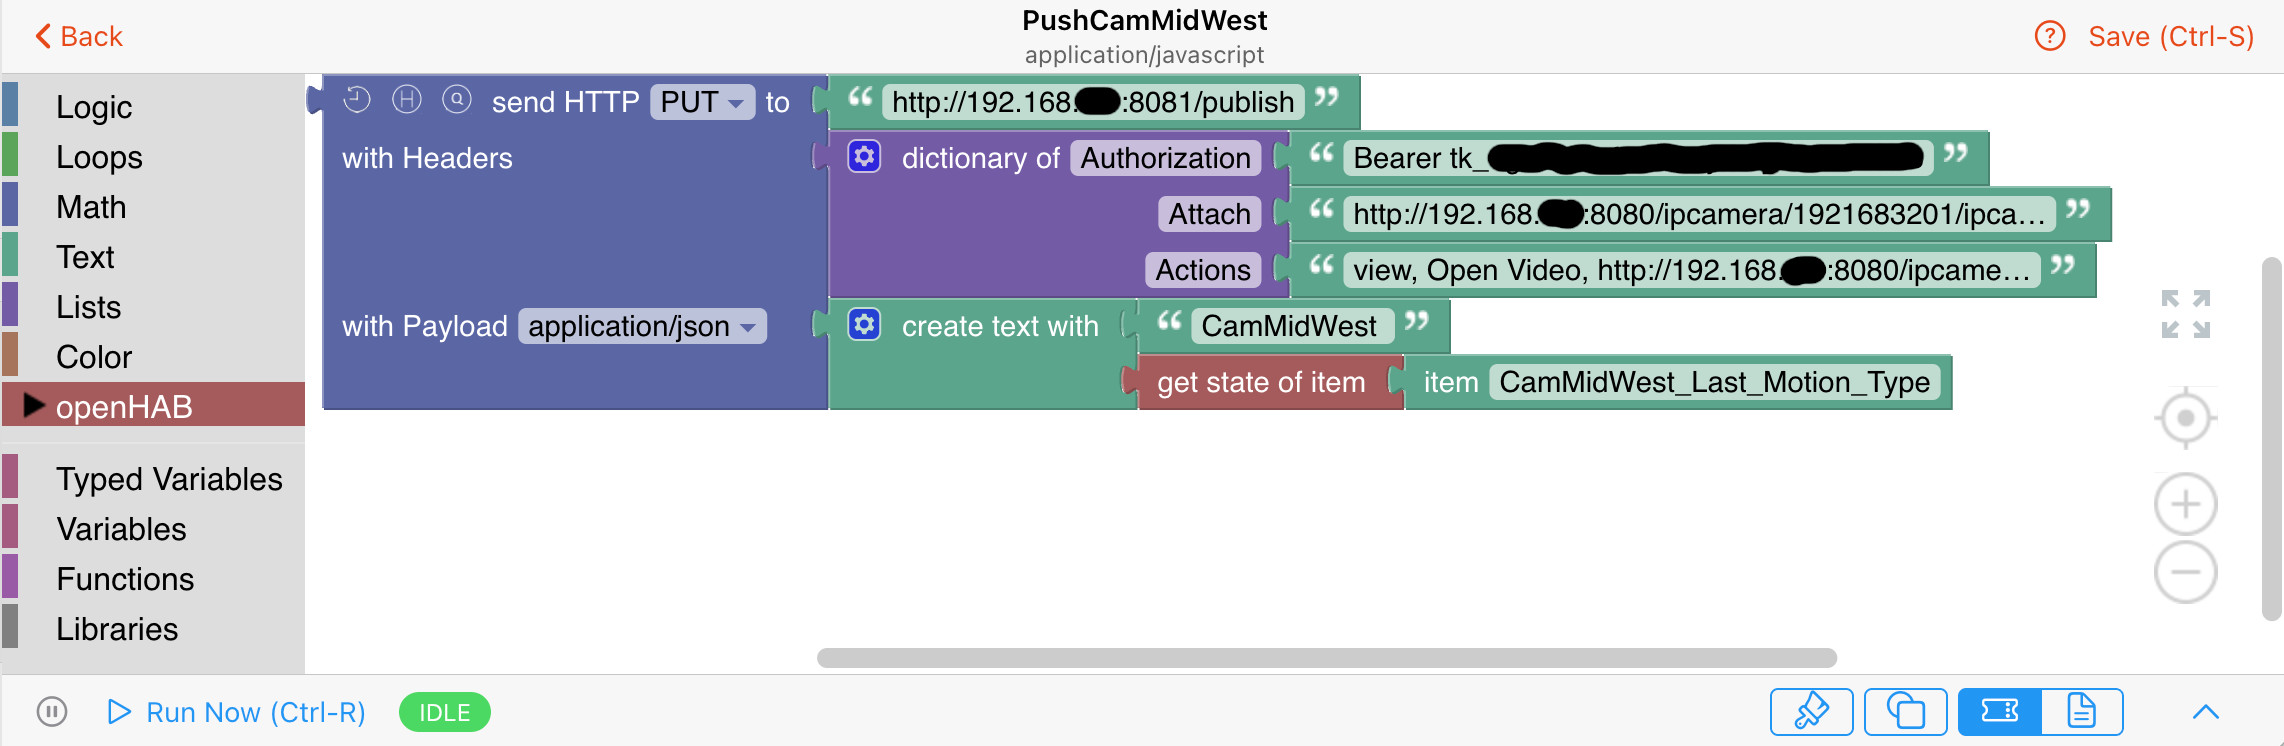
This lets you drag and drop chunks of connector to create a program which emits as YAML (and you can hand customise and edit that YAML at the same time, though changing the graphical representation may eat those YAML customisations sometimes). They are obviously trying to replicate VisualBasic from the 1990s, but it’s not quite that fluid nor intuitive. In particular, there is a steeper learning curve than it appears – I had to go search Google a fair few times to figure out how the drag-drop UI works in places. Above you can see a script which performs a HTTP PUT to Ntfy attaching a still from the camera, the last motion type, and an Action button to view the live video right now (which you saw appear in the Ntfy app screen shot above).
And yeah, that’s pretty much it for solving replacing the proprietary cloud services entirely. OpenWRT lets you firewall those devices off from the internet so you’re sure they can’t get out, but both Dahua and Sungrow let you toggle off the cloud push in their config as well. For now, I’ve left both systems running in parallel to ensure everything is working perfectly, and after a week both systems issue alerts in perfect synchronicity without one being delayed from the other etc.
Mobile phone battery consumption
I left the Ntfy app running on the Google Pixel 9 Pro for a day whilst doing nothing else with it, and according to the Google battery status ‘< 1%’ of battery gets used by the Ntfy Android app despite constantly running in the background. I then set up a timer to push messages at it to test its reliability. Every message was received, and it now reckons 1% of battery was consumed. This seems very acceptable, though this testing was exclusively done on Wifi.
I’ve since moved onto the Google Pixel 9 Pro as my main phone, so taking it out of the house and away from Wifi (also: when I’m in bed, the Pixel loses all Wifi and uses LTE – it has noticeably worse Wifi than the Samsung Galaxy S10 which sitting right beside it keeps a stable Wifi connection). Averaged over the past four days:
- From the system perspective: 76% of battery went on the mobile network, 8% on Wifi, 6% on screen, 3% on Camera, 3% on GPS.
- From the apps perspective: 23% went on the web browser, 12% went on WhatsApp, 3% went on Ntfy, 3% went on the Launcher, 3% went on the streaming radio app.
Between 4am and 6am when I was sleeping at my Dad’s house and it was 100% on LTE and I definitely wasn’t using the phone:
- From the system perspective: 54% of battery went on the mobile network, 26% on Wifi, 20% on GPS. Ouch!
- From the apps perspective: 22% went on WhatsApp, 15% went on the web browser, 8% went on Ntfy, everything else was < 1%. Also ouch!
It isn’t widely known that Meta supply an edition of WhatsApp which doesn’t require Google Play Services (here). This works by keeping an open web socket to Meta’s servers so it can receive push notifications. As you can see above, their implementation is nearly three times worse for power consumption than Ntfy’s, so I think I was right that Ntfy would have been heavily debugged and tweaked due to its large user base.
This past weekend I really needed WhatsApp to definitely be working, so I gave it unrestricted background operation permissions. As I won’t need it to definitely be working these next few days, I’ve enabled background usage optimisation going forth and we’ll see what that might do about WhatsApp chewing down so much battery.
The amount spent on Wifi when there is no known Wifi available is disappointing. It obviously is constantly scanning. I wonder if that is related to the high GPS consumption? Something might be constantly requesting the current location, which then uses the current Wifi environment and GPS. I found that the weather app was refetching the weather every ninety minutes – I’ve now changed that to every six hours, and we’ll see if that improves things.
Finally, I’ll also need to do something I think about the web browser as that power consumption is unacceptable, and I’ve now removed GPS access permissions from everything bar OsmAnd and Google Maps. I’ll keep monitoring battery consumption and keep at the tuning – the default battery consumption for GrapheneOS is one of the biggest complaints by new users on its issue tracker, but the old hands say a great deal can be done by tweaking configuration, so we’ll see how that goes.
What’s next?
I expect to write the article comparing the Google Pixel 9 Pro and my previous Samsung Galaxy S10 when I get back from my trip to Spain in October. Whilst in Spain, I intend to fully test the new phone, see how it holds up. I may get the article comparing my new watch to my old watch done this week, but I have a very full week ahead of me this week, so it’s entirely possible it’ll have to get pushed to after Spain.
In fact, I’ve been working so hard on burning down the chores and todo lists that Megan actually ordered me to take a lie in last week, which I turned out to have sorely needed as I had been getting six or seven hours of sleep nightly as I’ve been working so hard. I guess that’s the fortunate thing about unemployment – motivating yourself to burn through your own personal todo list is a lot easier than motivating yourself to do somebody else’s todo list for money. Because your own todo lists are worth more to you personally, you find yourself really going at them all day long every day without even often pausing for food.
On the one hand, long may the todo list burndown last! On the other hand, restoring financial income would be rather handy too.
| Go to previous entry | Go to next entry | Go back to the archive index | Go back to the latest entries |