Word count: 1527. Estimated reading time: 8 minutes.
- Summary:
- The timber frame supplier’s queue has been stalled, and the house build has made no progress for three weeks. Meanwhile, a 1:200 scale model of the site was printed using an Anycubic Kobra Go printer, and a full-size print of the main house is being prepared for a commercial online printer.
Saturday 1 June 2024: 20:07.
- Summary:
- The timber frame supplier’s queue has been stalled, and the house build has made no progress for three weeks. Meanwhile, a 1:200 scale model of the site was printed using an Anycubic Kobra Go printer, and a full-size print of the main house is being prepared for a commercial online printer.
I also finally got round to teaching myself how to use the design software for 3D printers which was another item long existing in my todo list. You may remember about eighteen months ago I picked up an Anycubic Kobra Go from the Aliexpress Singles Day sales which had impressive print quality for a printer under €200 delivered. I must be honest, since I printed a bunch of test prints and several ESP32 board brackets, I confess that I haven’t used it since, as I needed to go learn how the design software works.
It took a few nights of practice, but I’m now semi-useful with Autodesk MeshMixer, which was a free of cost 3D mesh editor. I say ‘was’ because when Autodesk realised 3D printing was no longer a hook for getting hobbyists into its wider software portfolio, they discontinued MeshMixer replacing it with a commercial alternative which many say isn’t as good. One can still find the installers for MeshMixer around, and yeah for a free of cost piece of software I would agree it is very good, a cut well above most free of cost software. It does have a fair learning curve, but I climbed it with a bit of effort.
Anyway seeing as there is zero forward progress on the house, the obvious thing to do is to print the house! My architect supplied me the current plans in STL format which is a straight export from his CAD program. I then used MeshMixer to edit down his original into something printable.
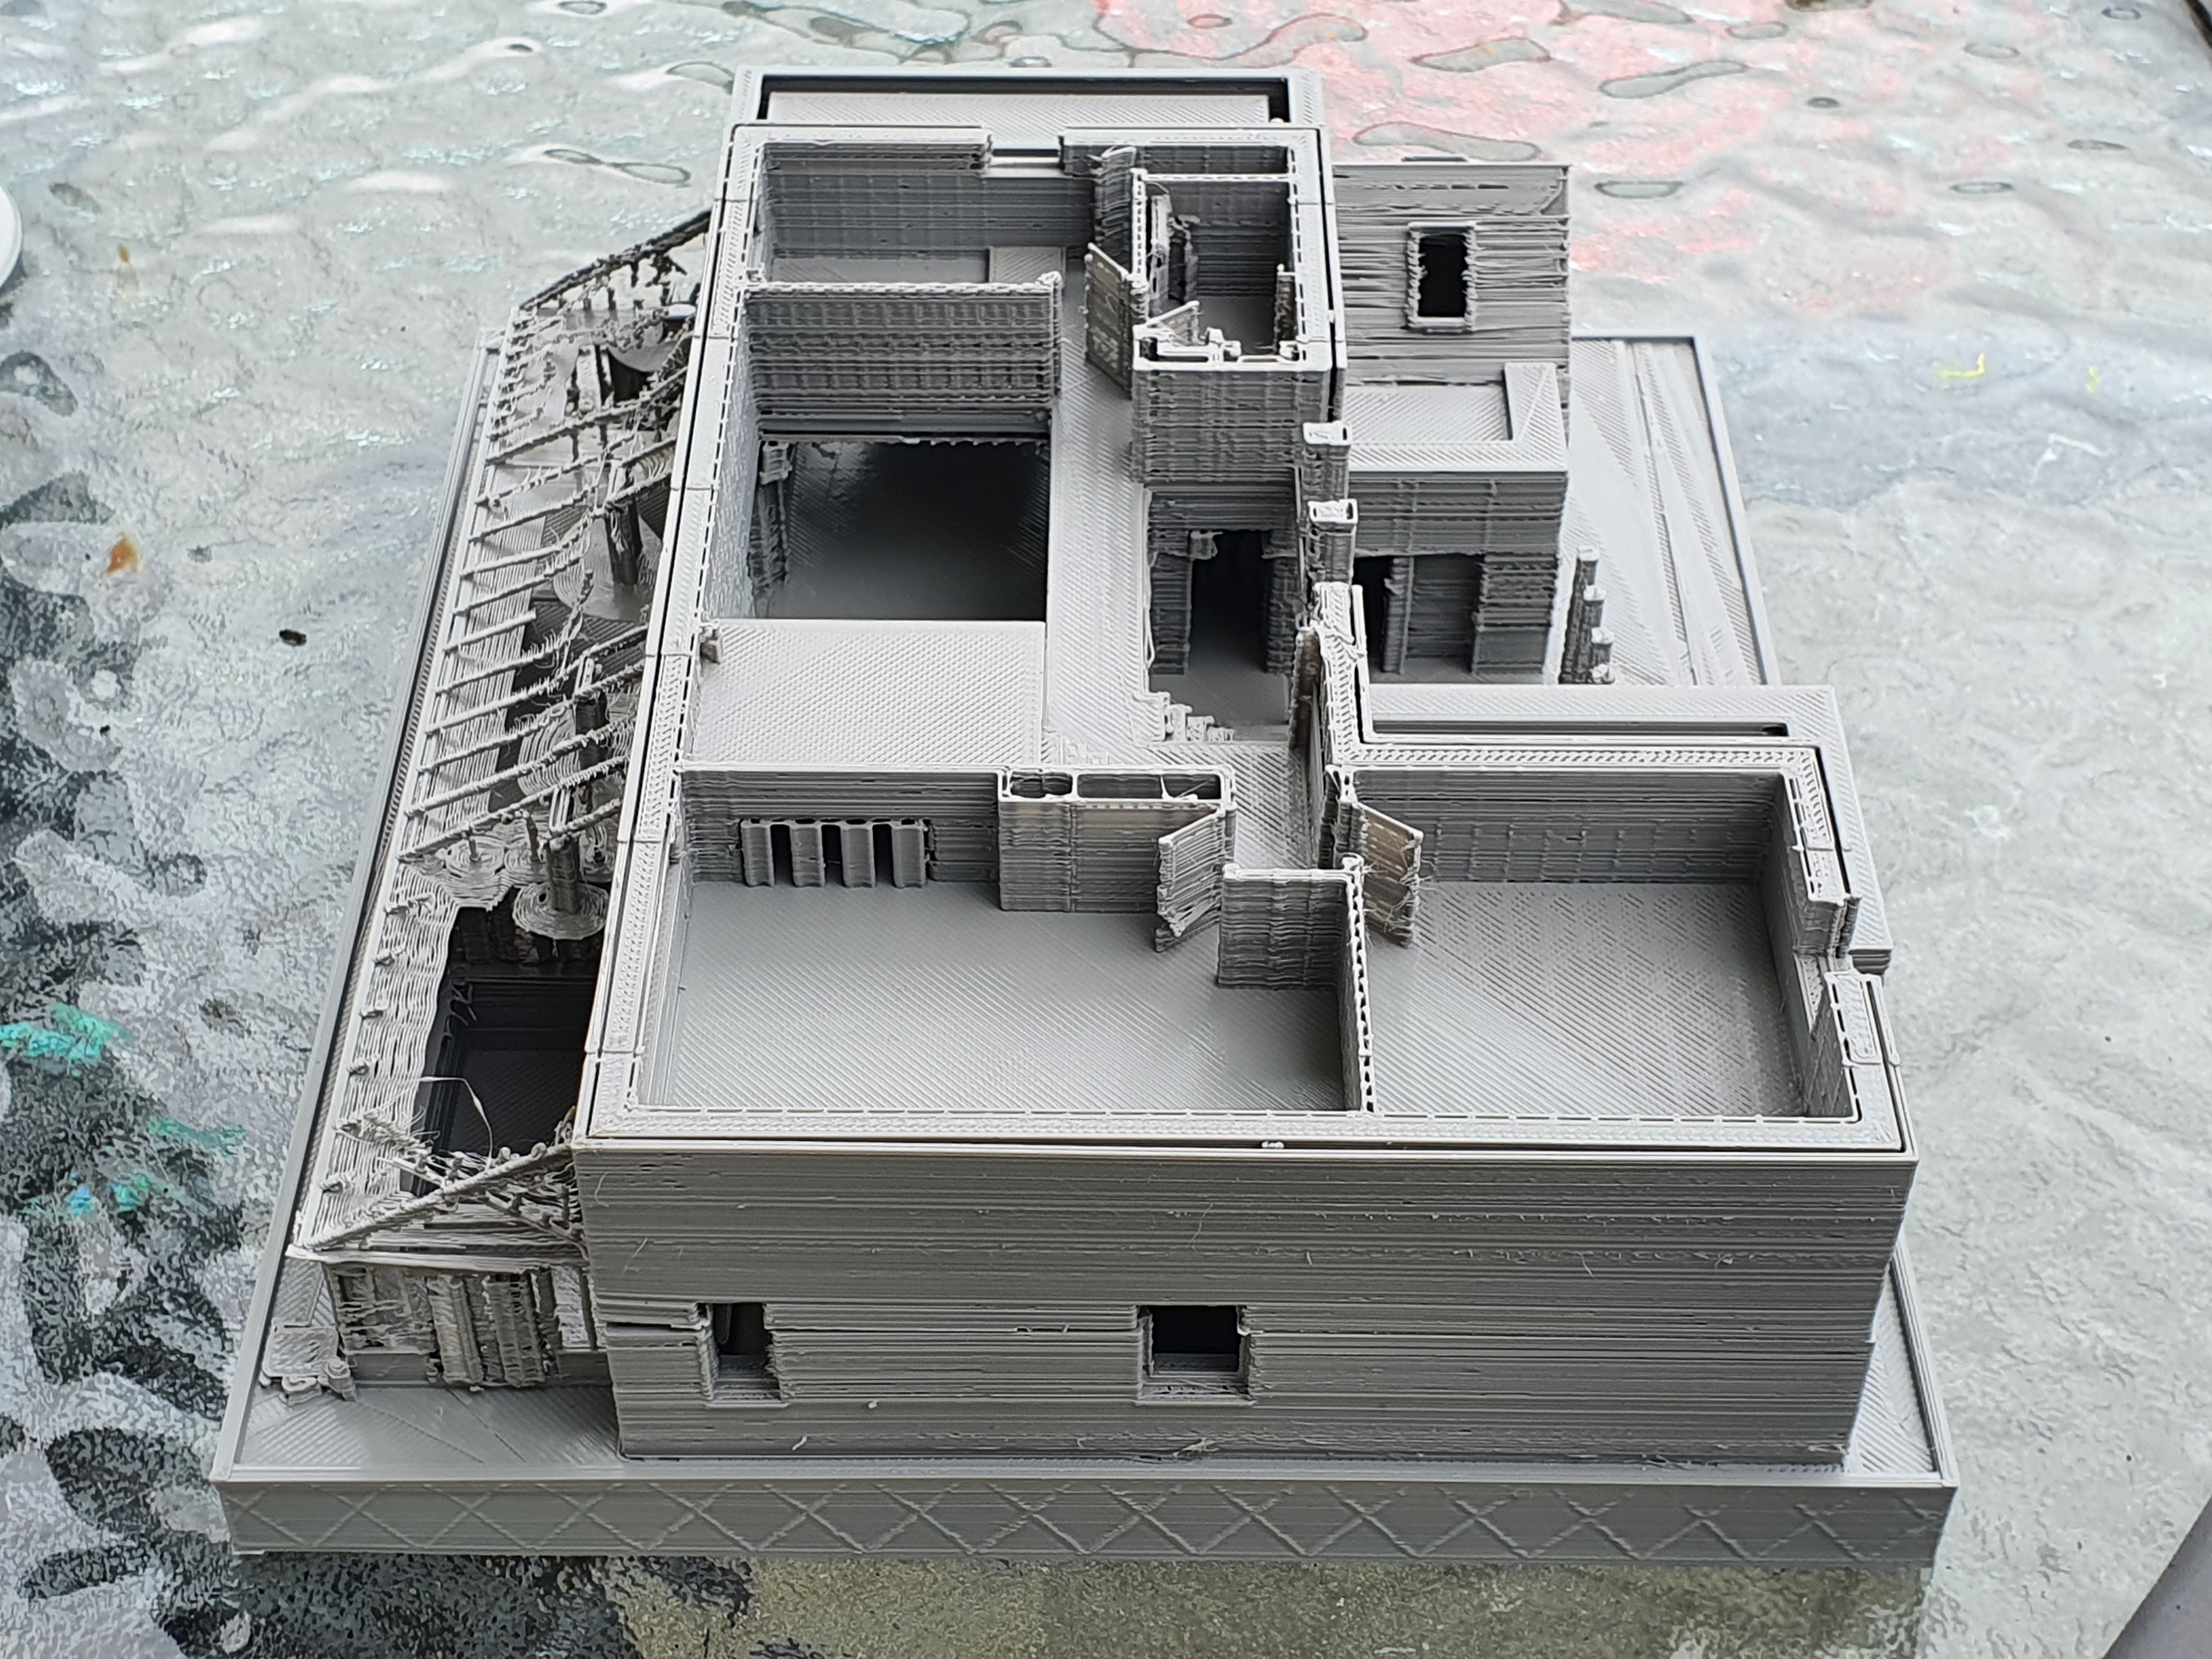
The Anycubic Kobra can do a maximum print of 200 x 200 x 240 mm, so I extracted just the site from the plans into a 200 mm width print which is approximately a 1:200 scale model of the whole site. I chopped the model vertically into three bits, so you can remove the roofs and first floor to see the rooms inside. I sliced it with Cura, and printed it using Hatchbox cool grey PLA which is a mid-range PLA filament costing about €25 with a good reputation online for being easy to print with, as printing a model this complex at the maximum size of the printer is a big ask for any hobbyist printer. I think you’ll agree it did a great job:

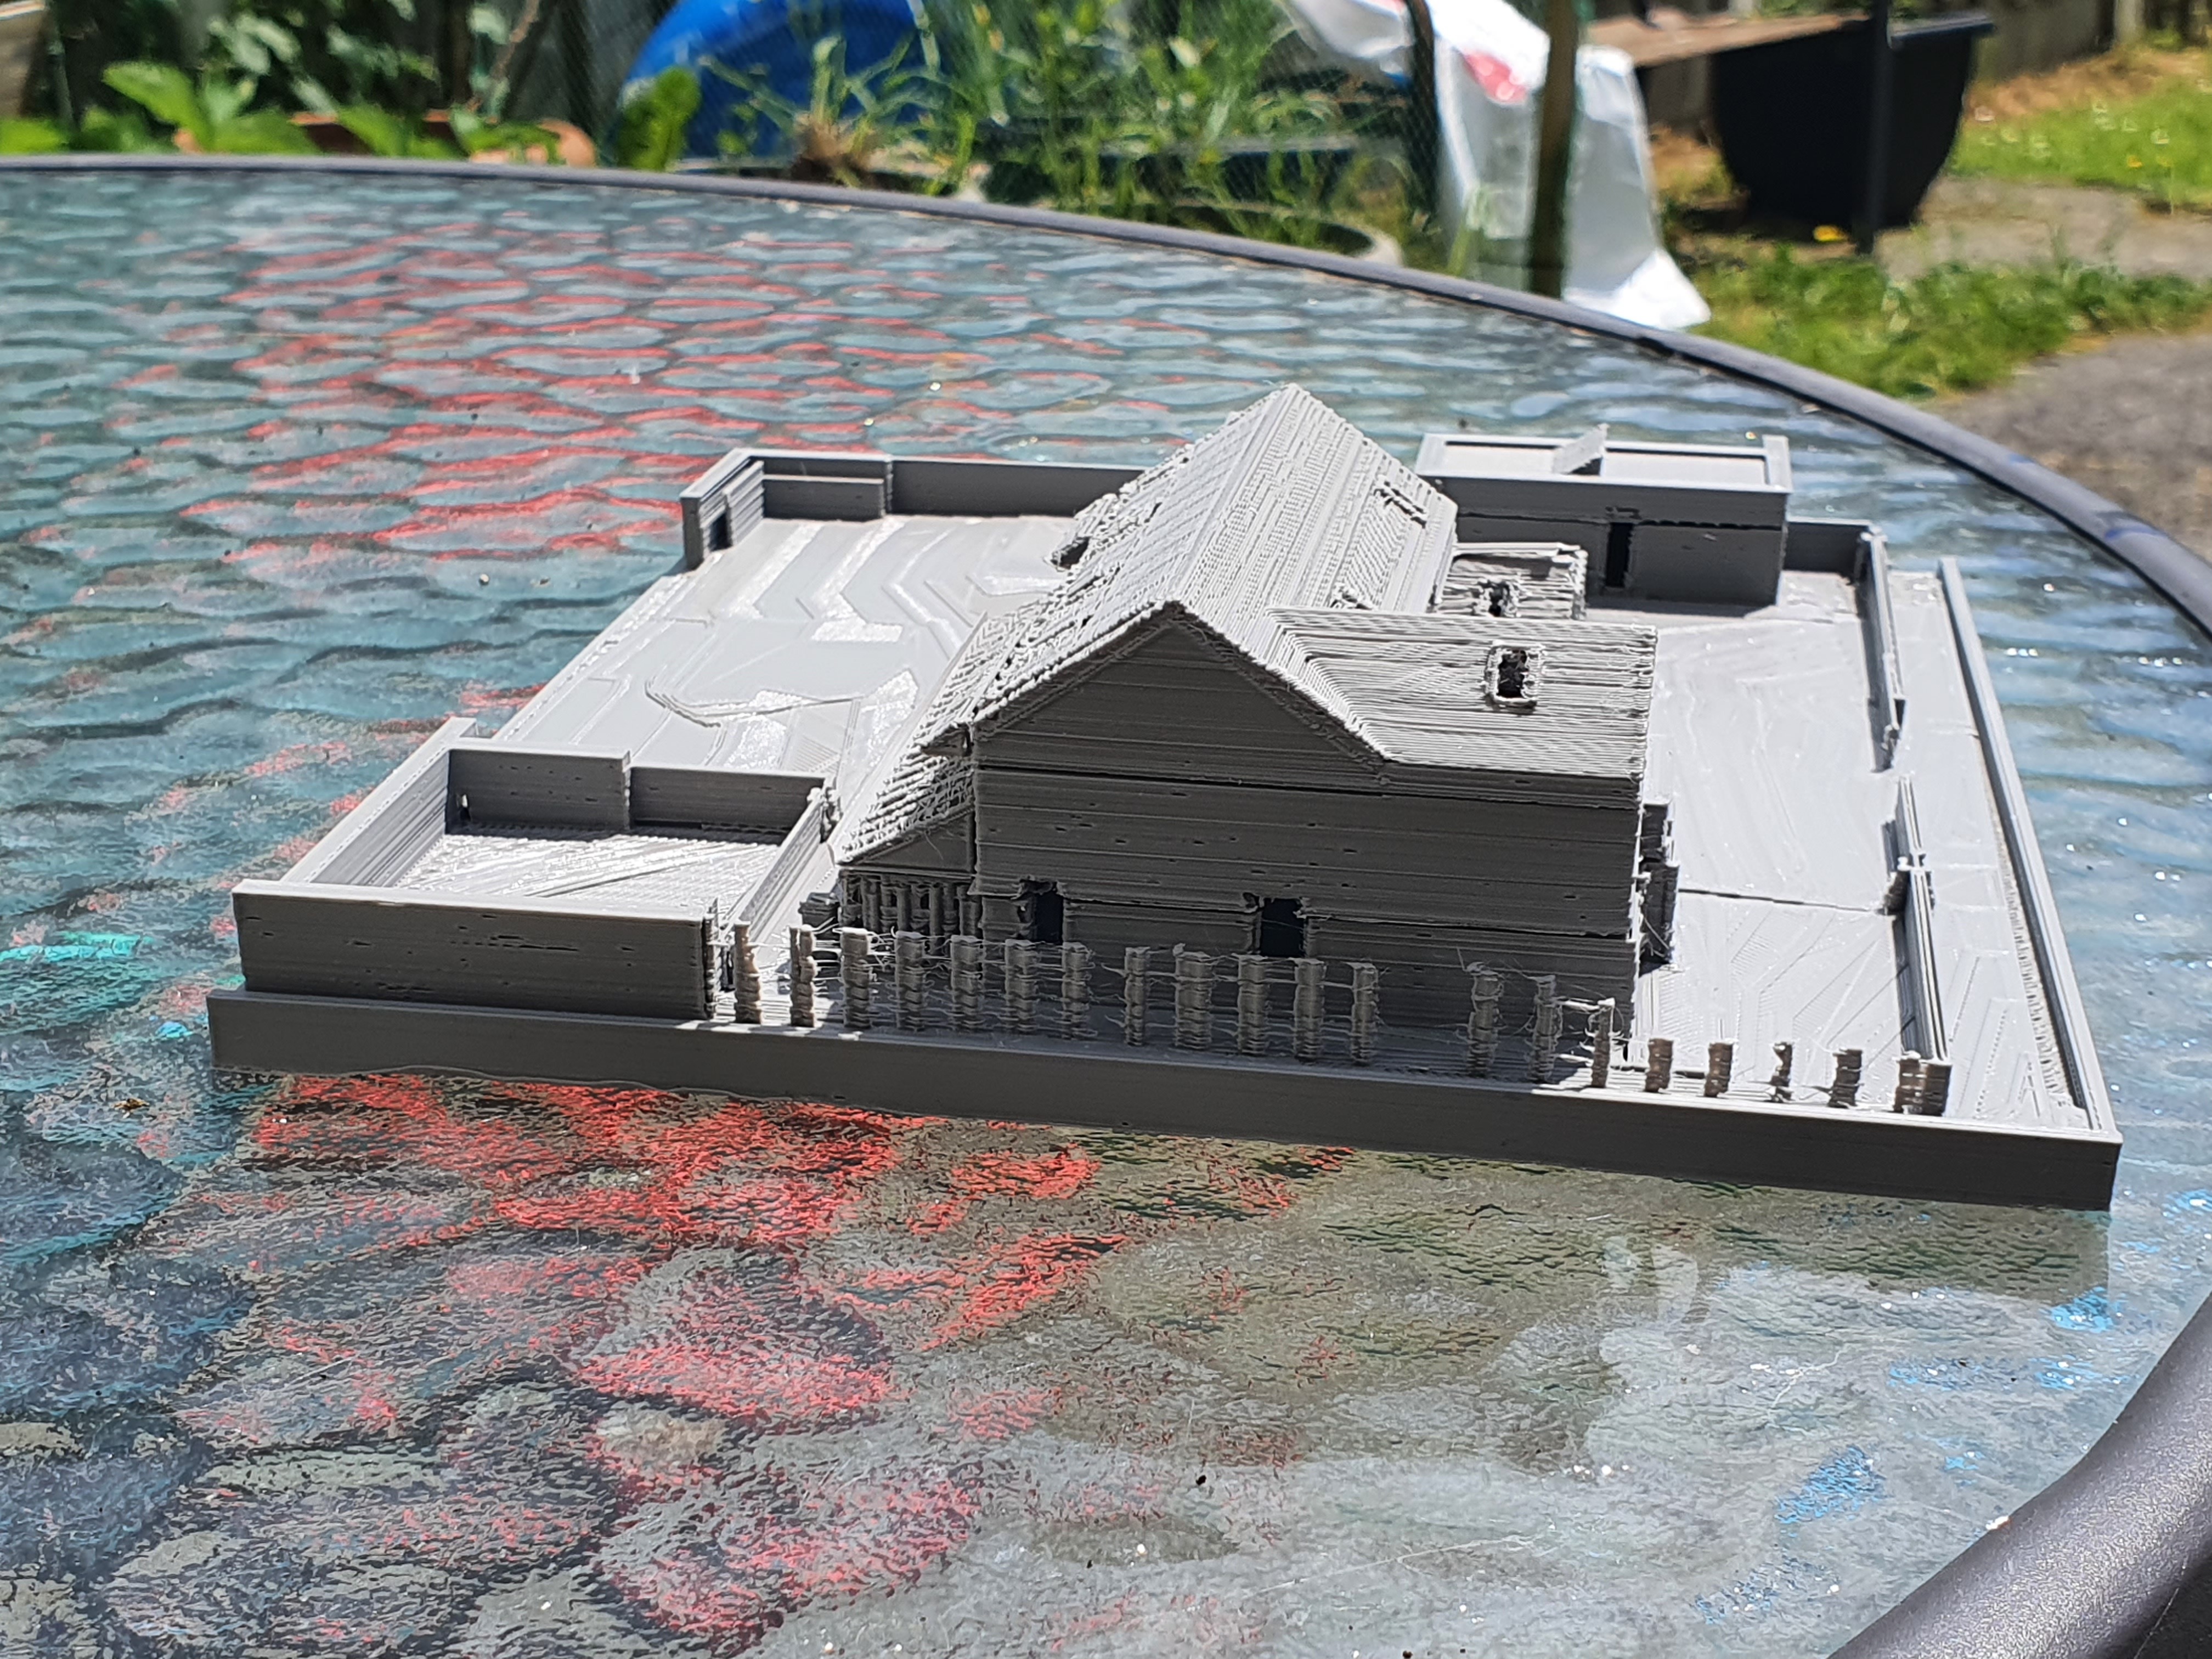
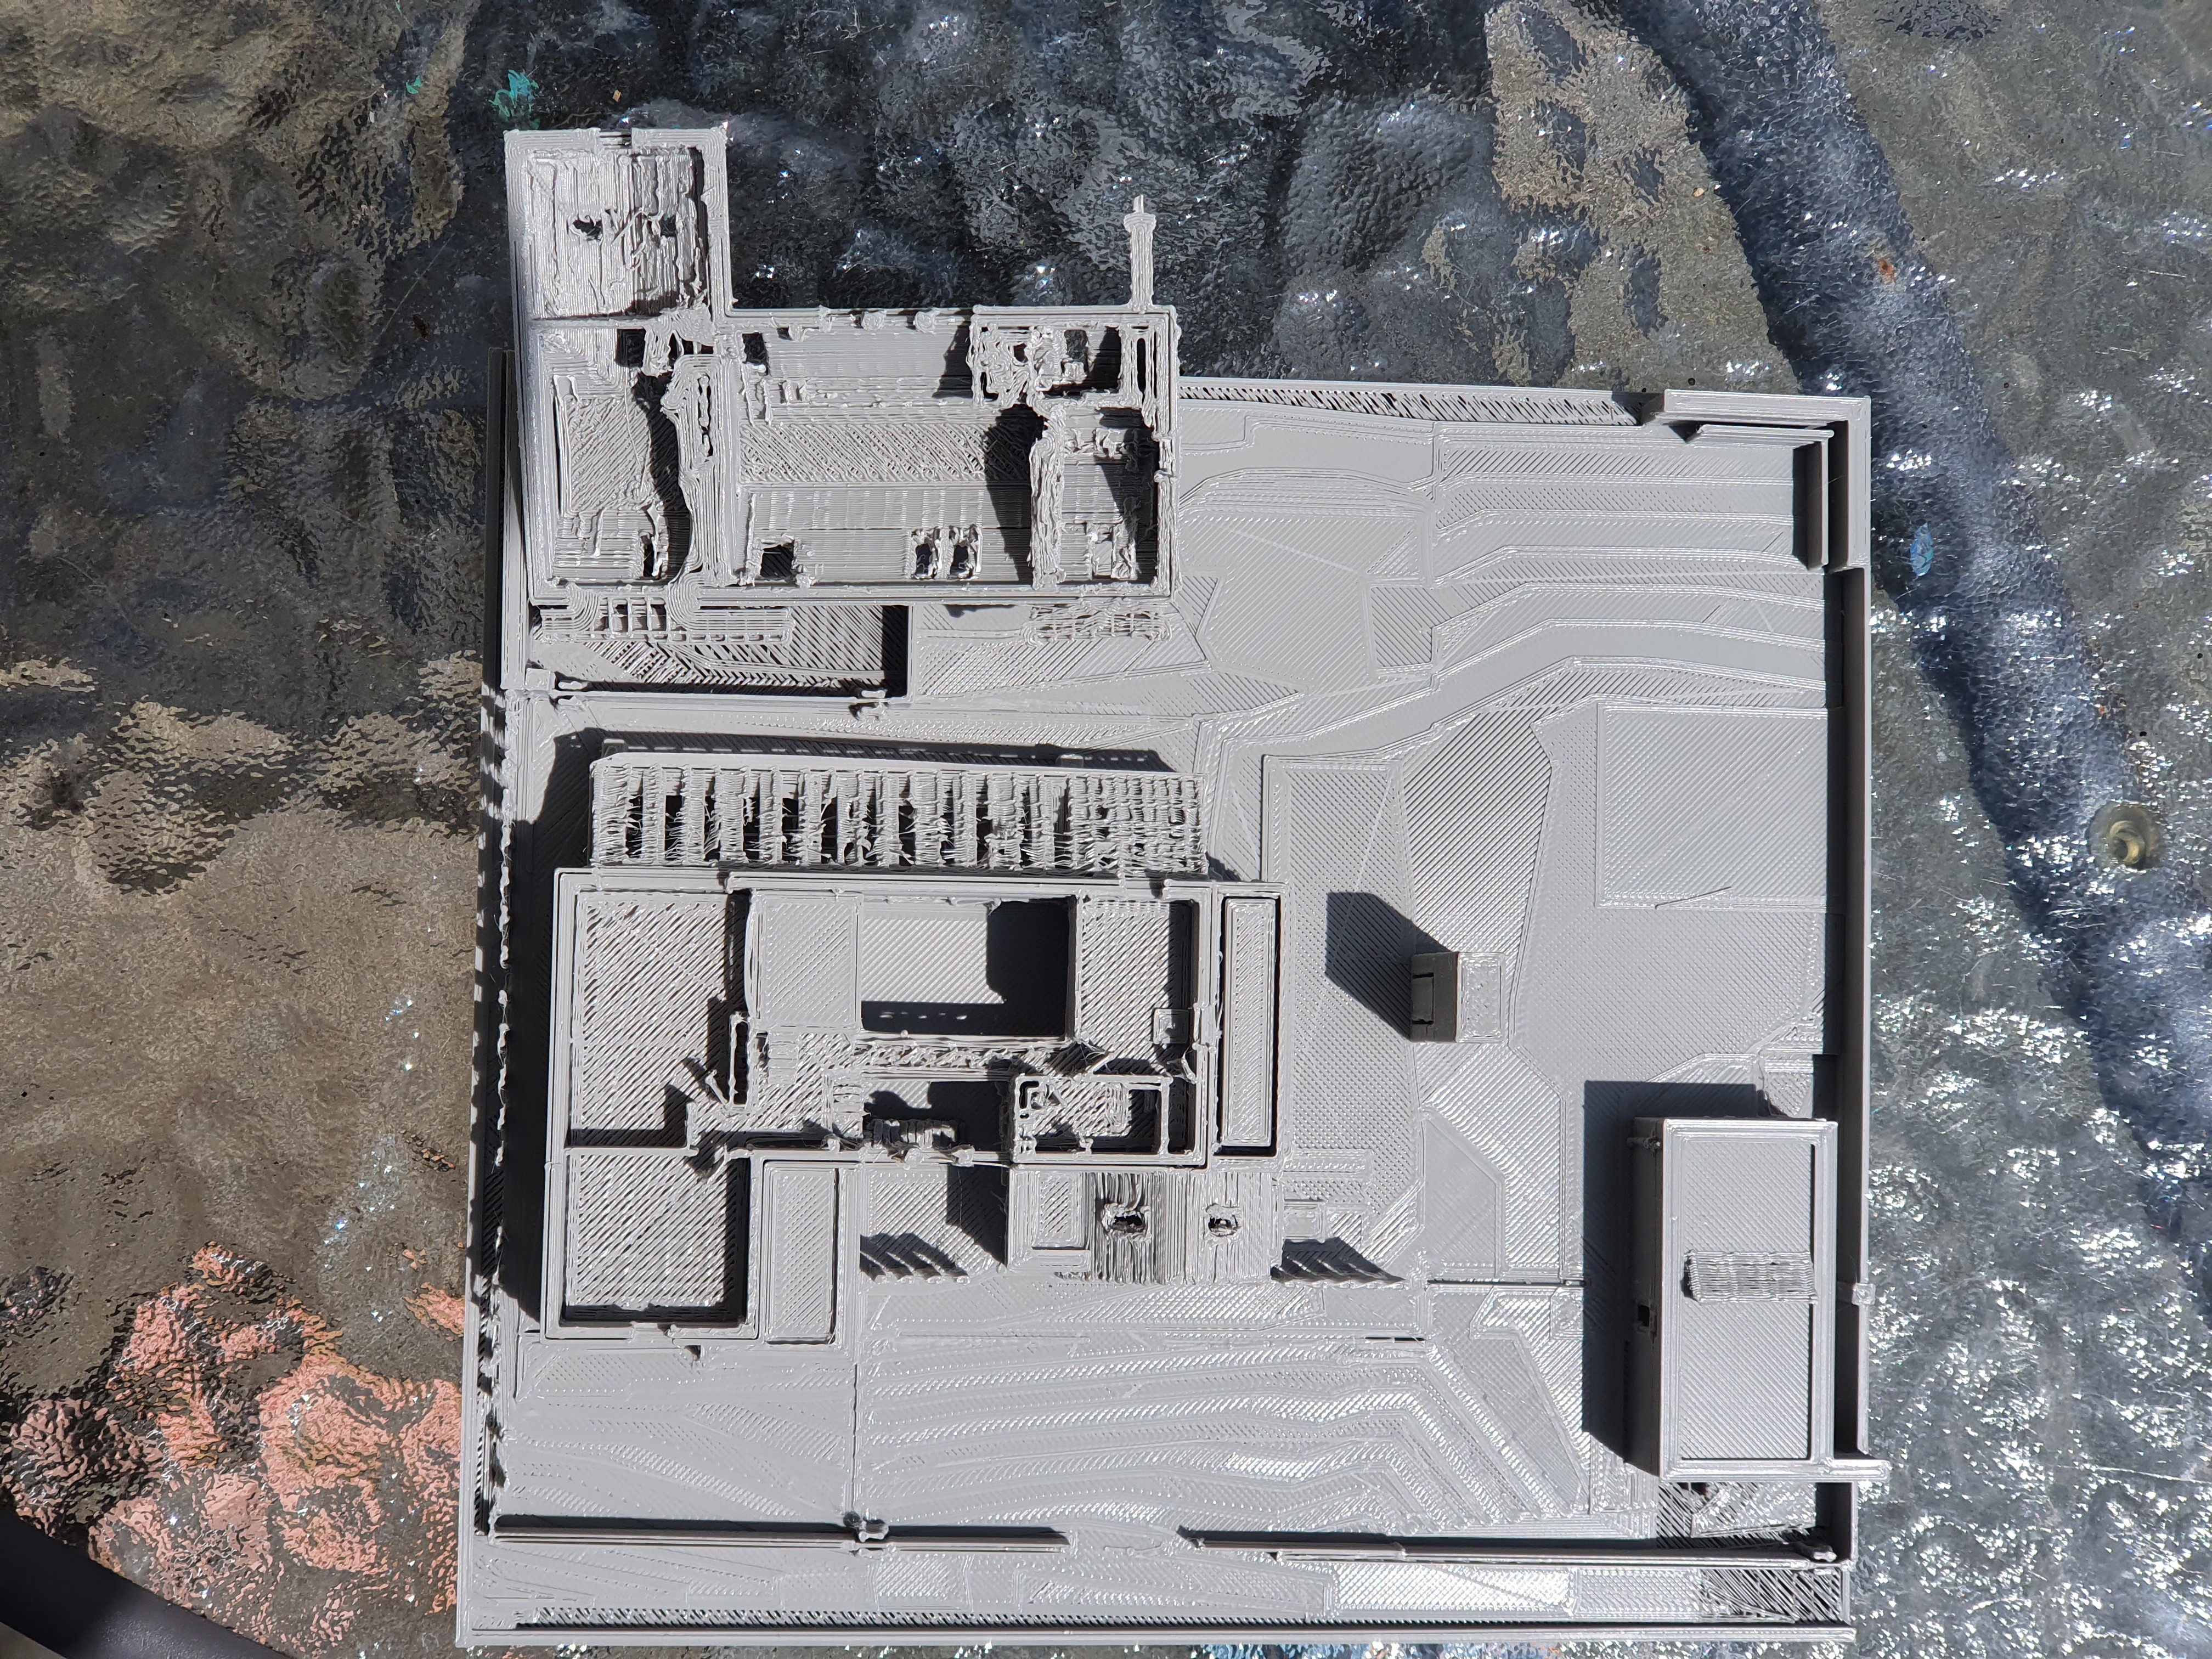
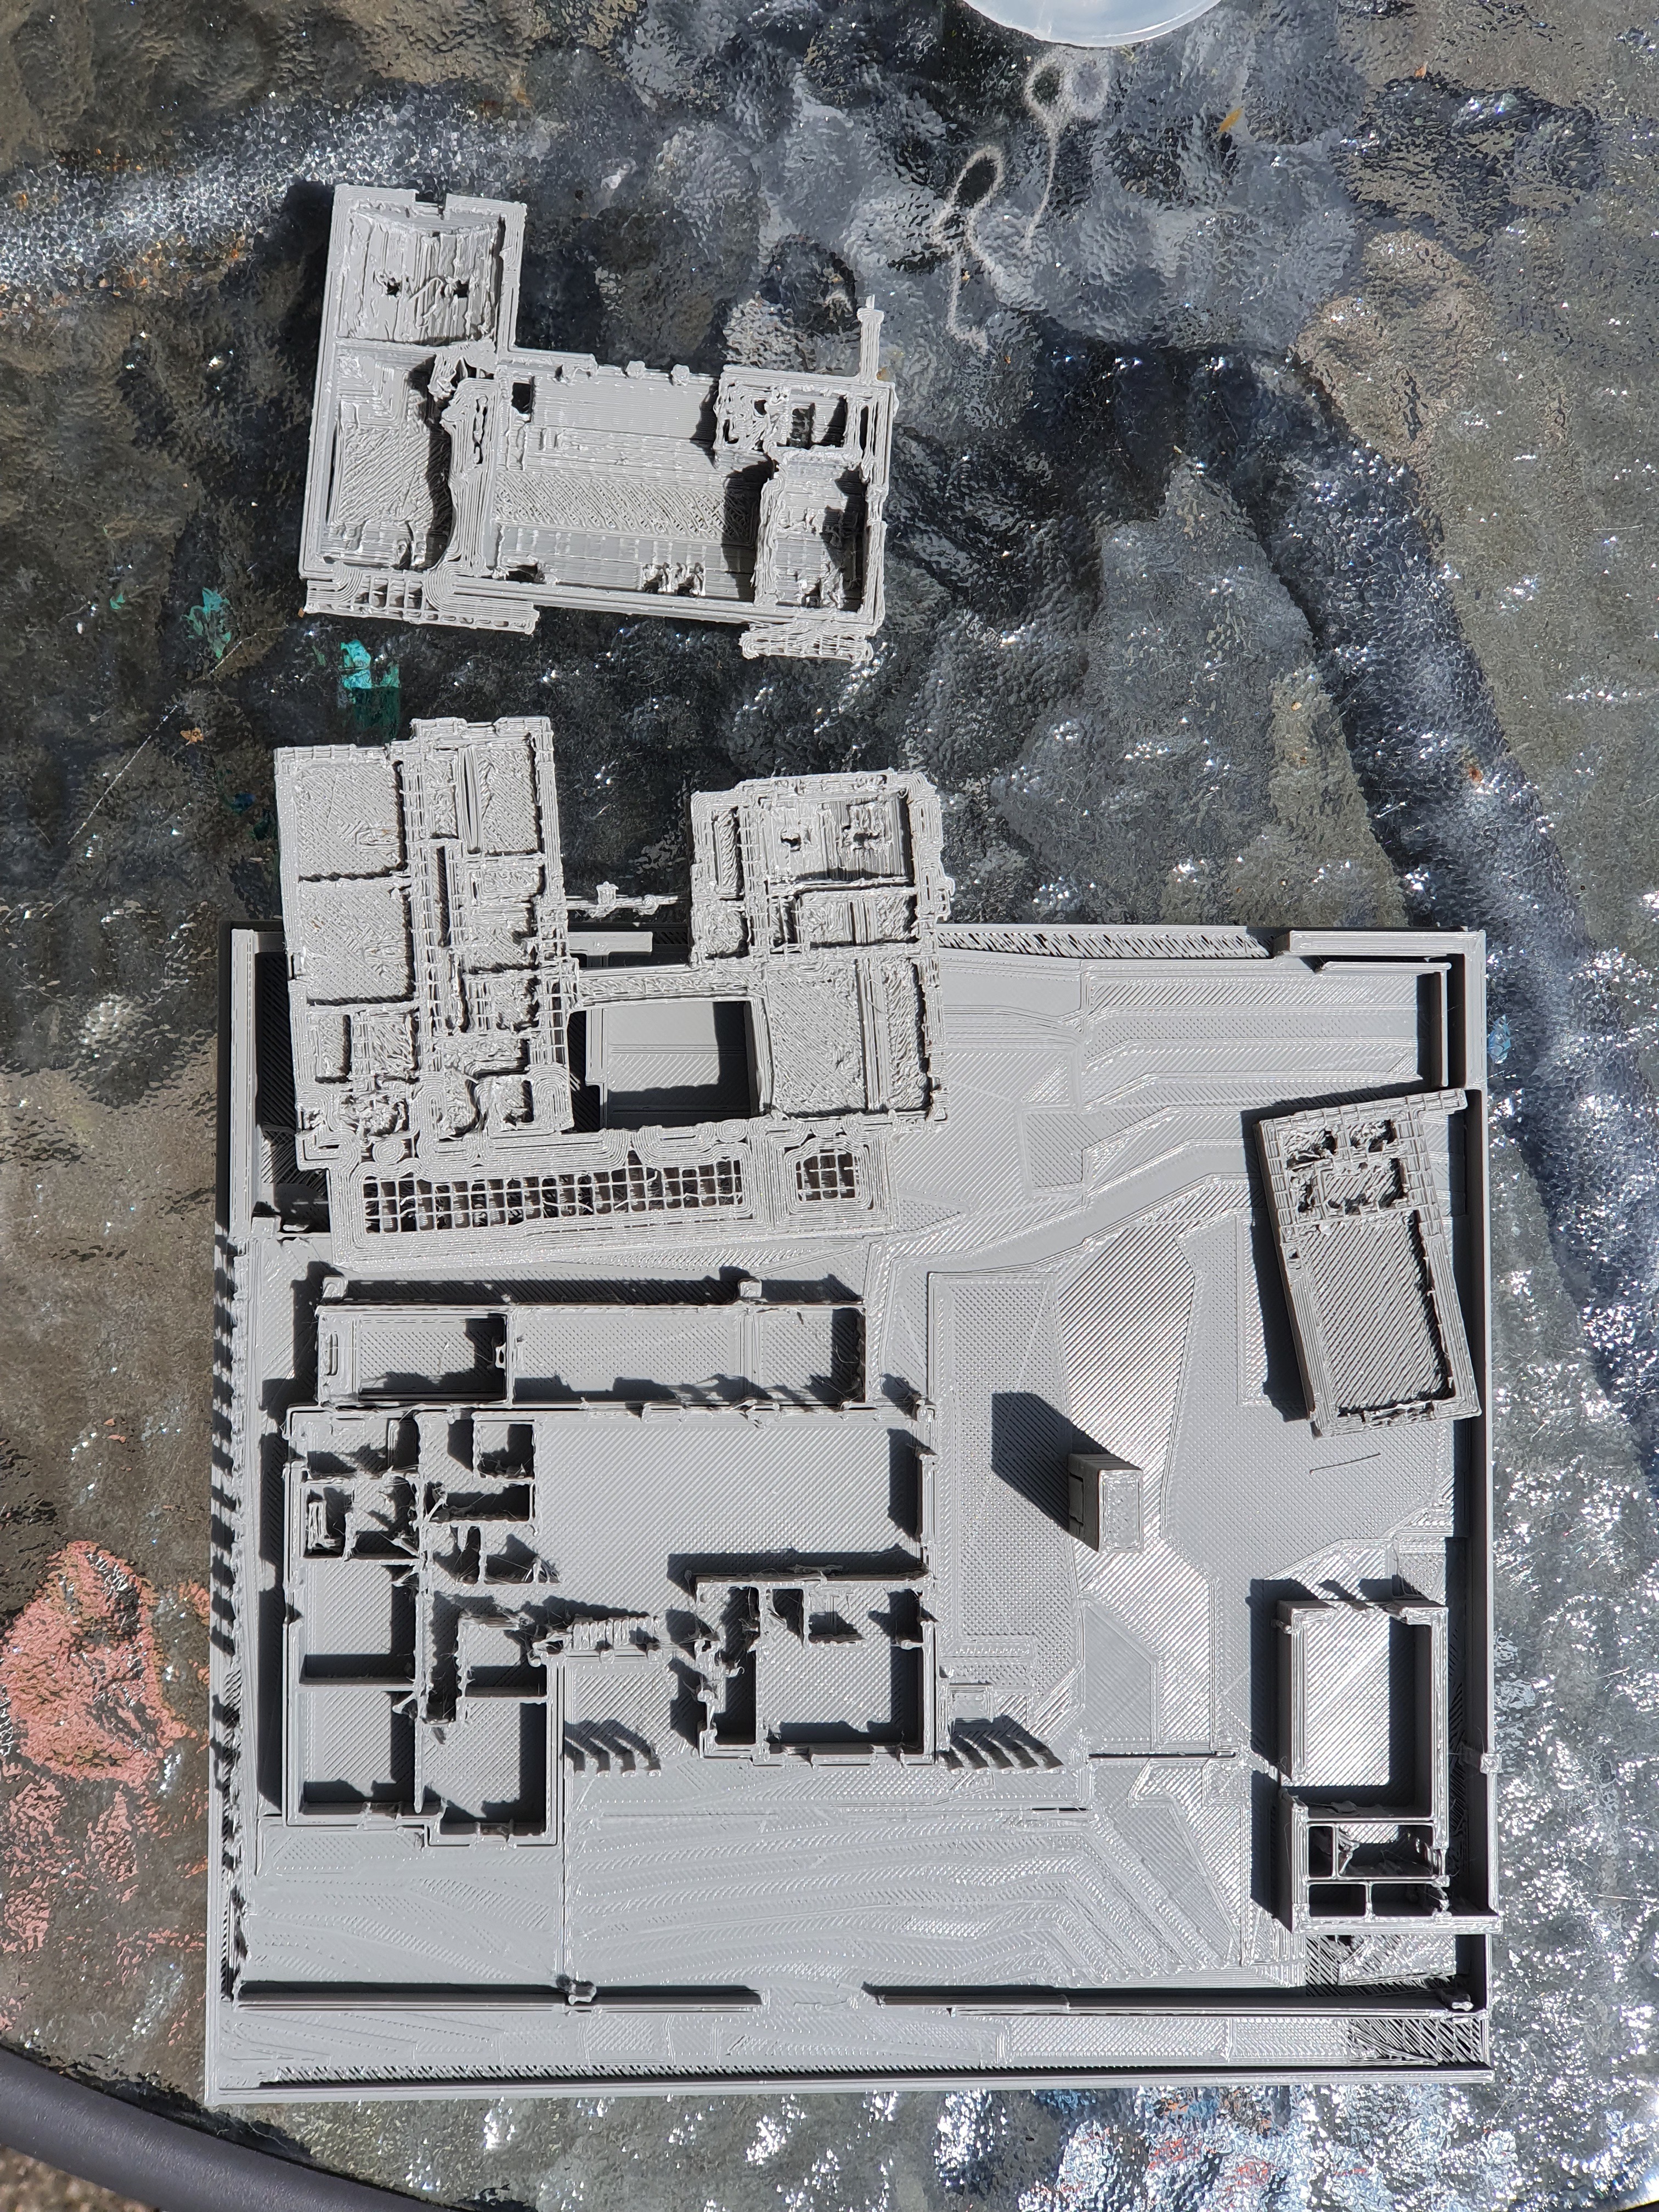
I had forgotten about the bed slinging affecting the Y-quality, so as is very obvious from the front of the house there was some wobble. The resolution is a bit coarse, for strength I required a minimum of three extrusions per thing, which means a granularity of 1.2 mm as the printer’s head is 0.4 mm. To get a four day print, I had the printer on maximum speed, which added to the roughness. I also made a bunch of mistakes in the mesh, the bottom right of the footpath and the bottom of the walled garden barely have a surface on them. I also had bed adhesion issues towards the top right of the print, I think the printer’s bed isn’t proper temperature up there as it’s a repeated issue.
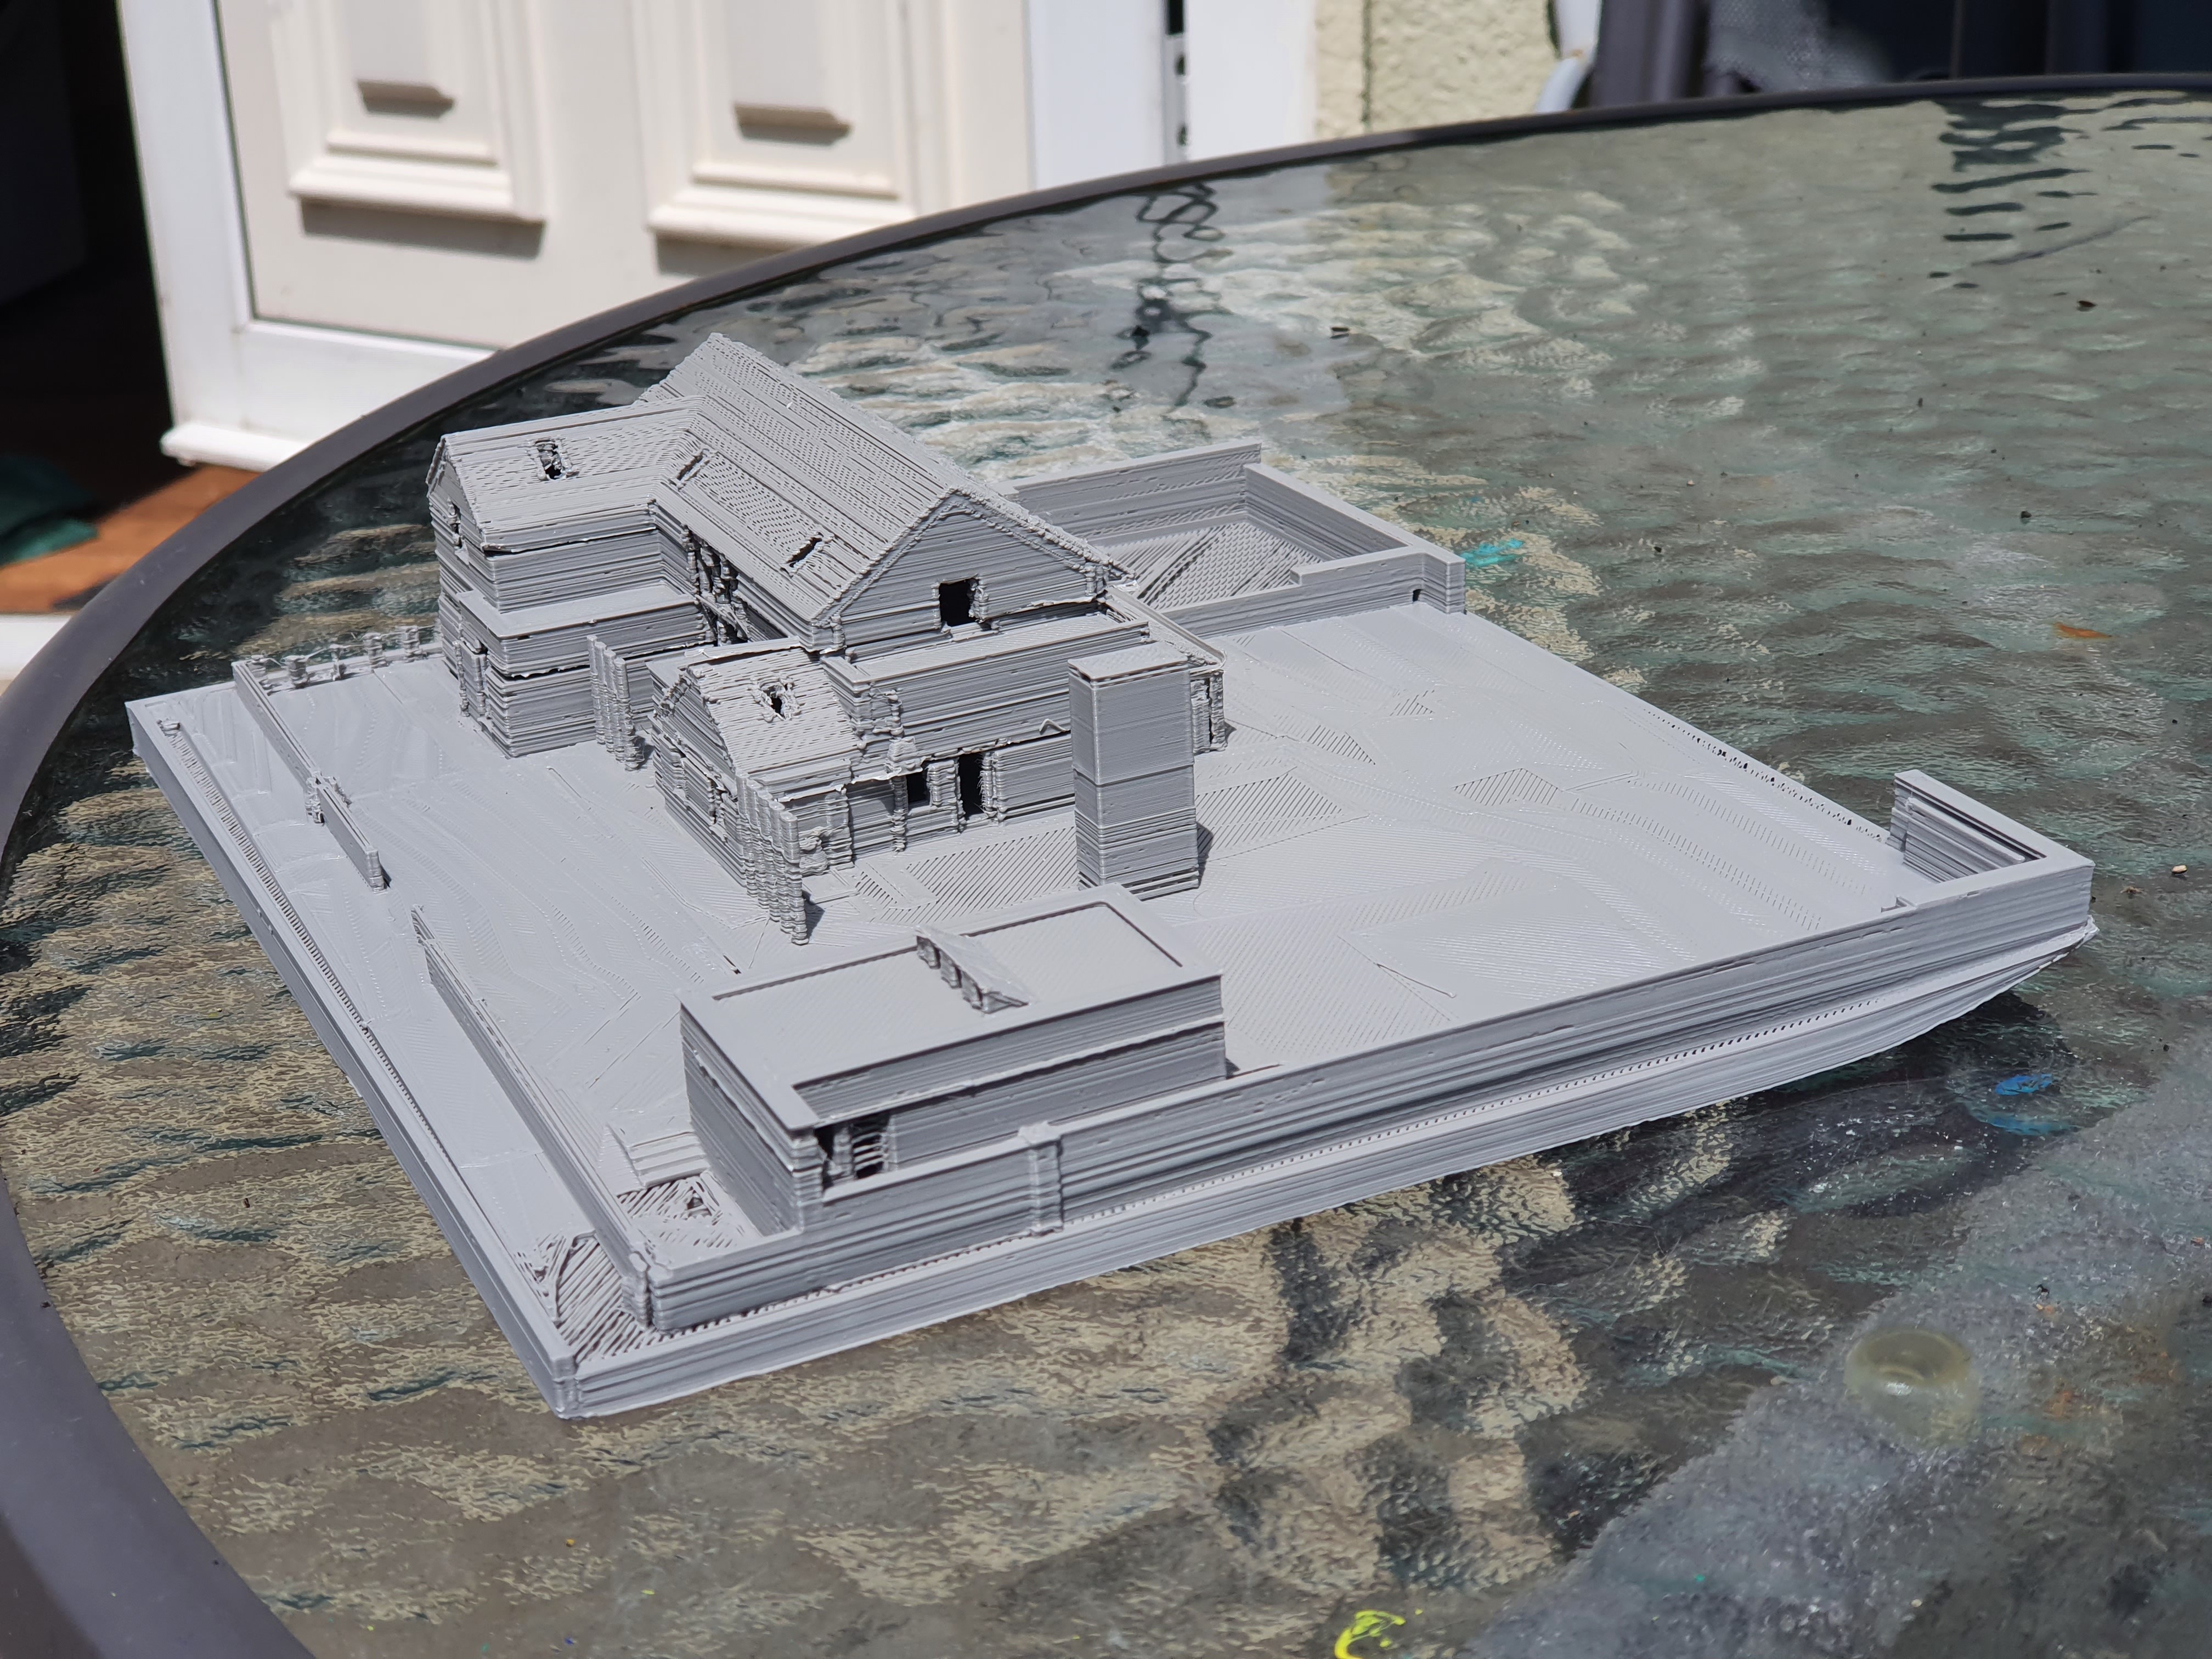
The next logical step now beckoned: printing the main house at the full 200 mm size possible AND at the minimum possible 0.4 mm detail size. This is a very, very difficult print. Every timber stud will be printed. Every joist will be printed. The cavity between the outer block leaf and the timber frame will be printed. Even the ventilation pipes and where they exit and enter rooms will be printed.
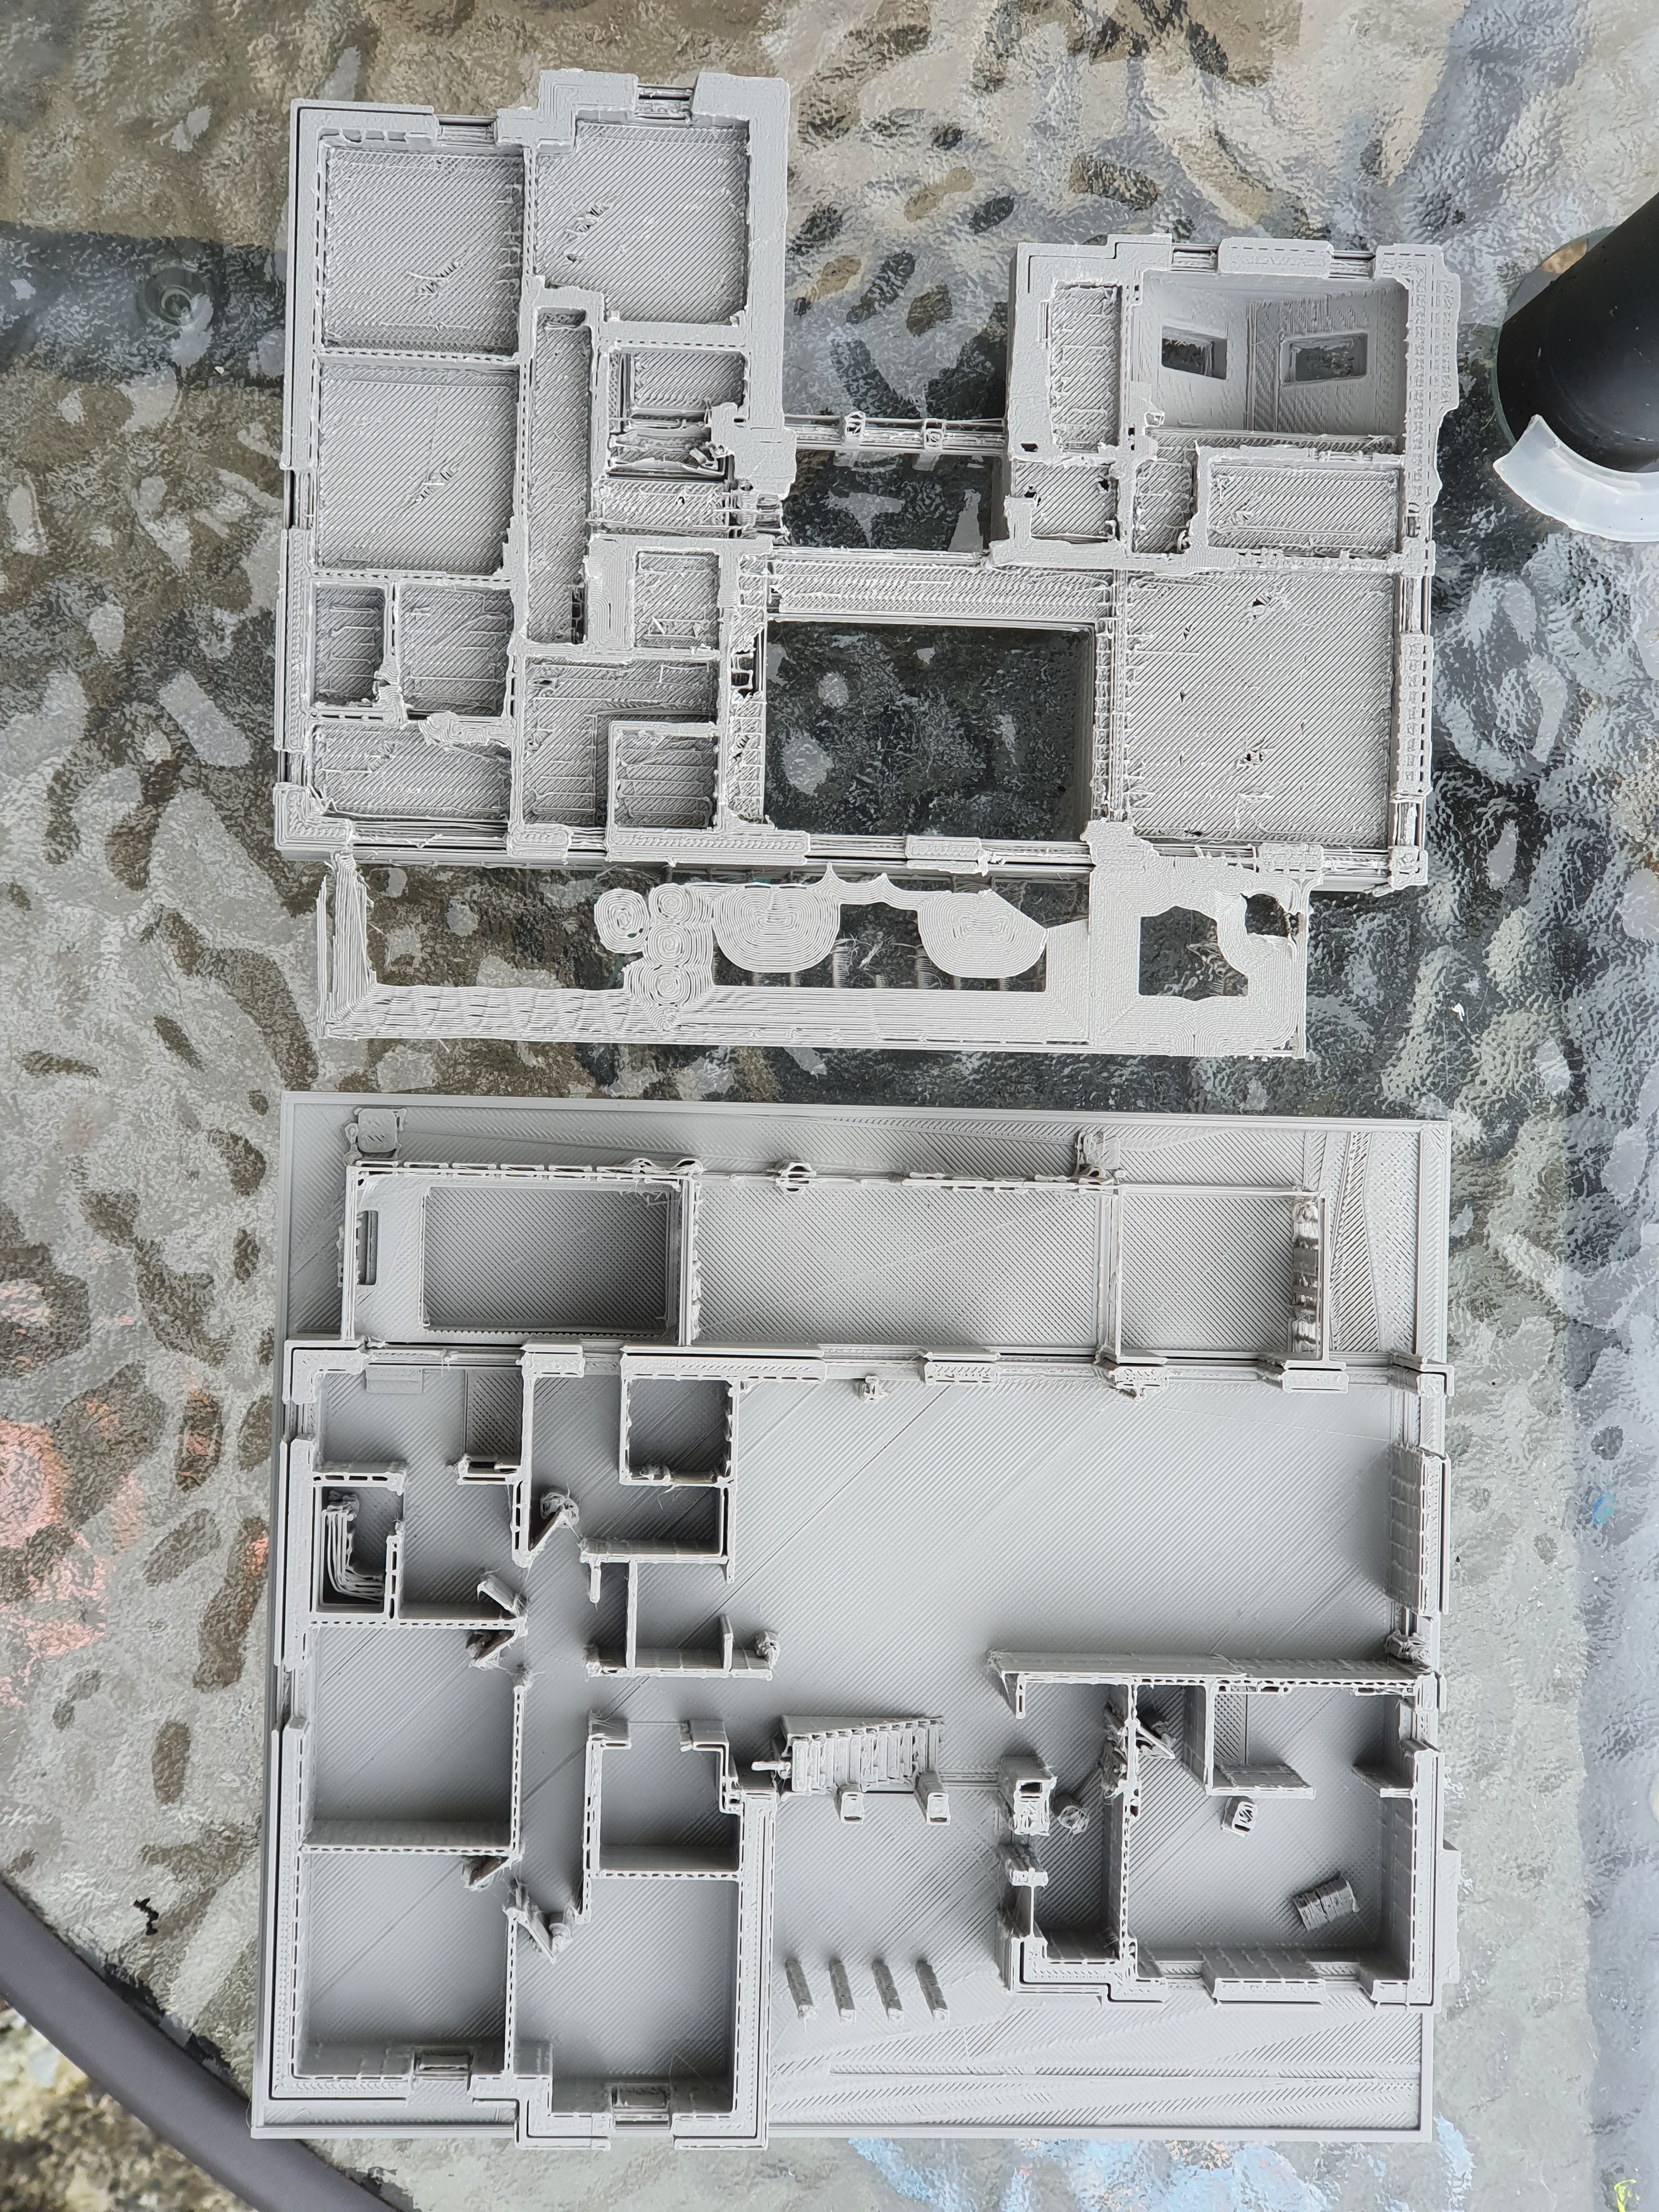
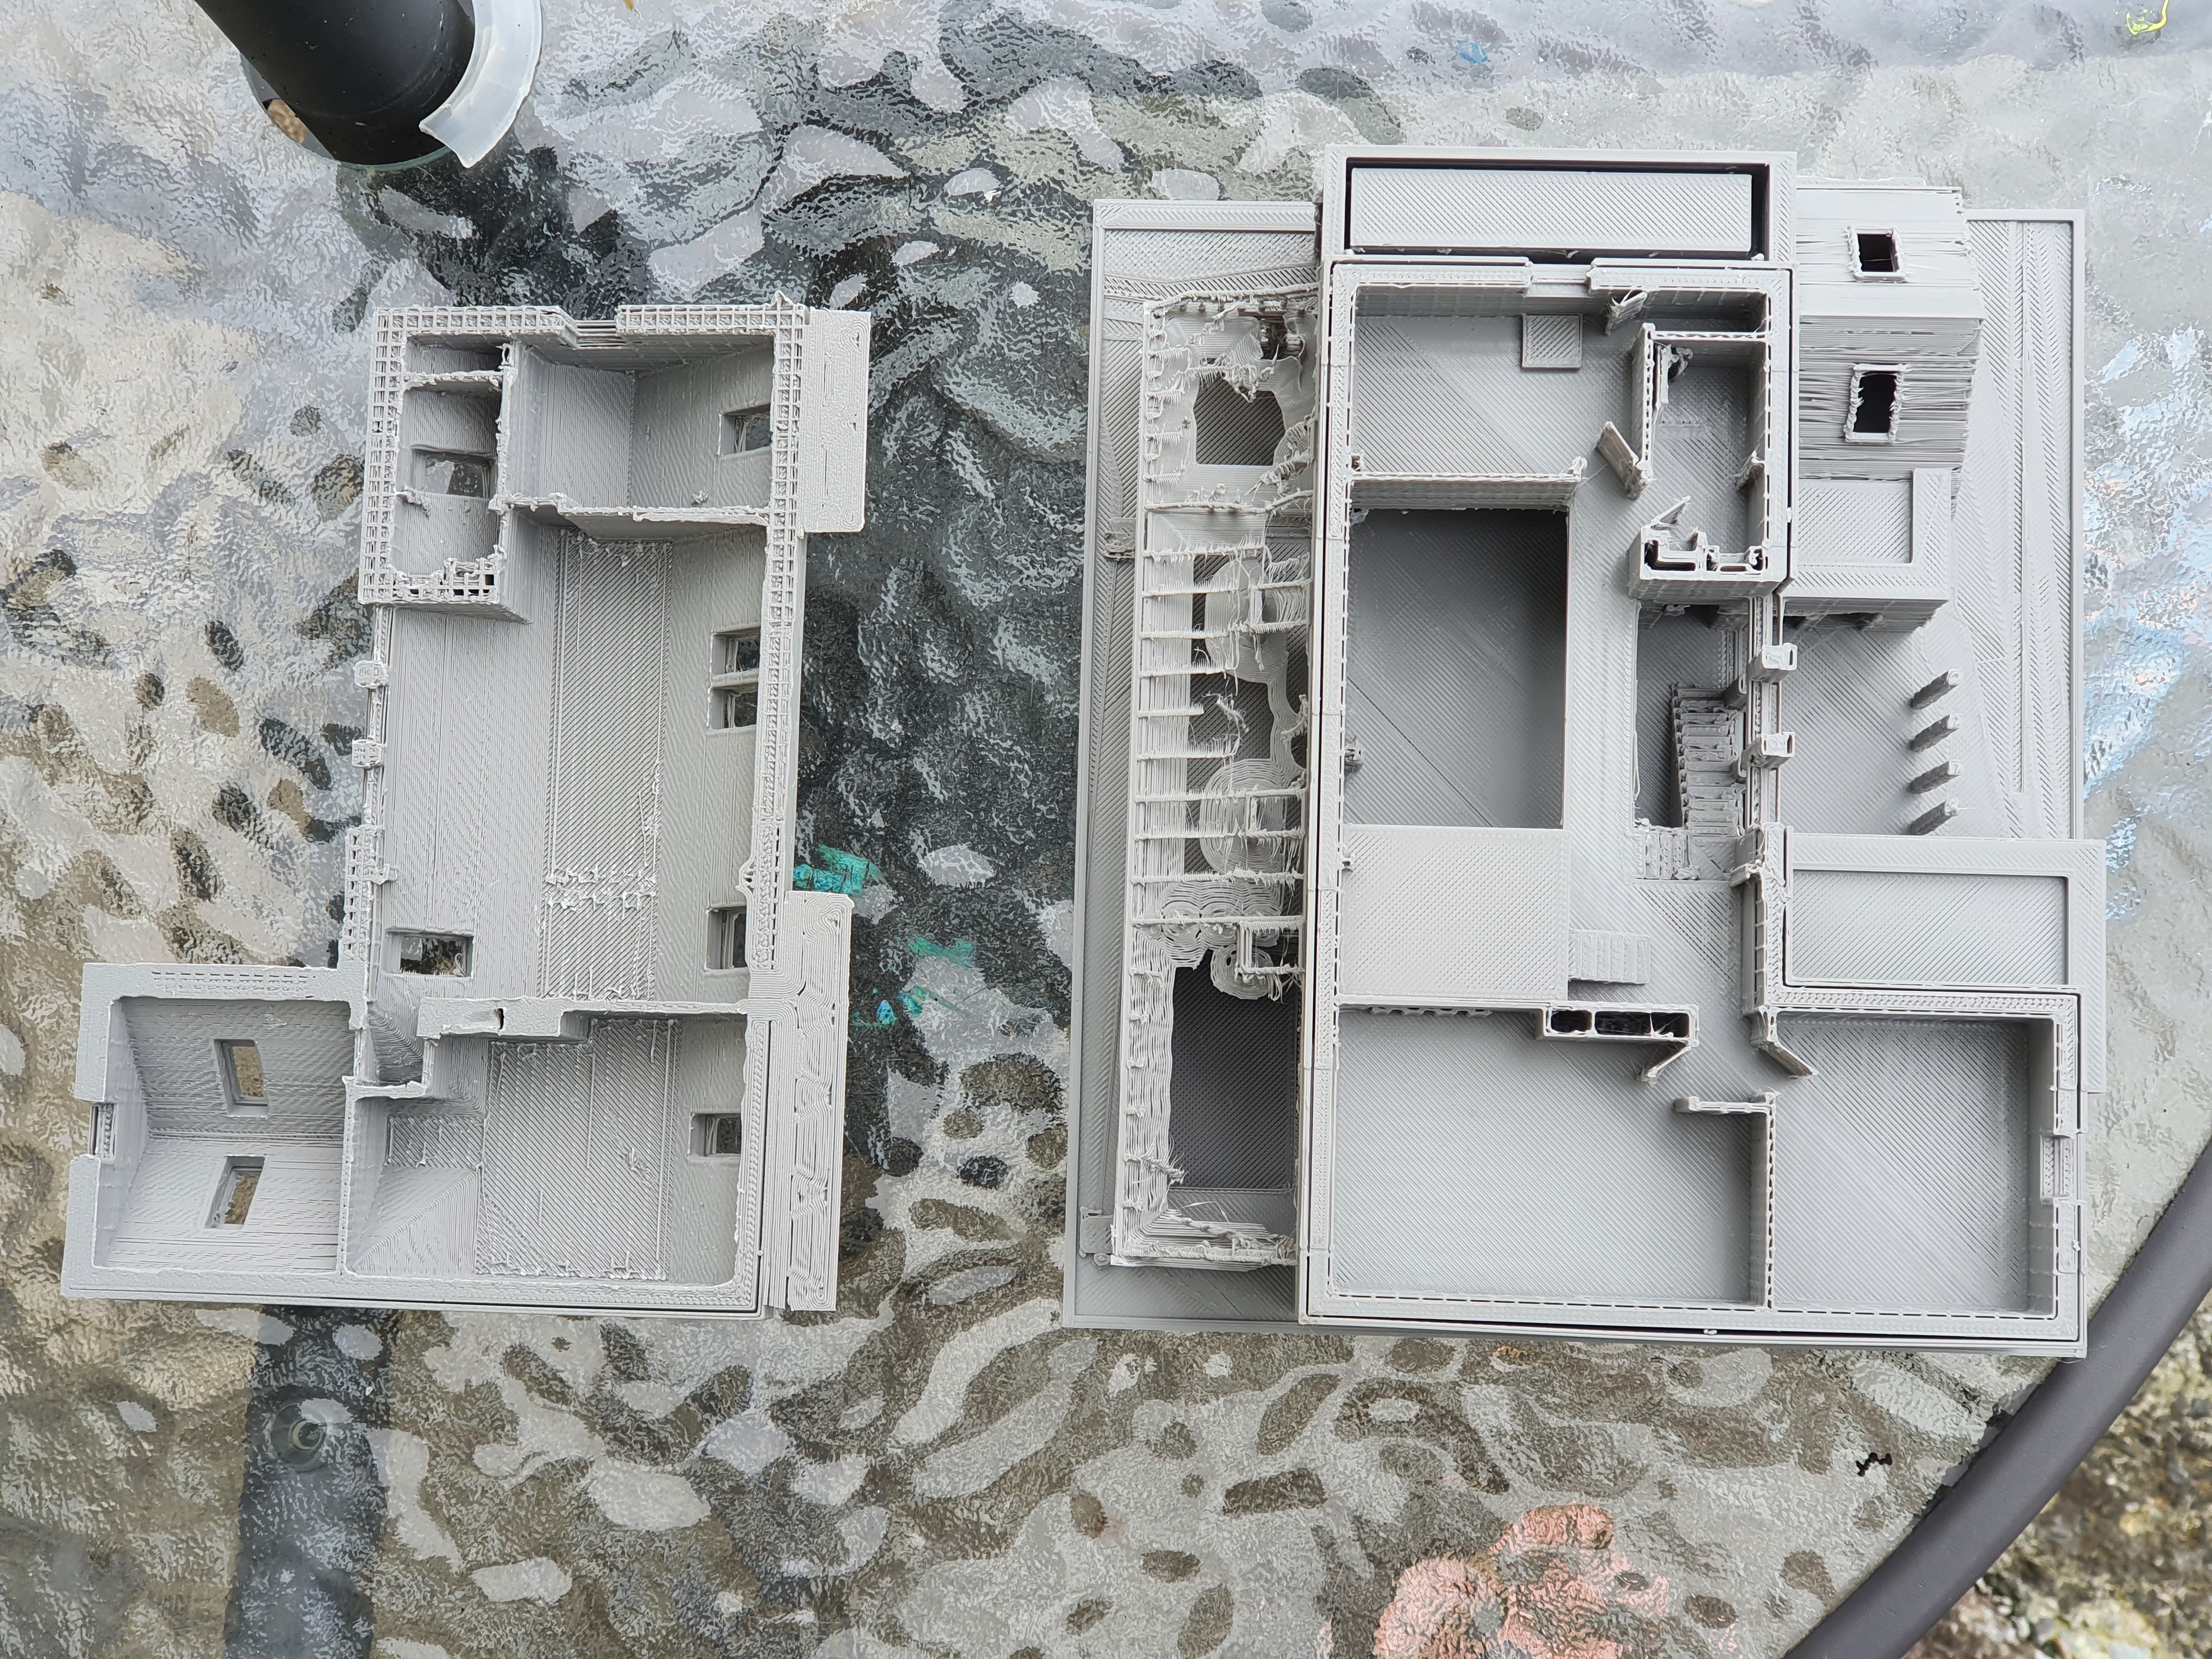
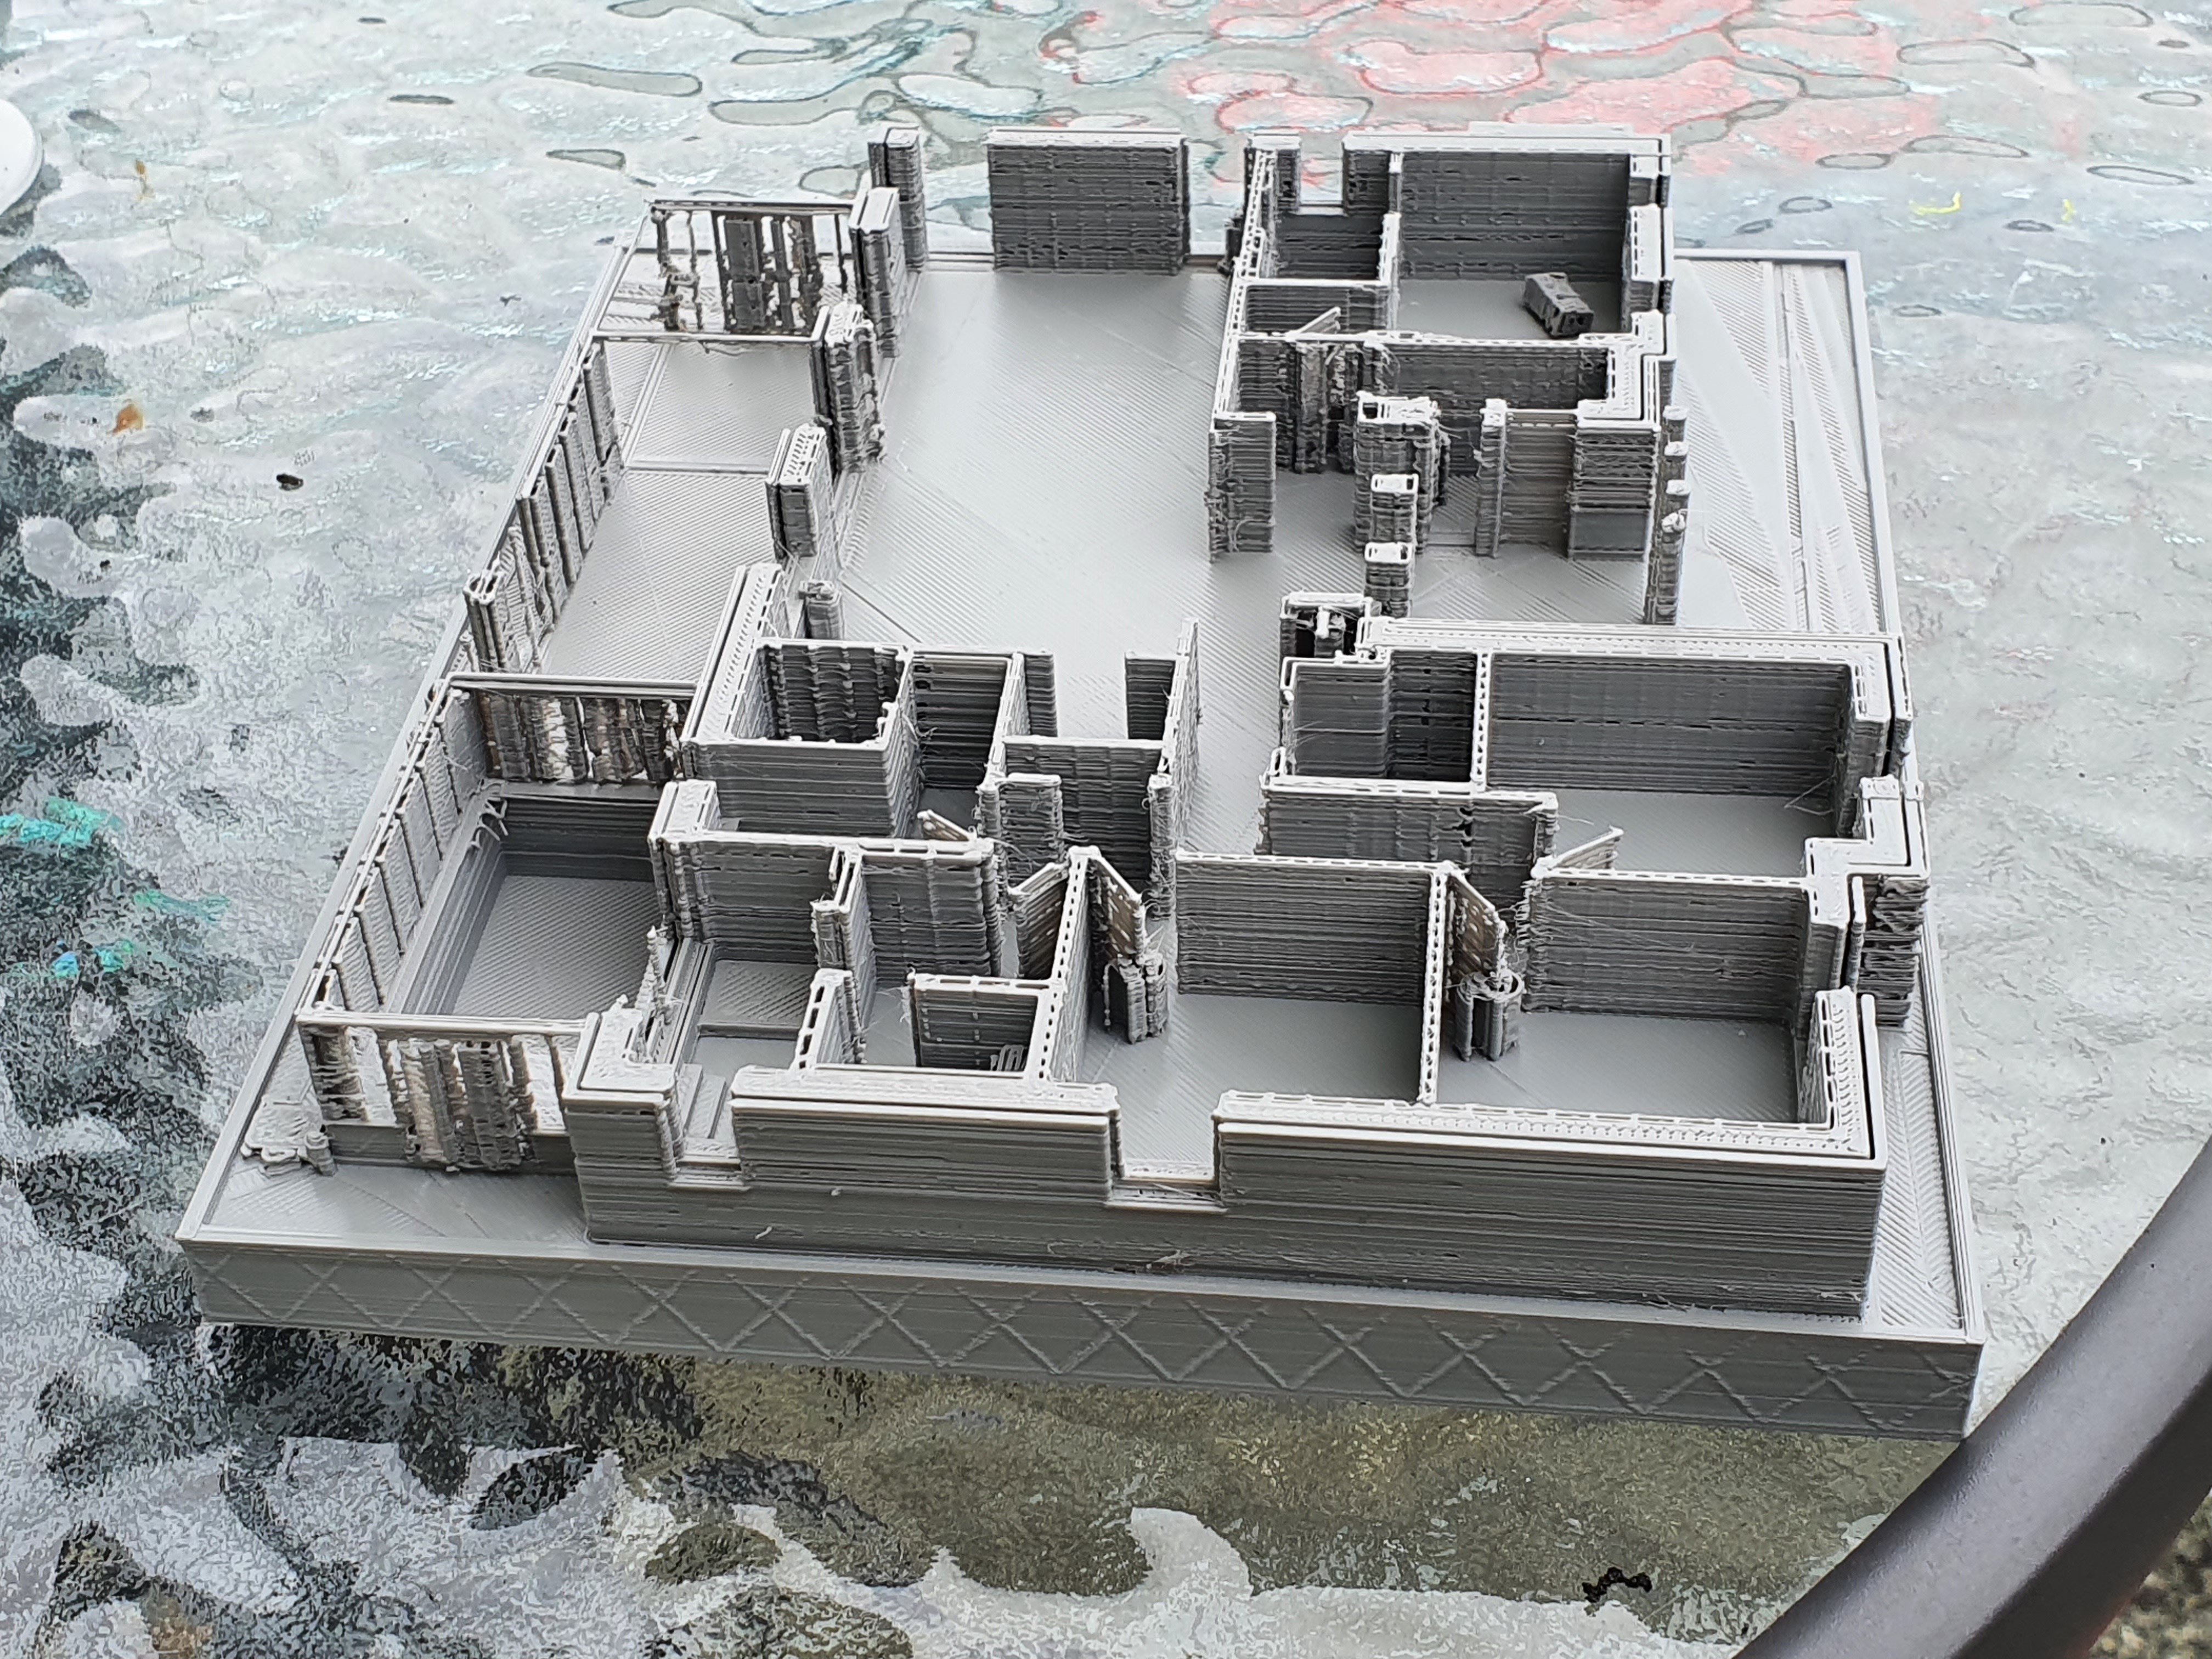
I spent a few more days in MeshMixer and Cura for this one, throwing away my work twice and redoing it from scratch until the third one was looking pretty good. I didn’t make any of the mistakes with the previous model, and I reckoned an over extrusion of 0.6 mm for outer walls coupled with bicubic space fills with deliberate overknitting to anchor the layers together should do the job of creating a strong print. Everything within the outer boundaries does get a 0.4 mm resolution, only the outer boundaries had a 50% reduced resolution, with the idea being you would ‘smudge’ the plastic into its neighbours to help it adhere. What helped is that the design is specifically intended to be structurally sound with timber, steel and concrete – polylactic acid plastic isn’t those, but the structural qualities of the house design apply to it too.
This print took the full week, partially because I had it print the structural elements extra slow:
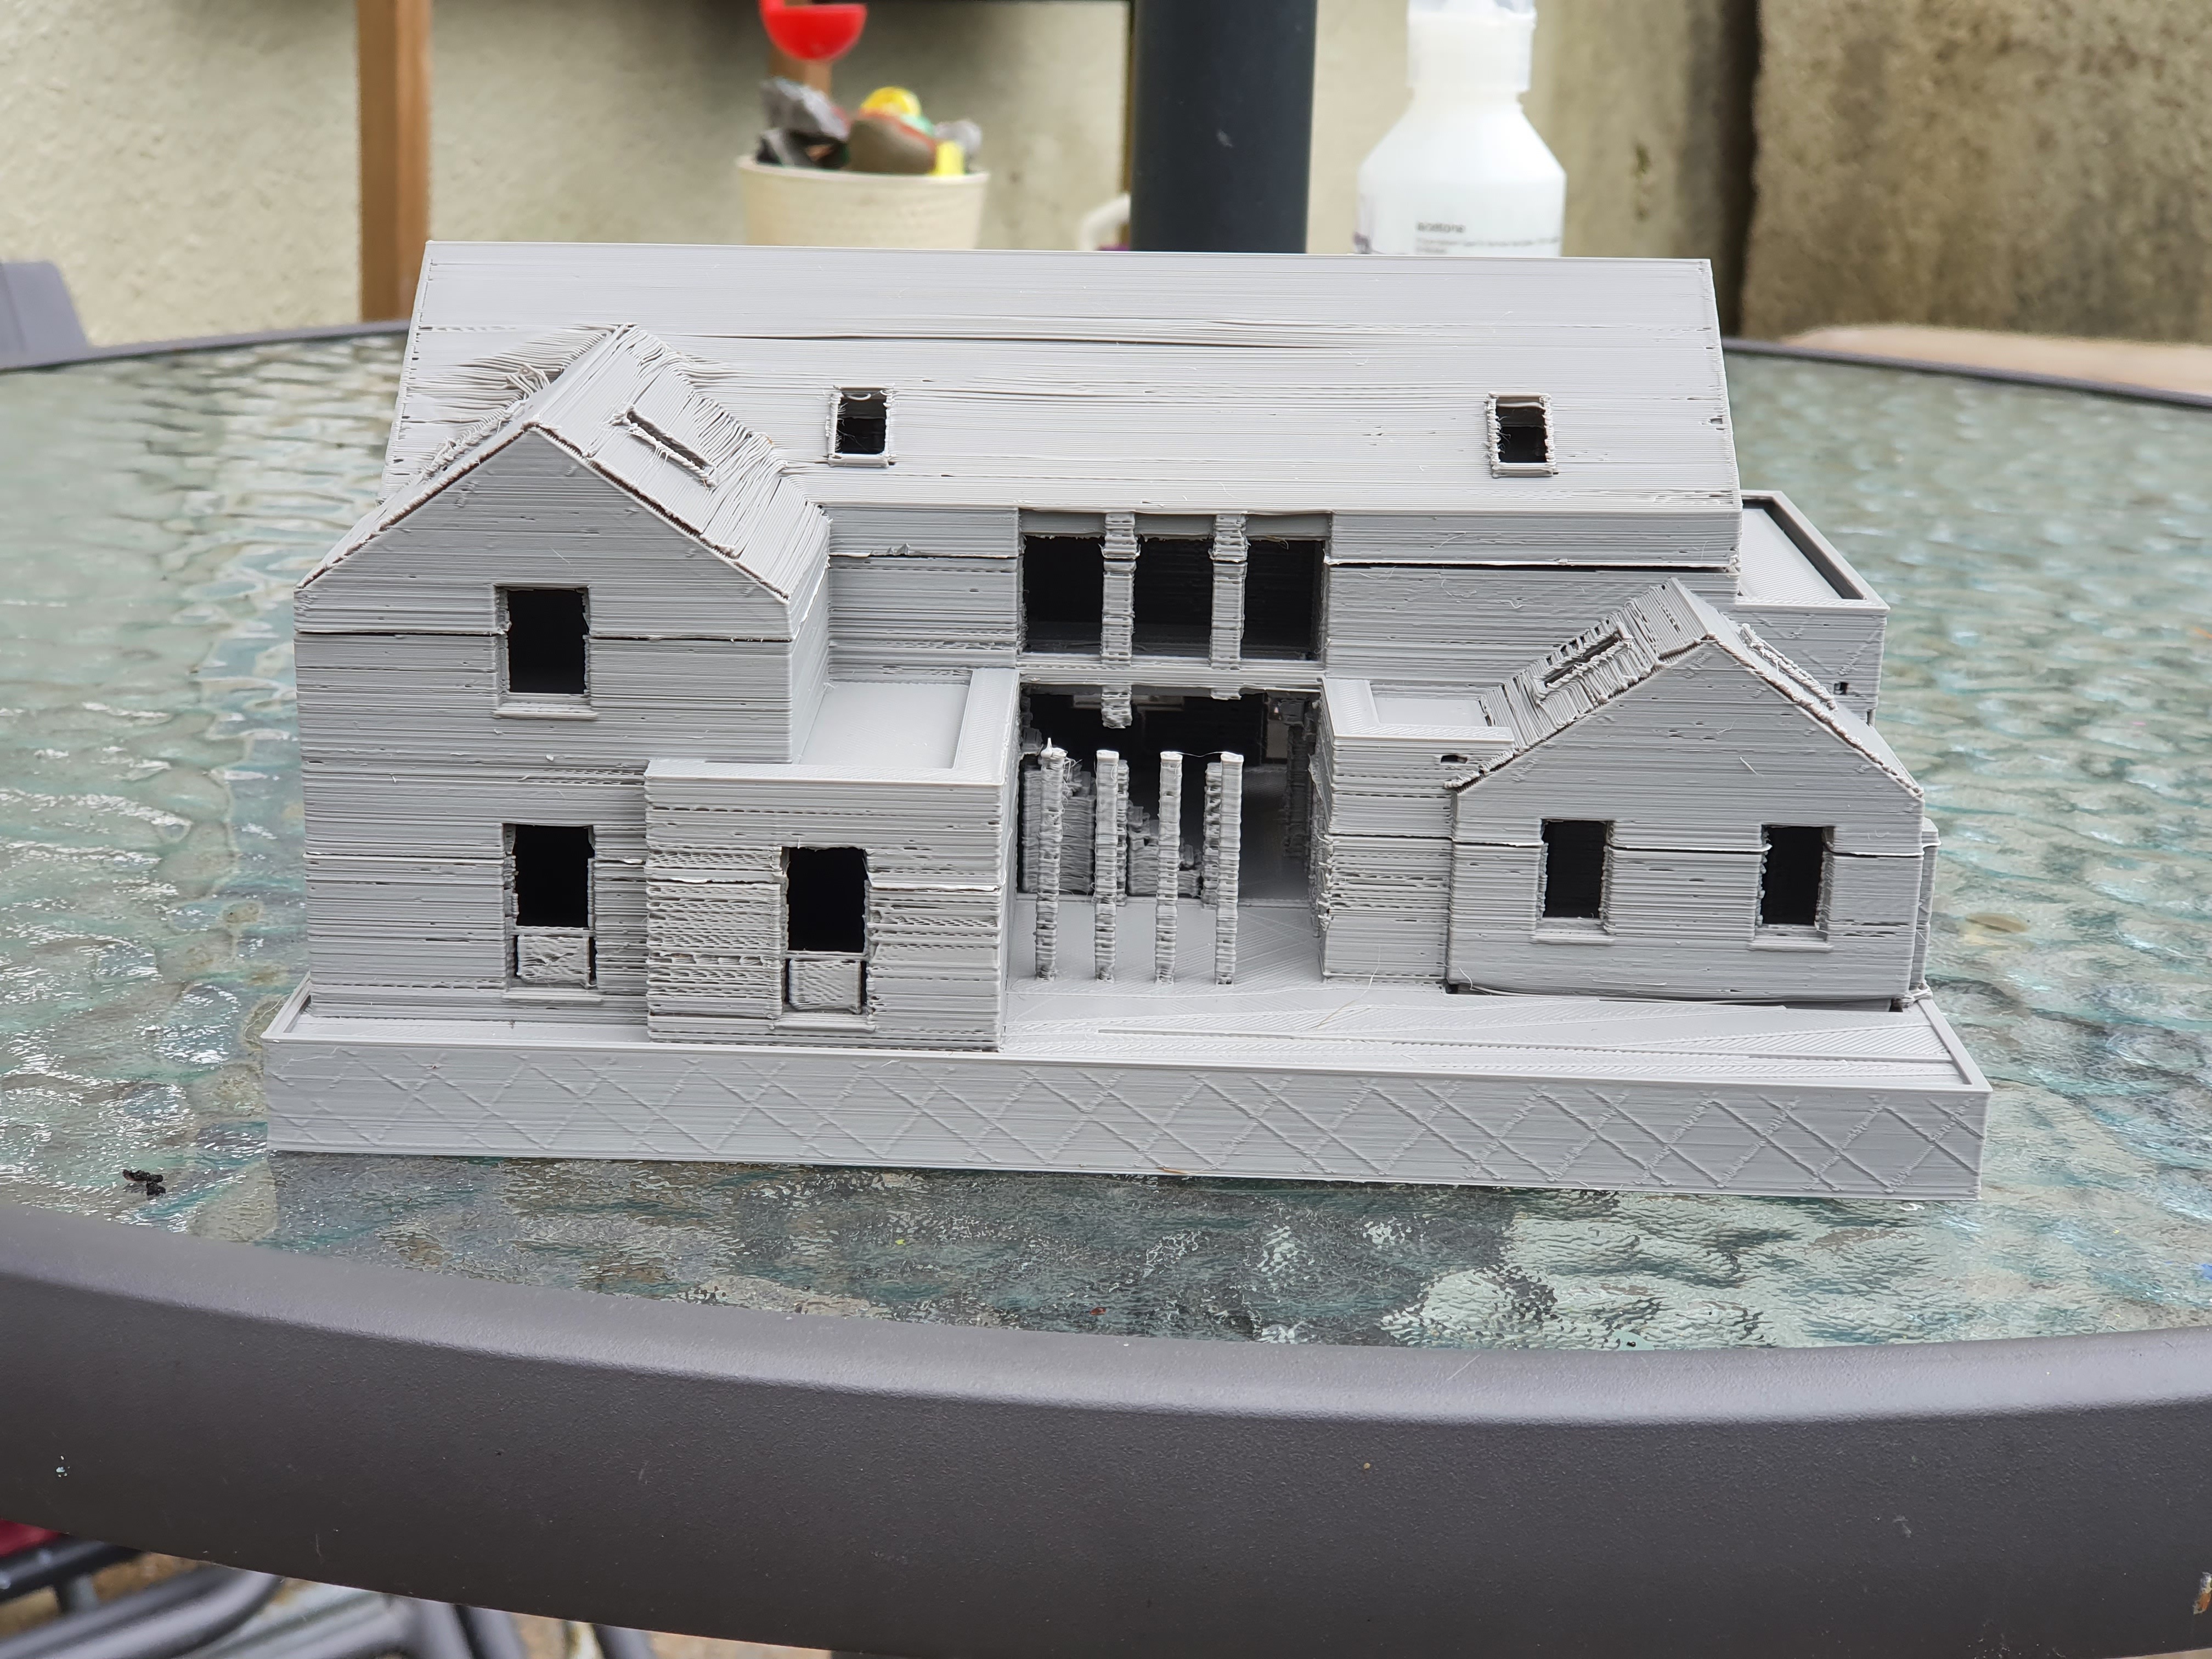
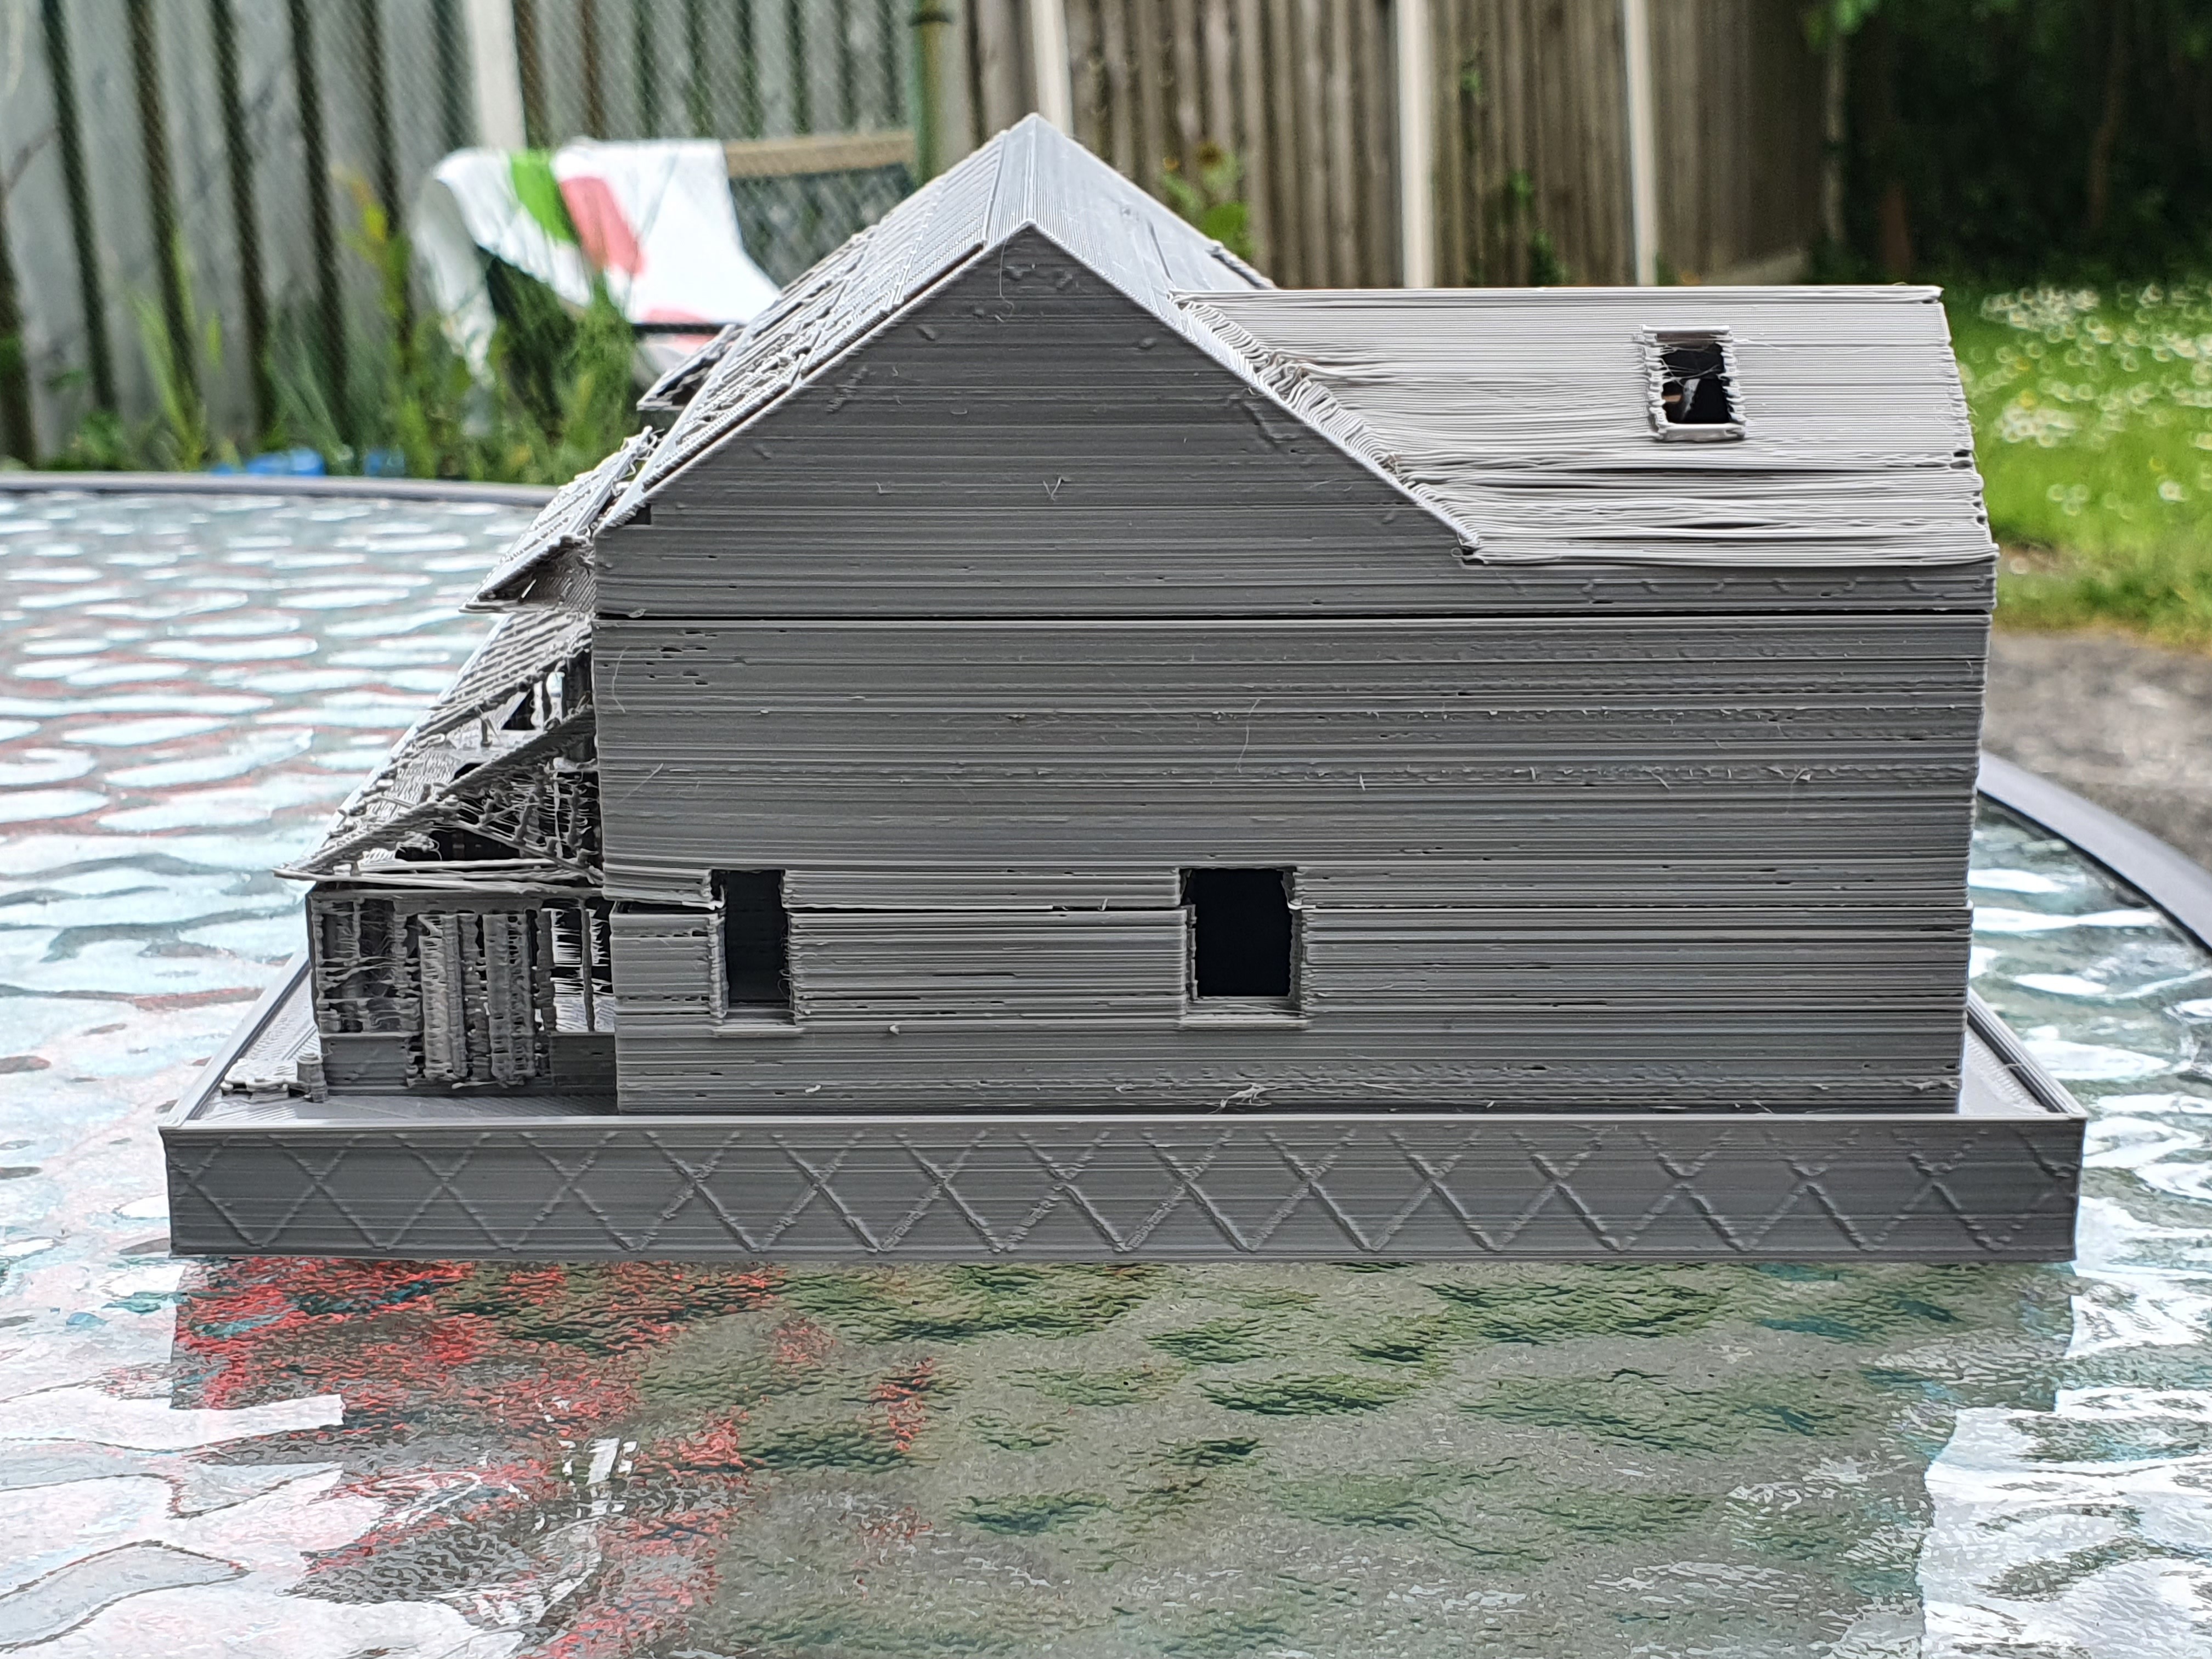
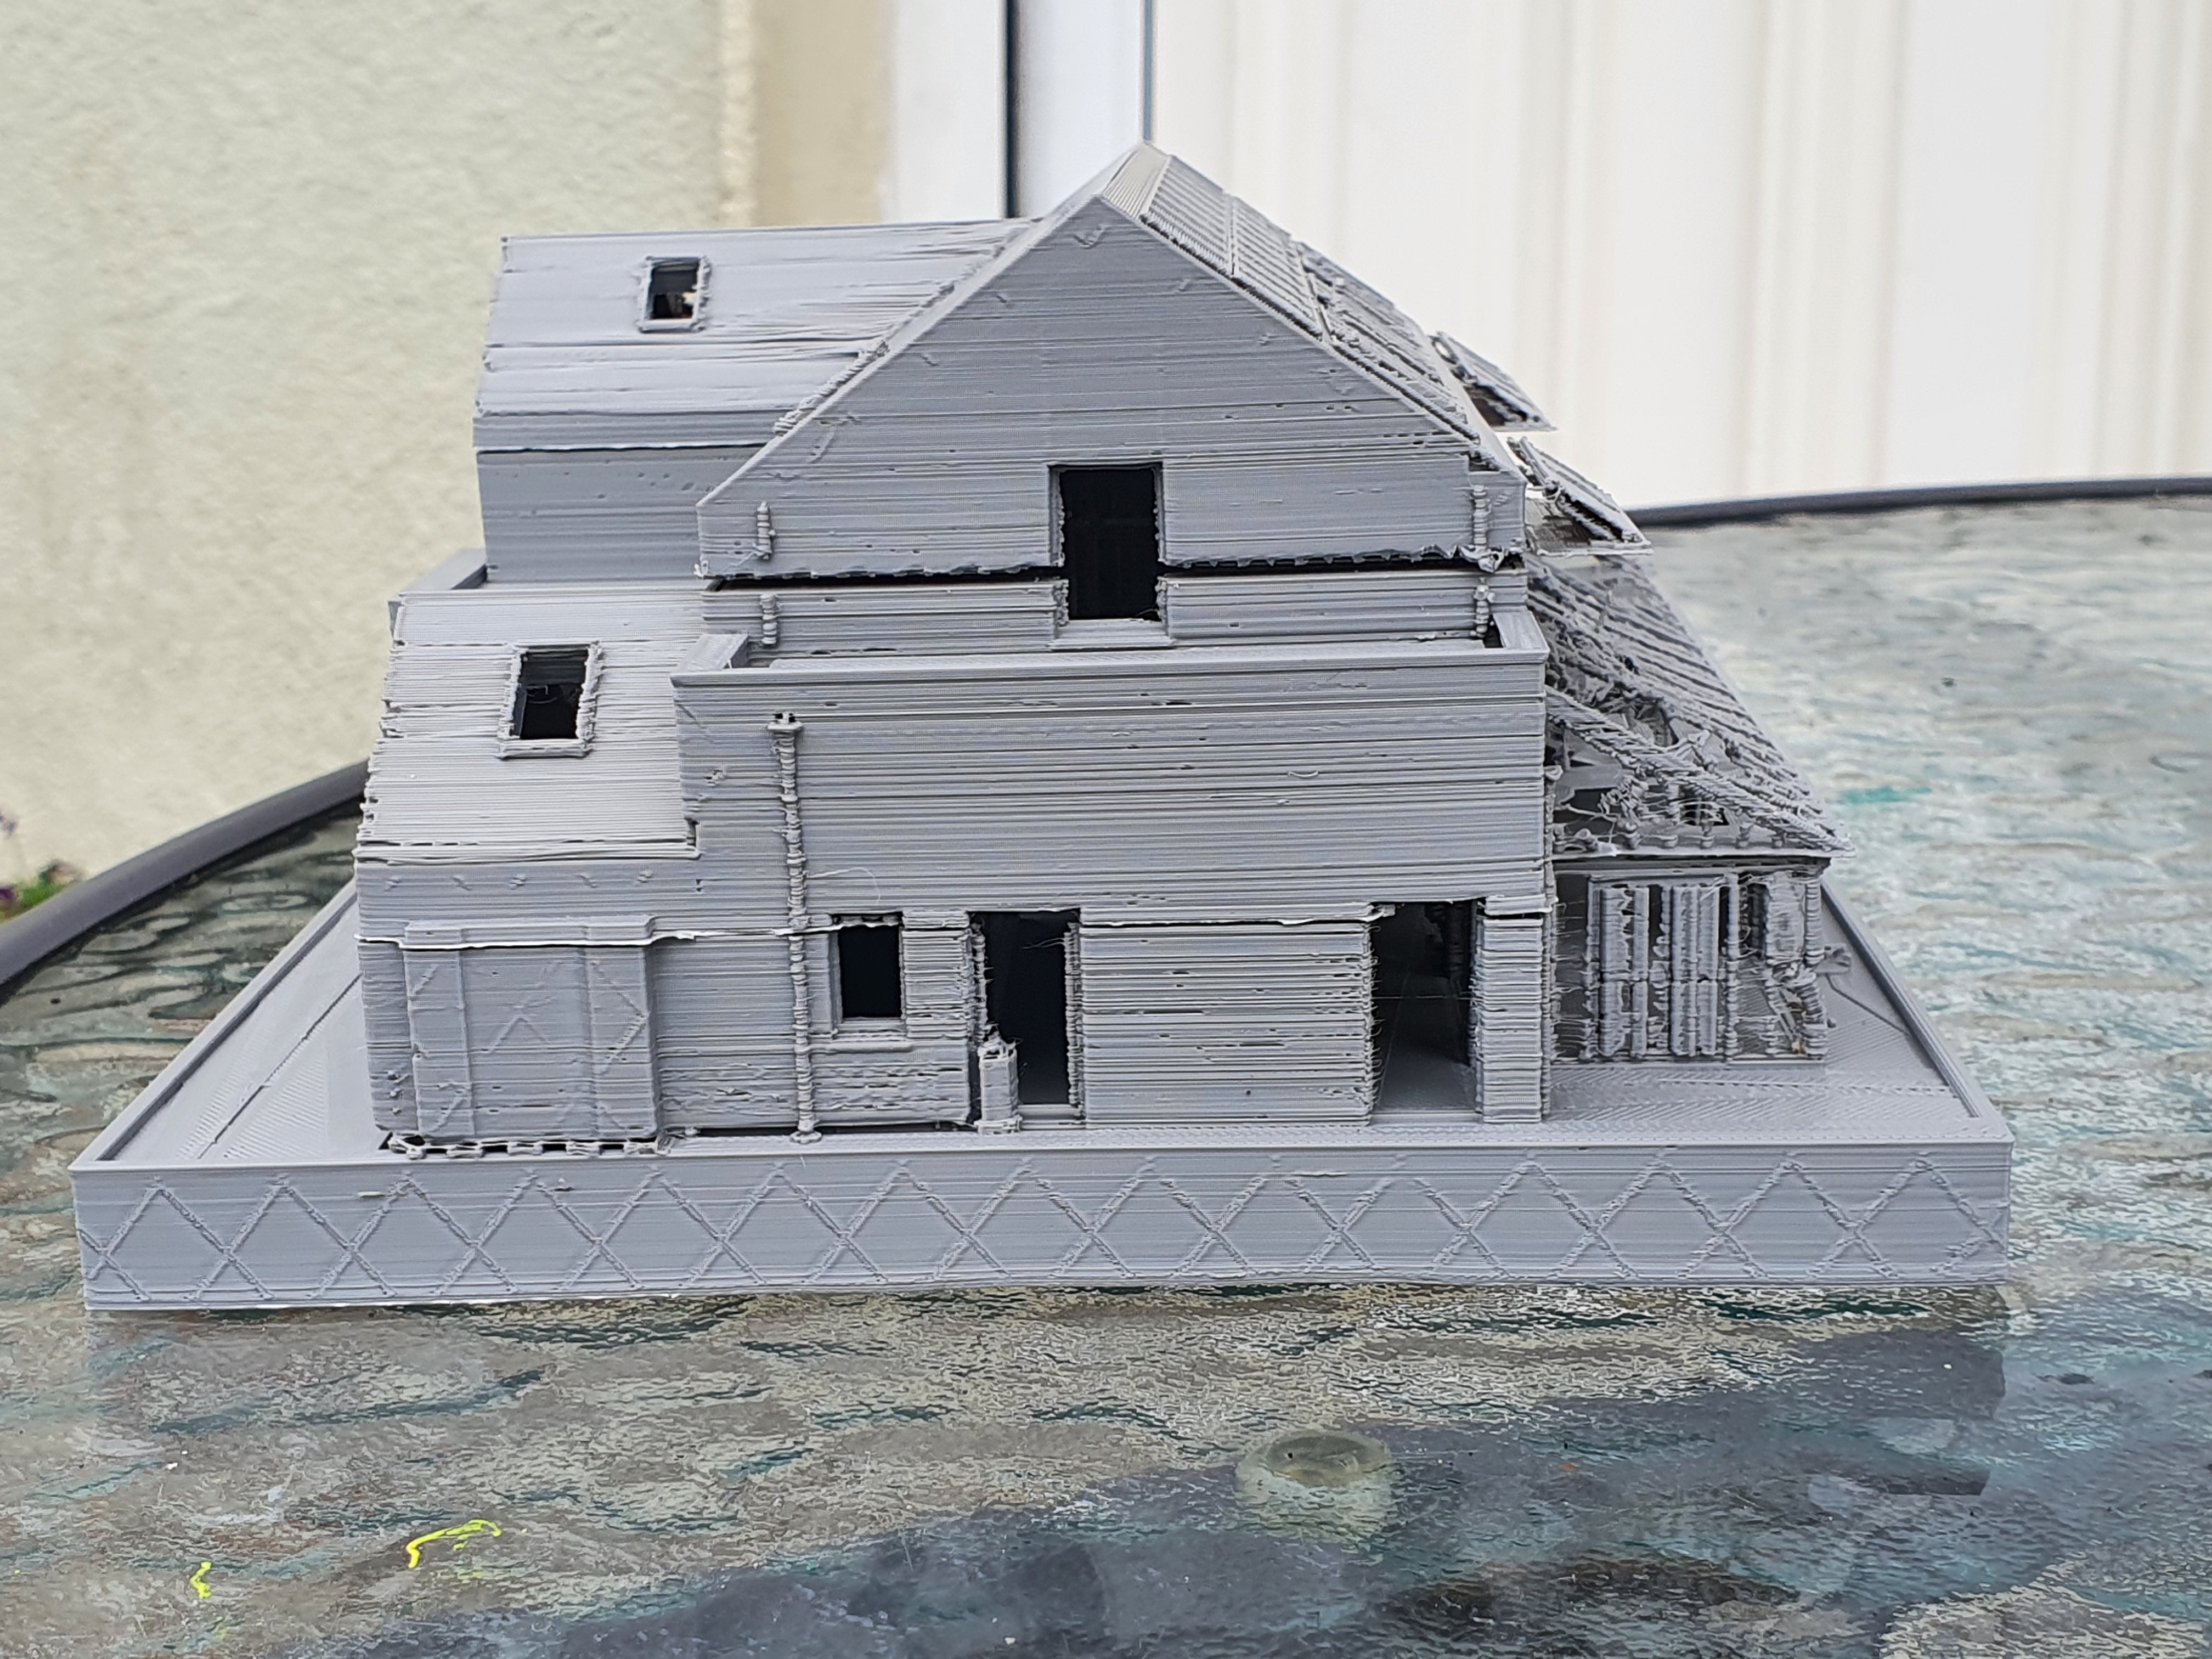
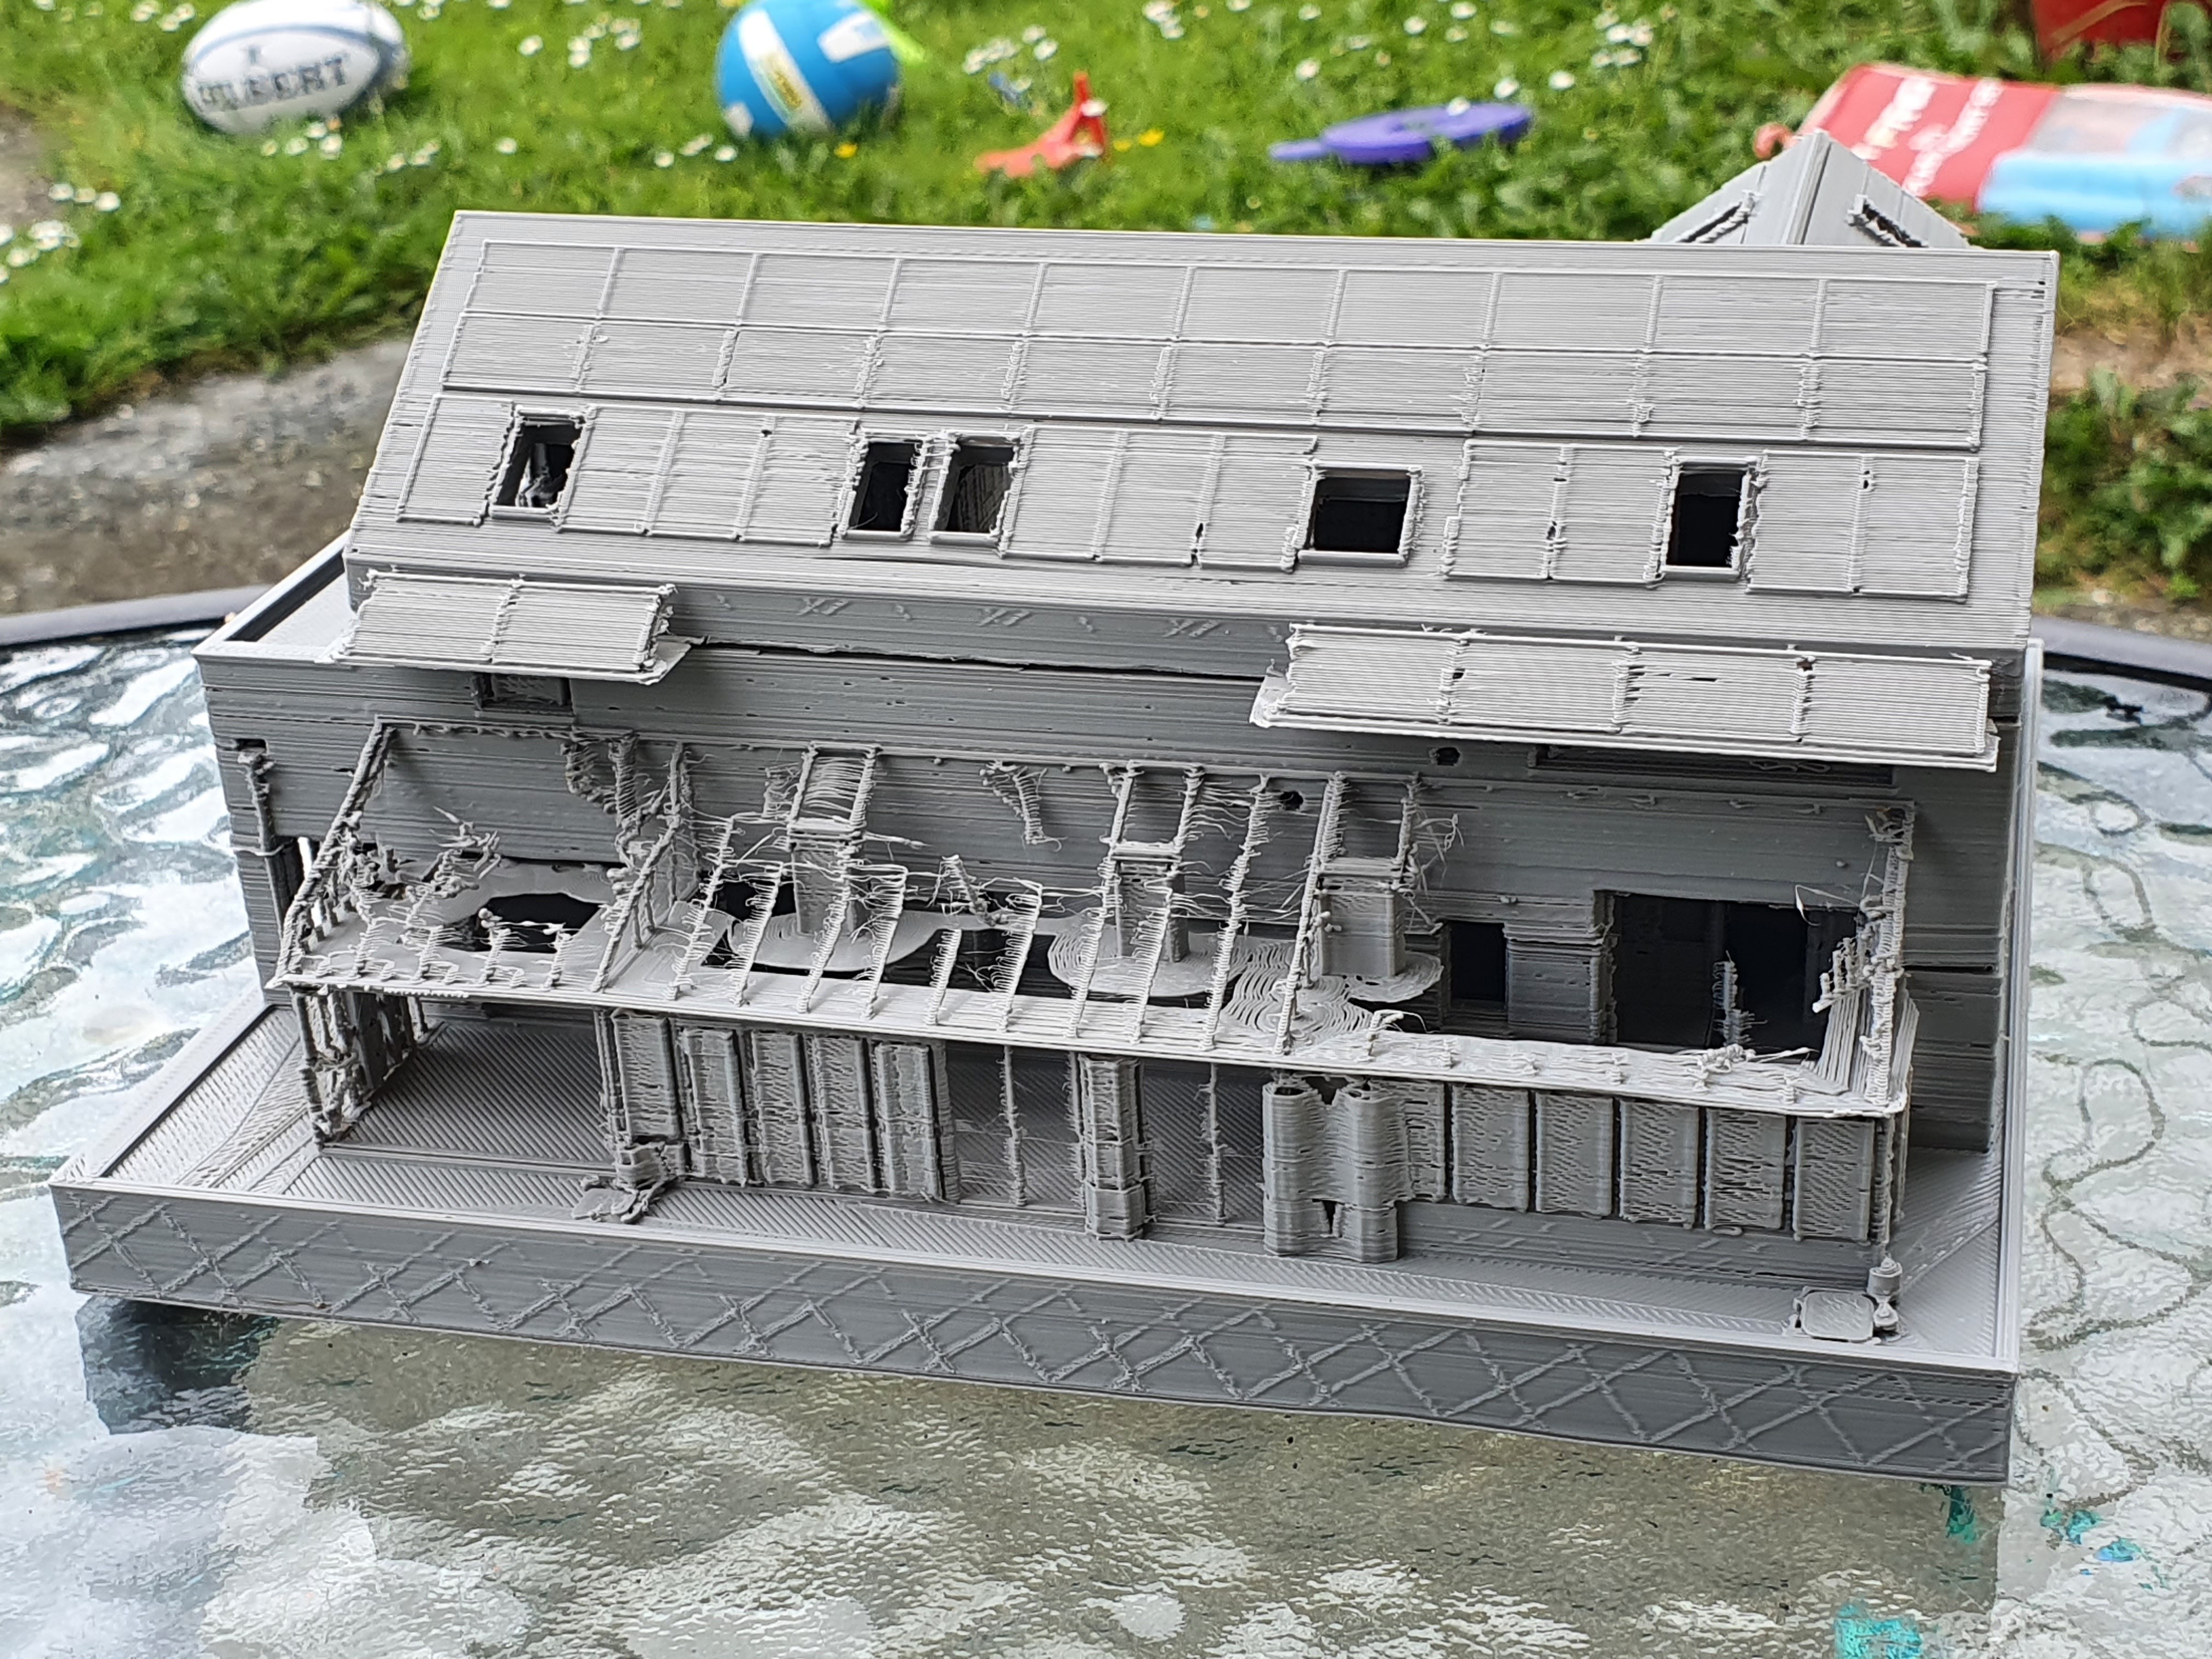

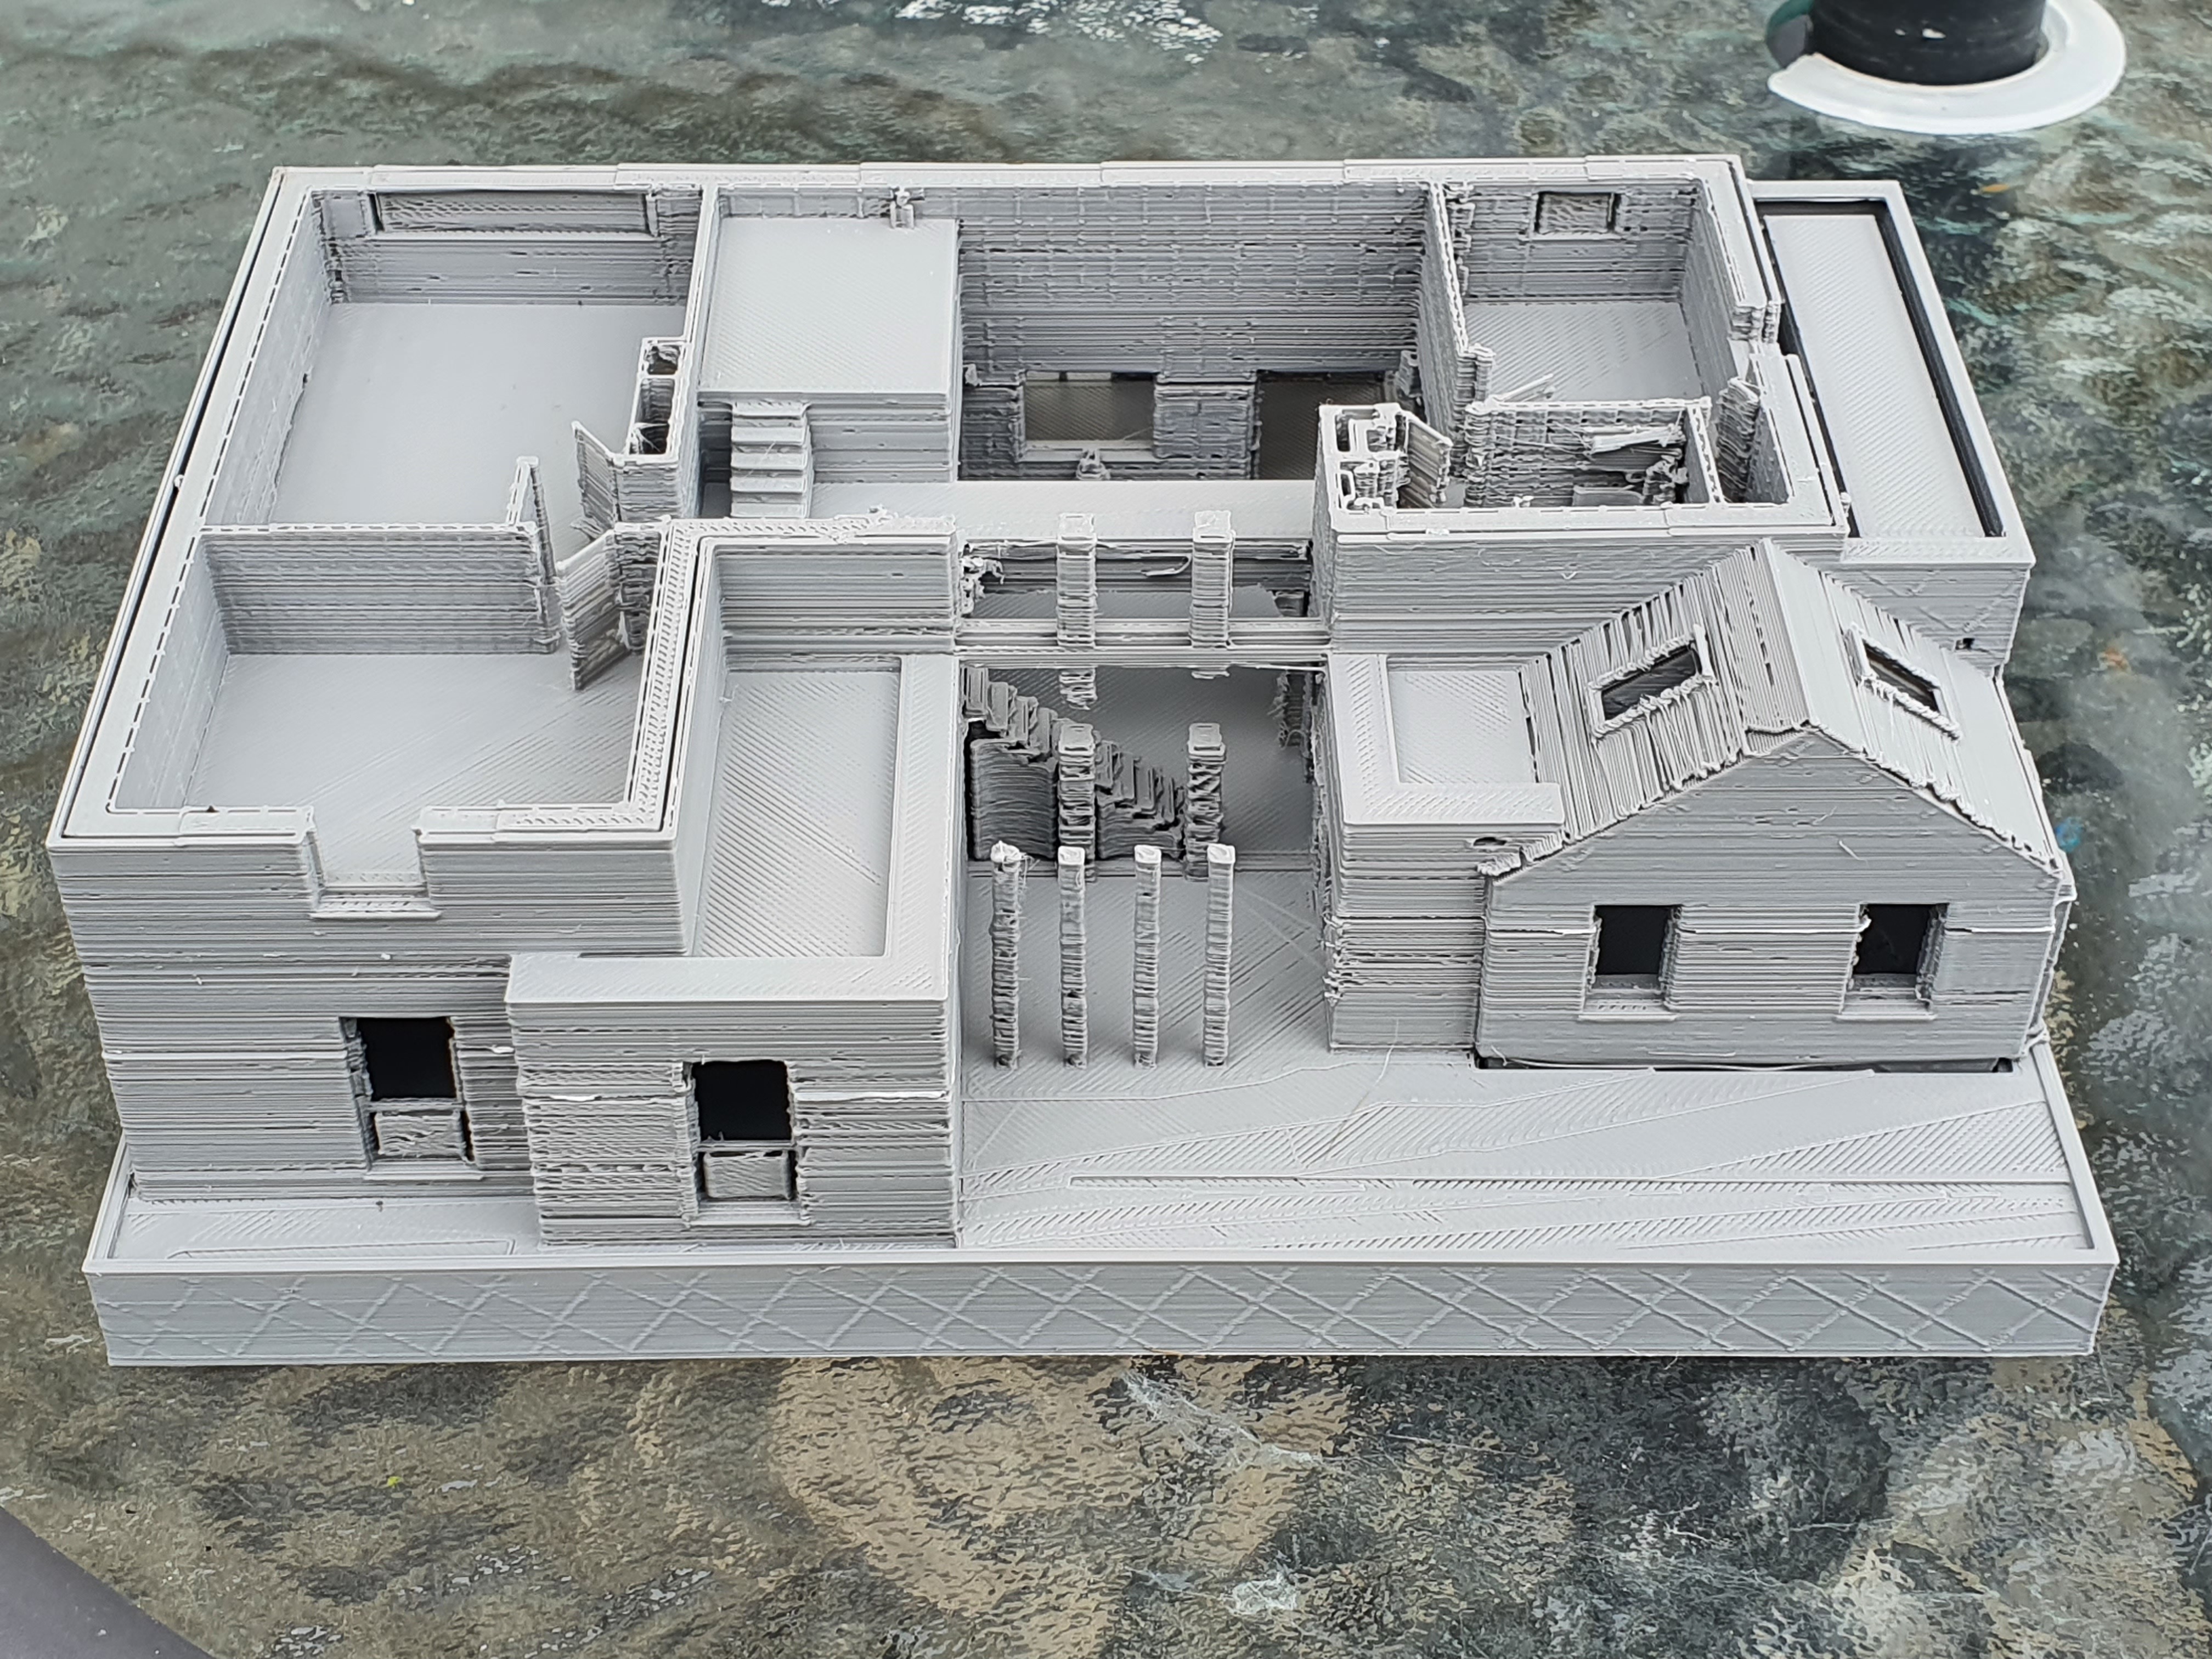
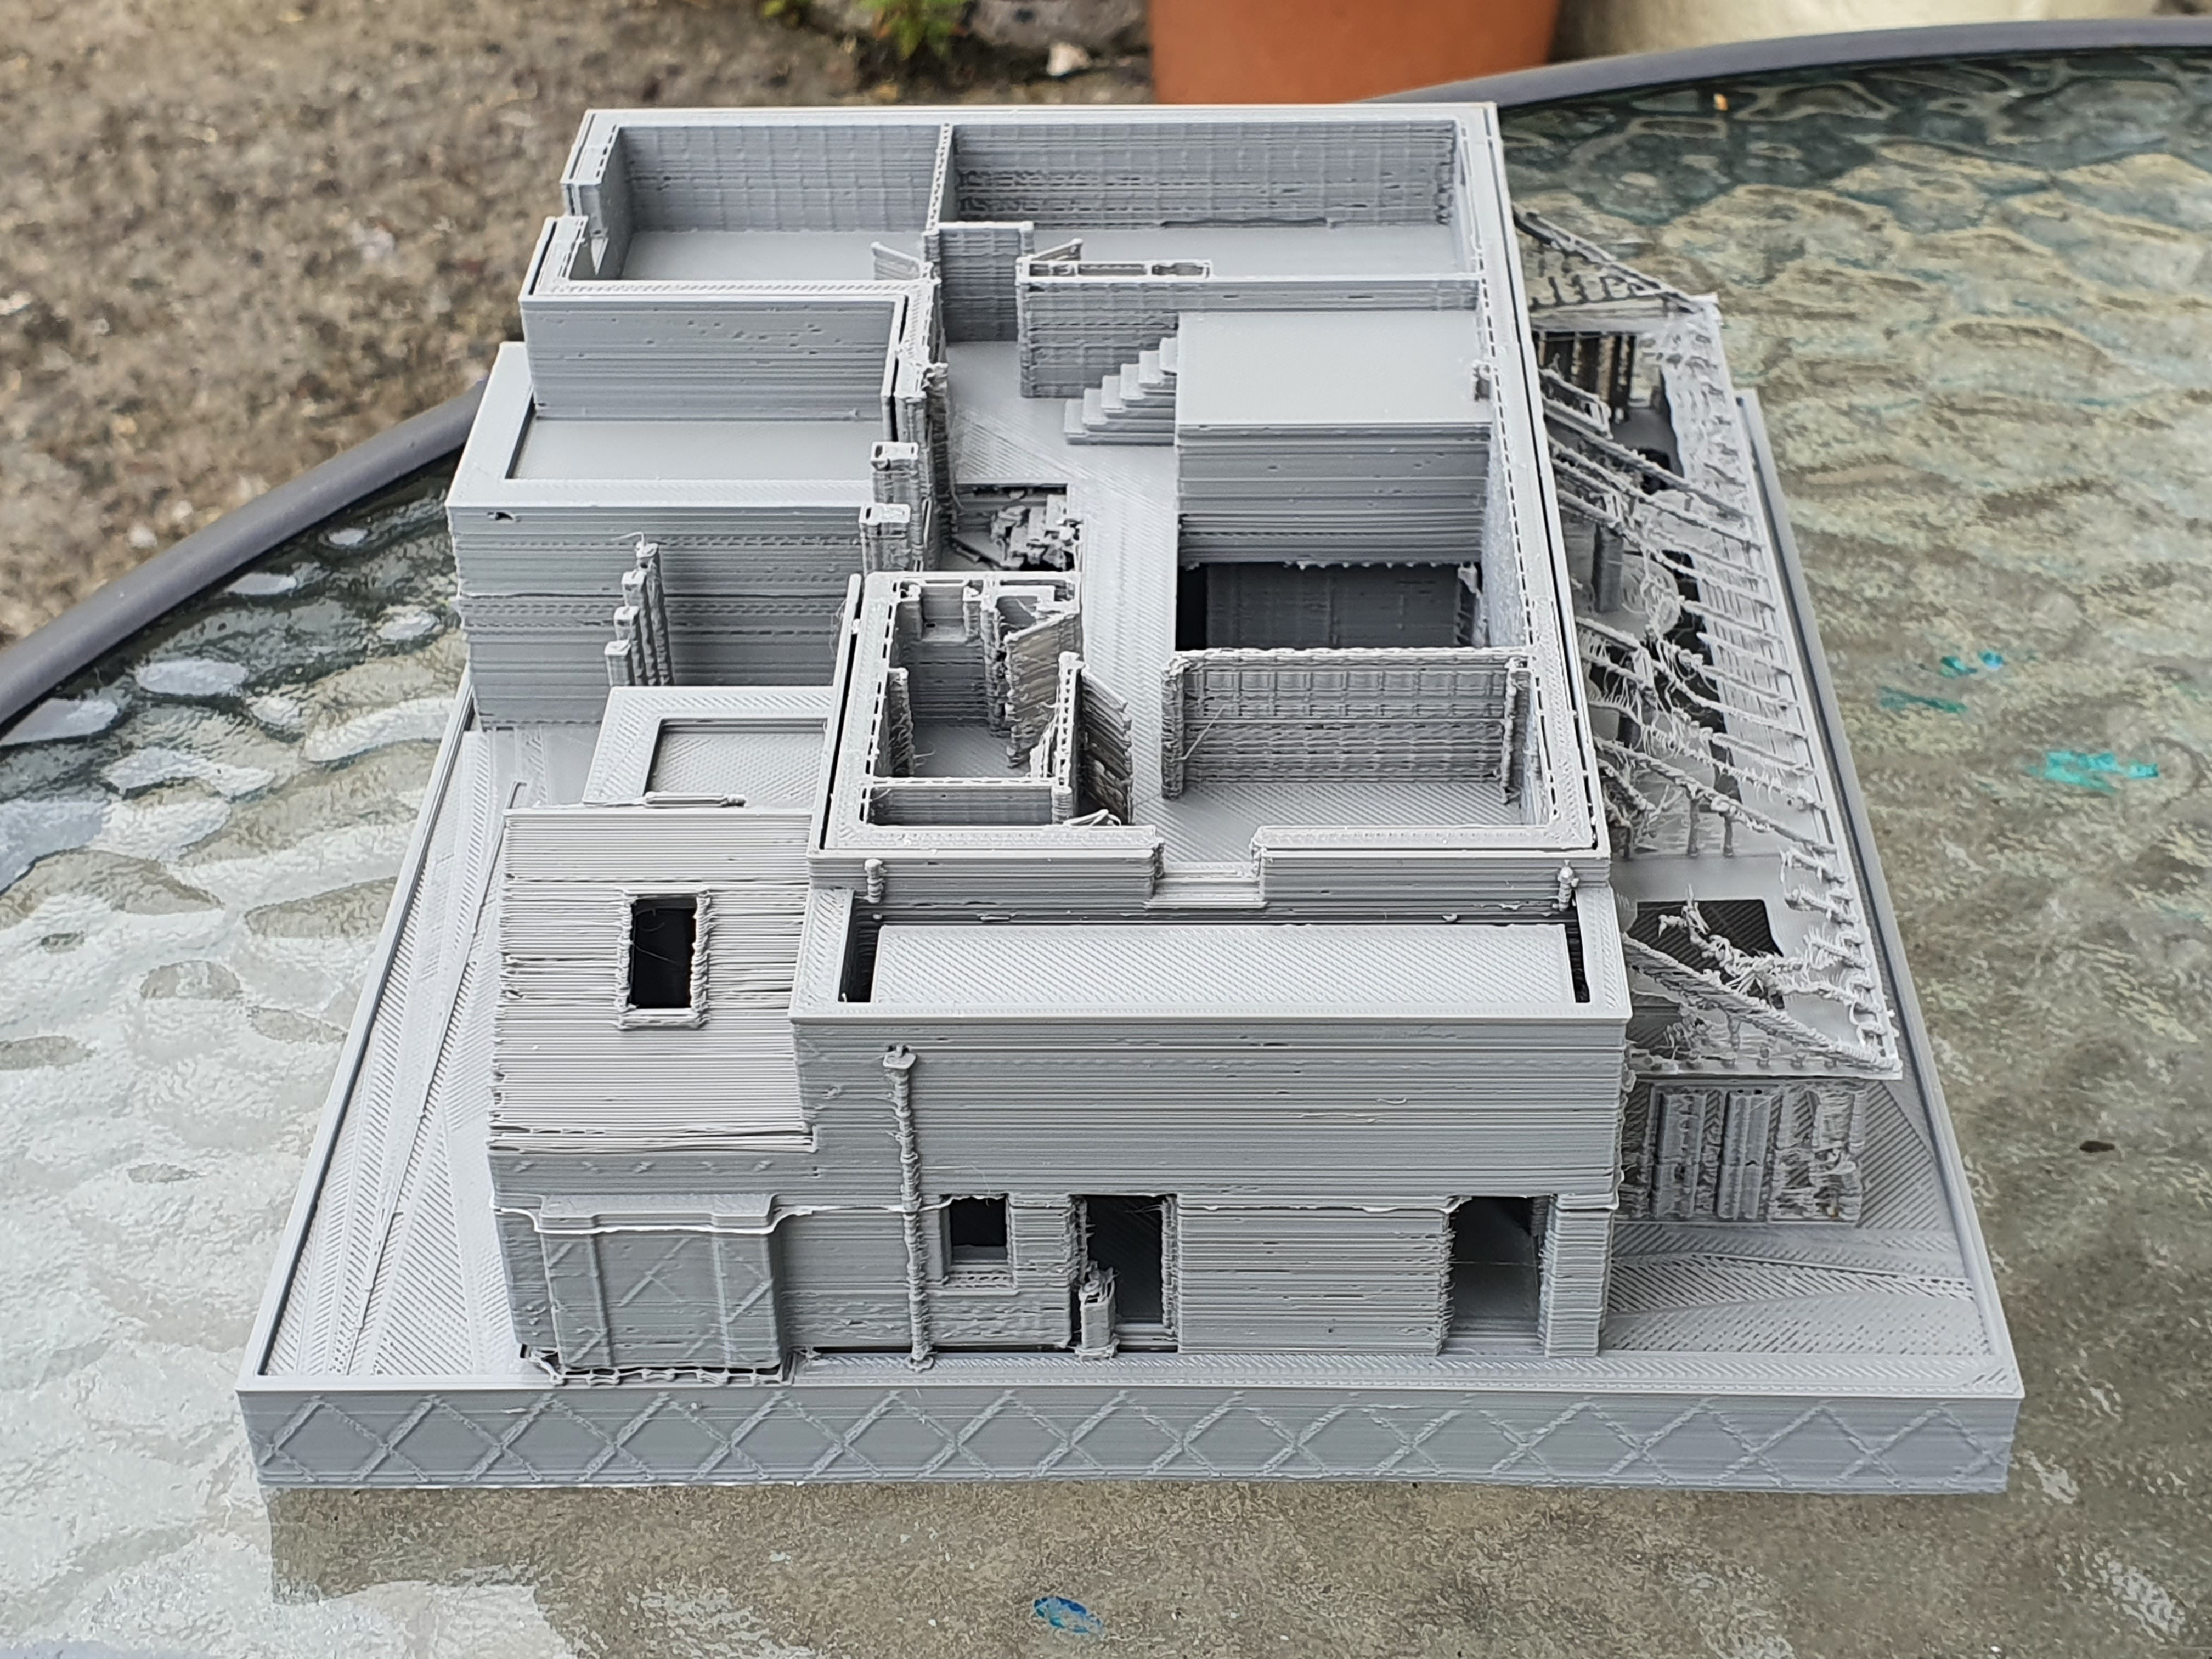
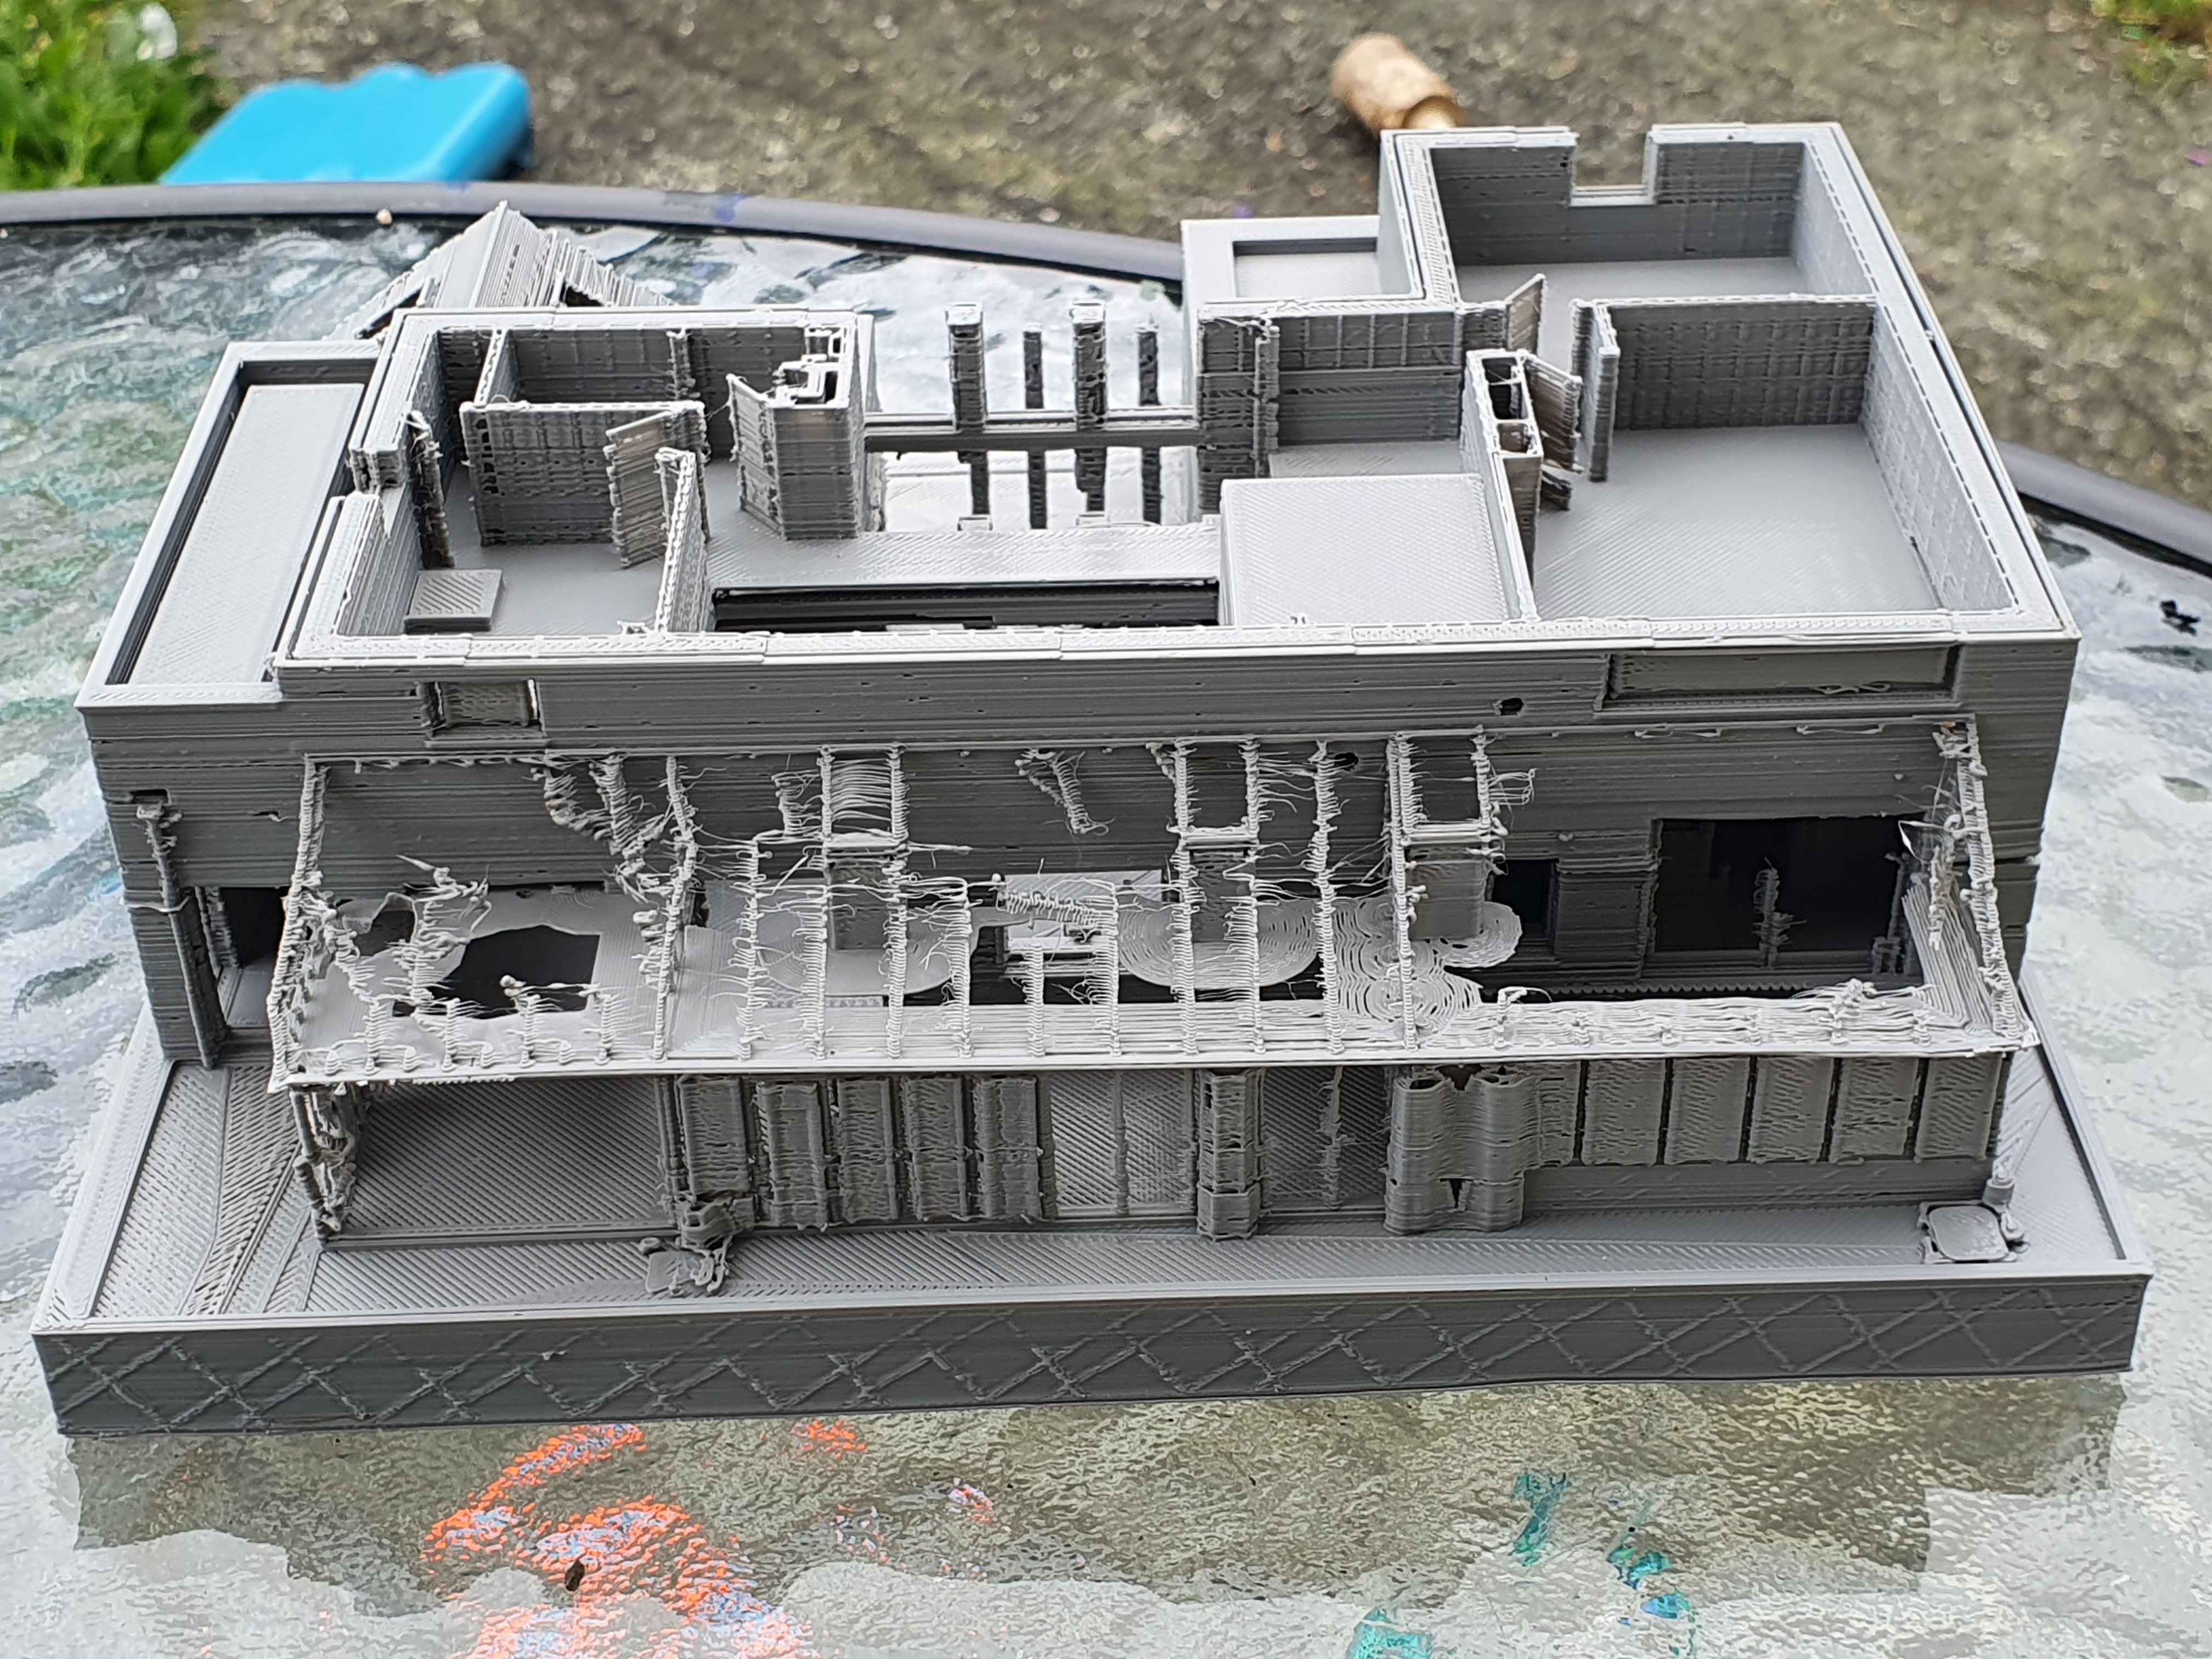
As I had rotated the print ninety degrees, the front didn’t get the effects of the bed slinging this time, but the sides did. The greenhouse was obviously too big an ask for this printer, which makes sense as its hot end is the second cheapest type possible, and it isn’t good at stopping and starting. Still, it made a reasonable attempt I think.
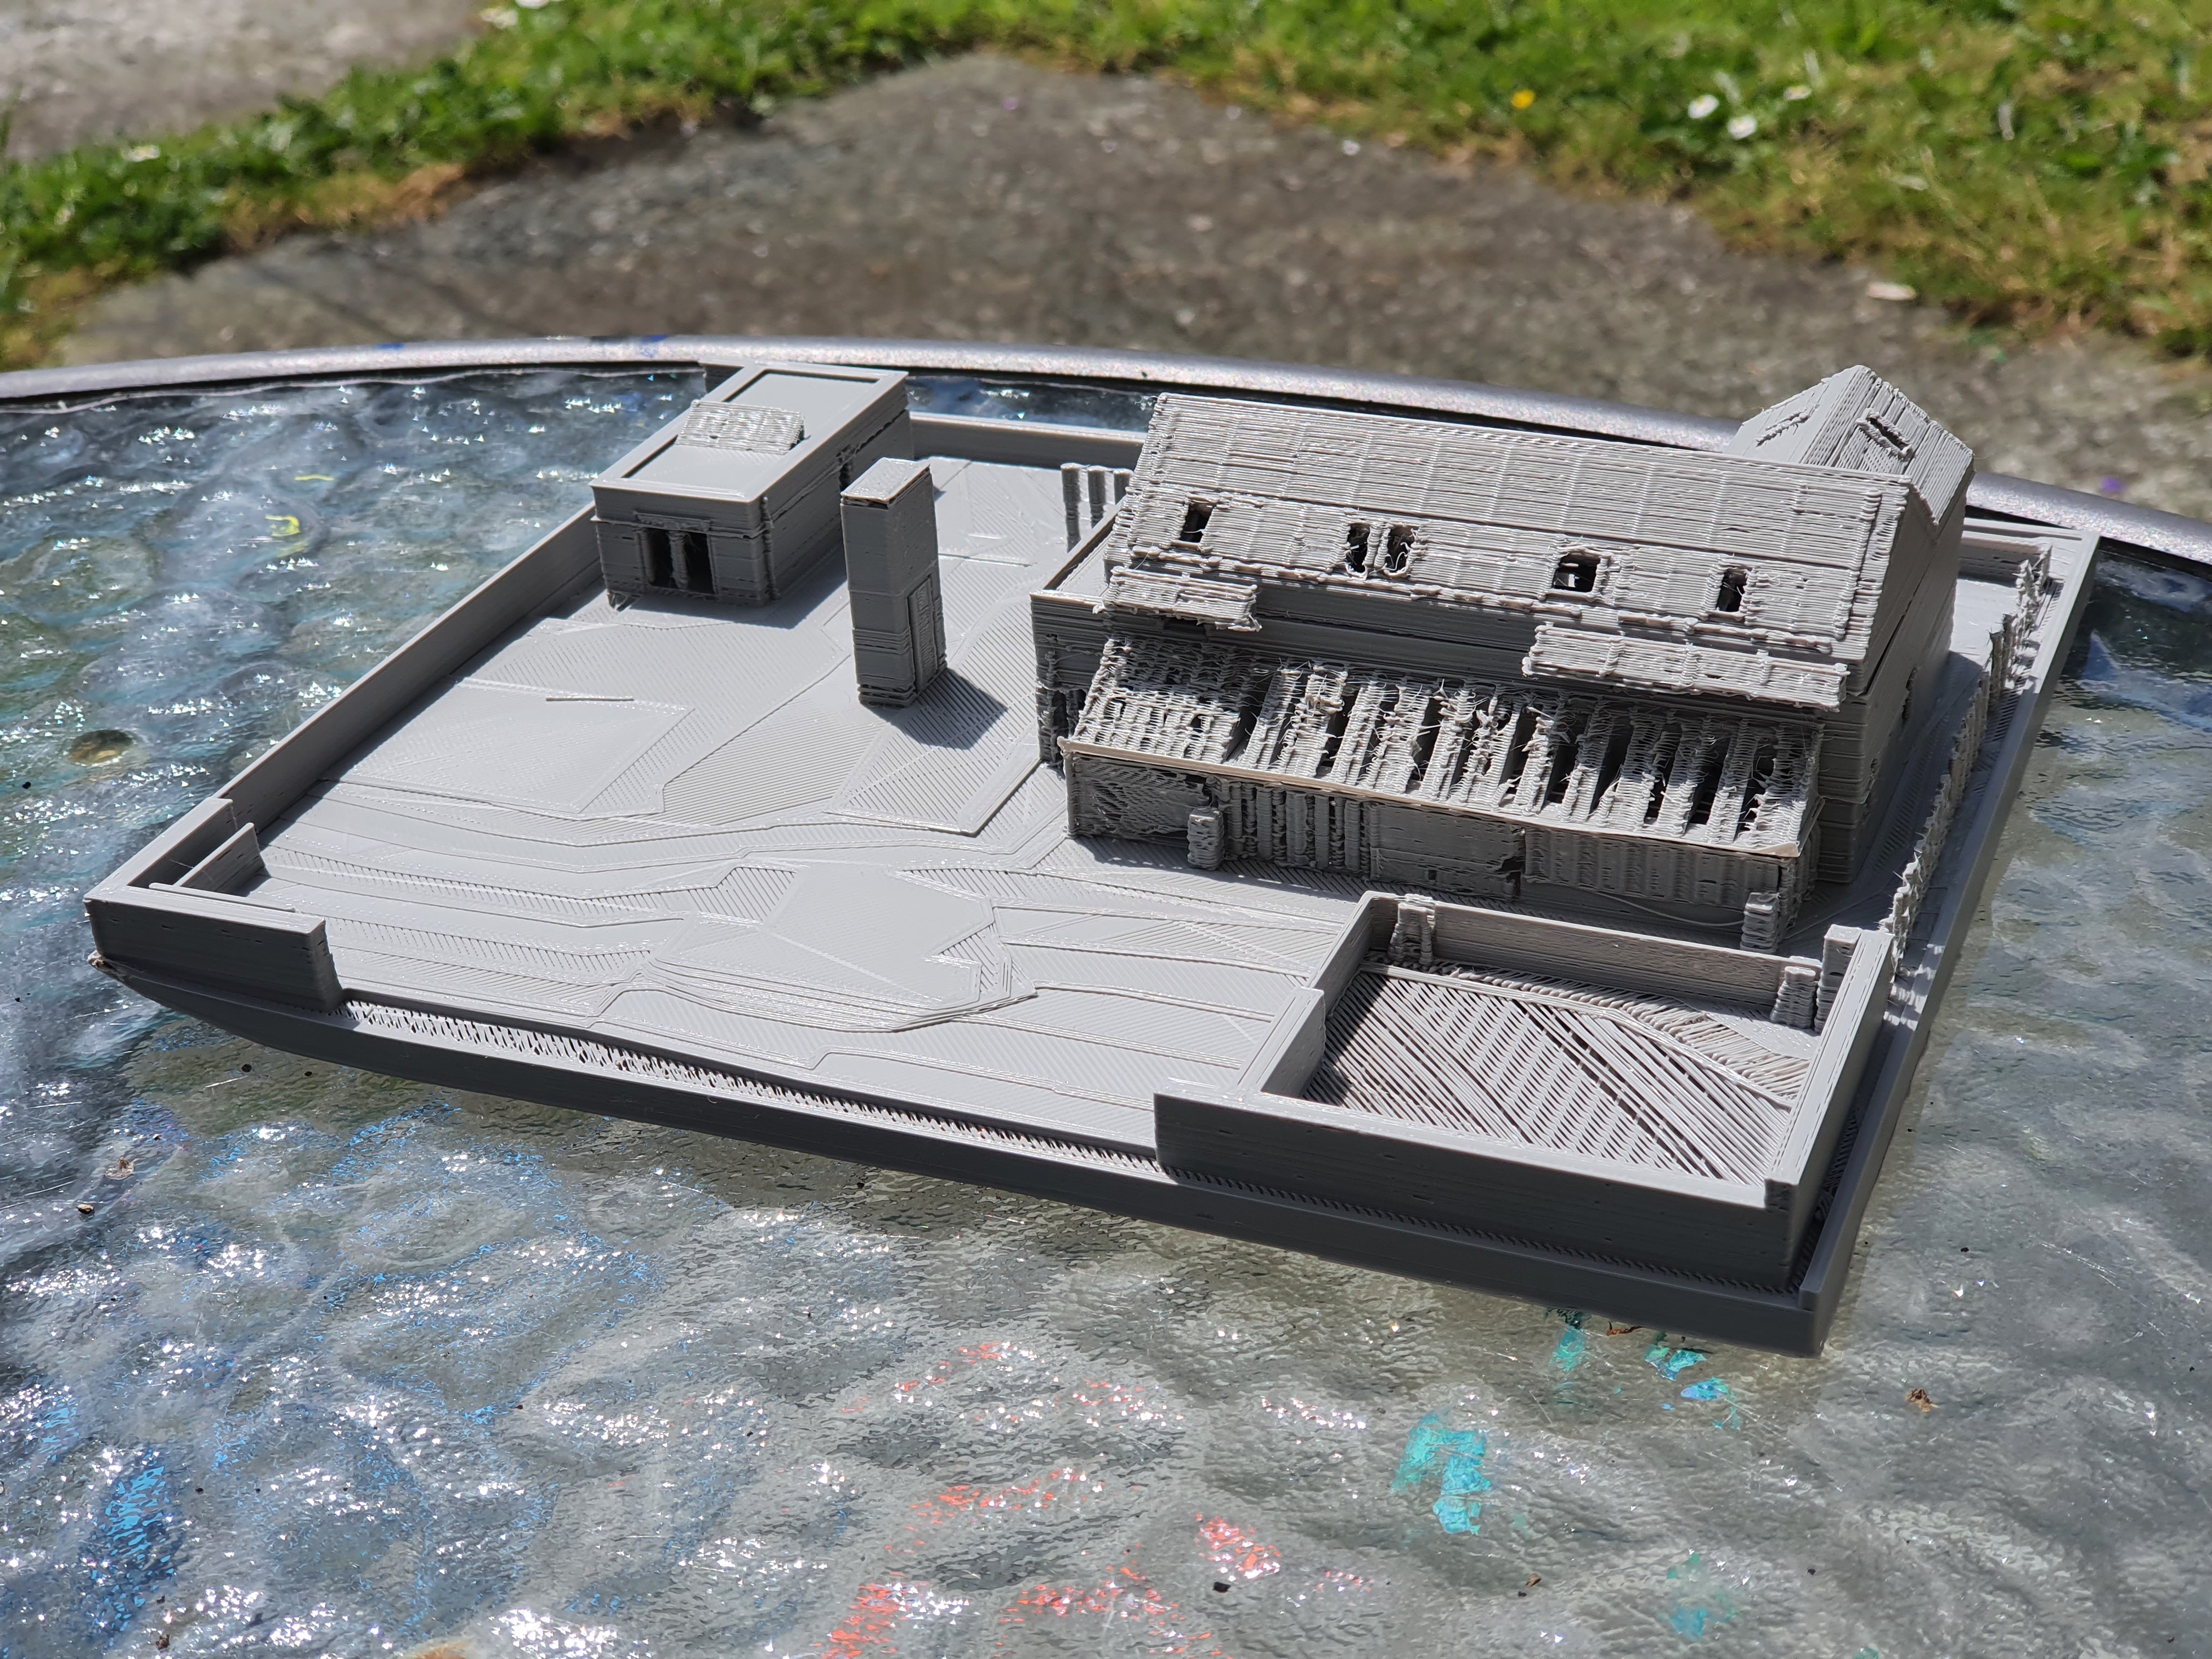
The resolution is now very good – you can clearly see the staggered studs in the walls around the bedrooms (the studs alternate sides). My bet on the overknitting of internal fill to hold thin walls together worked a treat. The cavity between the outer block leaf and timber frame is clearly evident. Even the ventilation holes into each room are clearly visible, and I can confirm during printing it did print all the joists between the floors, but you can’t see those now.
There are two mistakes in this build. The first is obvious on the roof where the layers did not adhere going into the gable. I reexamined my mesh after that, and found there was a gap (the roof tiles!) and the slicer emitted that dutifully. I hadn’t noticed because earlier slicer settings didn’t emit the gap, but after later tweaks it did and I didn’t notice. The second mistake is more subtle, but the floor of the house isn’t exactly flat, it has a slight tilt. I must have slightly messed up a rotation at some point as I didn’t realise until near the end that MeshMixer can do exact rotations, and I was rotating it by mouse movement and my hand must have wobbled. Oh well, there is very little in it.
I’ve sent this model for print by an online commercial printer for €150 delivered. It will be a Prusa XL doing the print, which has a maximum print volume of 320 x 320 mm so the model should be twice as big by volume. The printer he originally emailed me back to say this is an impossible print, it couldn’t be printed using any FDM printer. I sent him a picture of mine. Given the evidence, he said he’d have a try but no promises. His printer will take some weeks to do this print, even though the Prusa XL is much faster than mine, it is still a huge print taking a very long time. He suggested using ABA, it thinks it’ll be more tolerant to fine details and given the size of the model, PLA isn’t really strong enough to make a durable model. I look forward to it turning up in the post in the next month.
One big reason I chose PLA, and specifically grey PLA, for my print is because PLA is very paintable, unlike most of the other printable plastics. And grey is a good base for both dark and light paints. Megan intends to paint this model to test out colour choices for the house. And if she needs a second model for a second colour scheme test, it’s only a week of printing away.
As much as it was satisfying to make a sort of forward progress on the build by printing it, and it was a useful excuse to teach myself how to use the design software, I did find the printed model rather useful to aid conceptualising the design. I didn’t expect that: having designed this house exclusively by VR, we had walked all over it, flown around it, sat down on all the chairs, sofa and bed, practiced playing pool on the pool table, sat in the library reading books etc I really thought that there was no further understanding possible of this house design. However holding a 1:100 scale model in your hands … somehow it triggers something in you which VR doesn’t, and perhaps can’t. Something about the physicality, the realness of the actually existing thing … VR can approximate reality, but it can’t quite substitute fully for reality I think.
Anyway I suspect that will be as much forward progress as my house build will make in the next few weeks. Here’s hoping next time I write one of these posts something will have happened!
| Go to previous entry | Go to next entry | Go back to the archive index | Go back to the latest entries |