Word count: 4792. Estimated reading time: 23 minutes.
- Summary:
- A detailed technical diary entry is presented. The imposition of new EU tariffs on small packages from China is discussed, and the resulting costs are detailed. Furthermore, various electronic components — including PWM dimmers and ESP32 development boards — are reviewed. Technical issues, such as fuse failure in DC-DC converters and fibre network testing setups, are also explained.
Thursday 25 June 2026: 14:08.
- Summary:
- A detailed technical diary entry is presented. The imposition of new EU tariffs on small packages from China is discussed, and the resulting costs are detailed. Furthermore, various electronic components — including PWM dimmers and ESP32 development boards — are reviewed. Technical issues, such as fuse failure in DC-DC converters and fibre network testing setups, are also explained.
This new tariff has been designed to be especially awkward and annoying: the foreign seller must collect a tariff deposit in advance, then pay it to the EU based delivery service who then may ALSO charge an additional administration fee. There are already reports of some EU national postal services charging over €20 as their admin fee, then the tariff is €3 + VAT per type of item, and that is on top of the original price in China plus EU VAT. This will render most small packages from outside the EU utterly uncompetitive in price, never mind lots of faffing around, delivery delays, and hassle.
Anyway, all that is a separate story told better elsewhere than this website, rather, this diary entry is about the end of an era: the Chinese direct to consumer market was primarily about price, but it was also about choice because sites such as Aliexpress often had components you simply couldn’t get elsewhere in small quantities, or indeed sometimes you couldn’t get them at all anywhere else. I, having known that this tariff was coming and being almost certain that the two weeks beforehand would be just a mess, got my ‘last ever’ Aliexpress order in by end of May, and the last of everything was successfully delivered without any hassles nor problems more than a week ago. This diary entry will review some of those recent orders.
I put ‘last ever’ in quotes because I will almost certainly buy some items from Aliexpress et al in the future, specifically items where I can’t get them anywhere else at all, or in reasonably sized quantities, or where even with the tariff they’re still cheaper than say Amazon which lists many of the same items, just 15-20% more expensive (I note that the Amazon commission is 15% for most items, as compared to 8% for Aliexpress). So let’s call this a review of my ‘last ever cheap Aliexpress order’.
Missing bits for the house
I had previously made large orders during the Singles Day sales, having spent thousands of euro on things like LED strips and DC PWM dimmer wall switches. I saved an absolute fortune over buying locally, but as the house design reached completeness we had become short in a few items e.g. DC PWM dimmer wall switches, as we had added a few more. I therefore made an order for the balance:
- Seven more DC PWM dimmer wall switches, which I previously reviewed here.
- Thirteen more BTS7960 H-bridge motor drivers, which I previously reviewed here.
- Sixteen more GA12-N20 motors with movement encoders, which I previously reviewed here.
These had all gone up in price by about 20% since the original order three years ago, apart from the BTS7960 H-bridges which were actually marginally cheaper. 20% is probably about the amount of accumulated price inflation during those three years, plus I was buying now in non-sale times whereas previously during the biggest and deepest annual Aliexpress sale. So, methinks fair enough.
This wasn’t an expensive order, I had had to keep meaning to get round to it for yonks, but the coming tariff made me get it done.
New type of DC PWM dimmer wall switch
While I was searching for my previously bought DC PWM dimmer wall switches in order to buy more of them, I found a model I hadn’t previously seen, and at under €12 inc VAT each they were nearly half the price of the ‘fancy’ ones I’ve standardised upon. I reckoned buying one was worth a punt so I could test it, and here it is:
The front panel is glass, which is surprising at that price point, and the knob is some sort of metal infused plastic which looks cheap and I’m not sure if the silver isn’t paint which would rub off over time. The build quality is noticeably below that of my ‘fancy’ model, and the circuit board is clearly simplified, however for a less often used location I think it would last years well enough. On the circuit board, there is a single 80N03 MOSFET – which is surprising as eighty amps seems rather overkill for this – and a 8S003F3P6 STM8 microprocessor, which is also surprising as it’s quite expensive relatively speaking at US$0.32 per unit. I unfortunately didn’t take a picture of the rear where the voltage converter obviously must live given the three pins pointing through, but it would be surprising if it’s much different to other DC PWM dimming wall switches: it’ll take something like zero to thirty volts input and output something between 3v and 5v (the STM8 will work with anything in that range). I certainly can confirm it works fine with 5v inputs as well as with 24v inputs.
How well does it perform? It turns out really well …

Yup, that’s a 80 kHz PWM being emitted there, which is ten times better than my ‘fancy’ switches which put out an 8 kHz PWM – and that’s great compared to cheap PWM dimmers some of which can run as low as 0.5 kHz. For this price point, that’s stunningly good, in fact it’s the best PWM dimmer off Aliexpress that I’ve ever personally seen. Why they don’t advertise this quality in the listing I don’t know, but certainly the choice of the expensive STM8 which has a 16 Mhz clock speed makes it trivially easy to emit an 80 kHz PWM, even if that is just a dumb loop manually pumping an output. The STM8 does have three hardware PWM outputs, it’ll do a divisor up to 32,768 on your choice of either a 16 Mhz or a 128 kHz internal clock. I’ve no idea how they implemented it, but such an overkill choice of expensive microcontroller makes very high quality PWM a cinch.
I can also tell you that there are exactly twenty stops on the dial between fully on and fully off, and when it’s off it connects everything to ground and puts itself to sleep (I can tell this, because I can see the noise from the AC-DC converter when the switch is set to off). I assume it writes its last known value to flash, as across a power cut it restores its brightness before losing power. As you can see on the oscilloscope, there is a nasty negative voltage flyback on PWM down, but as LEDs are also diodes and the negative flyback voltage is within 2x of the LED strip voltage, it should be fine. The ‘fancy’ switches reviewed nearly three years ago also have some negative flyback voltage, but more controlled than you see here.
For €12 inc VAT there is a lot to like here. If the knob were just a touch better quality, this model would be a no hesitation recommendation, and they are nearly half the price of my fancy model, so this is a whole load of DC PWM dimming knob for your money. I would still prefer my ‘fancy’ model not just for the better build quality, but also because it shows a dot LED when off so people can find it in the dark, and it does also show a percentage on a LED display, which is fancy.
Ultra ultra cheap PWM LED dimmer
Ever wondered to yourself how bad these ultra ultra cheap inline PWM LED dimmers are when you buy them in bags of ten or more and they come out at less than sixty cent each delivered (well, before the EU tariff anyway)?
The case is actually heat shrink wrapped plastic, and they have a standard DC plug. They can not only dim, but also do various flashing patterns. They do remember their last setting after power loss, but I know from experience with these cheap parts in the past that after a while they forget their last setting after power loss, no doubt due to flash write wear as they’ll use a single location for storage and not update a ringbuffer which you’d do to greatly extend life. At sixty cents each, you just replace them if the memory loss annoys you.
I wasn’t expecting much, but they turned out to be okay:
That is a 1 kHz PWM, not great but also not terrible. Some with sensitive eyes might see flicker if this were driving a large, bright, LED, but in general you would use these inline dimmers in something like a desk light or other small lighting solution. So flicker shouldn’t be that noticeable, even to those sensitive to PWM flicker.
The irony is not lost on me that this ultra ultra cheap PWM dimmer produces the cleanest oscilloscope graph of any of the PWM dimmers tested. Of course the sedate 1 Khz clock rate helps hugely with that, controlling flyback with a 80 kHz PWM clock rate is much harder than for 1 kHz. However, my picture also tells lies – this unit actually oscillates between really bad flyback and clean over time, and my picture shows it when it is behaving. Again, back voltage remains under 1.5x of LED strip voltage, so it’ll be fine, but you get what you pay for.
And also in that vein, this dimmer only has eight levels of dimming! This may be too few for some, but for sixty cents each they’re good value for money.
Thermistor surge protection
I don’t think that I’ve mentioned on here an issue with one of my 480w DC-DC converters which keeps blowing its fuse – what’s weird is that I have several of those converters in use, and only one location keeps blowing its fuse. I opened one of the failed units to discover why:

One of the blown DC-DC converters with its resin scraped out by me to determine why it failed
As you can see, it has a 20 amp automotive fast blow fuse on its 48-60v input, and from inspection I can see that is has blown. There appear to be two Aishi R series 63v 330 μF capacitors on the input side, and two LF ET series 25v 470 μF capacitors on the output side. The input side capacitors have a 0.041 ohm impedance at 100 kHz, and a rated ripple current of 1500 mA. I must admit some surprise that the fuse blows, as a 20 amp automative fuse actually has this blow curve (italic values are inferred by continuing the slope of the line on the datasheet):
| Amps | Duration to blow | |
|---|---|---|
| 30 | 5 seconds | |
| 40 | 400 milliseconds | |
| 50 | 200 milliseconds | |
| 70 | 100 milliseconds | |
| 100 | 50 milliseconds | |
| 125 | 25 milliseconds | |
| 150 | 12 milliseconds | |
| 175 | 6 milliseconds | |
| 200 | 3 milliseconds | |
| 225 | 1.6 milliseconds | |
| 250 | 0.8 milliseconds | |
| 275 | 0.4 milliseconds | |
| 300 | 0.2 milliseconds |
For 54v DC to create a current above 20 amps would require a resistance below 2.7 ohms, but the lower the resistance the shorter the duration of surge current. Let’s say that the resistance is one ohm, then from 660 μF of capacitance the surge current would be 54 amps and it would last 3.3 milliseconds – nowhere near long enough to blow that fuse. Therefore, the resistance must be way lower, enough to generate such a massive current flow that it could melt that fuse. Let’s divide by ten and see what happens:
| Resistance | Surge Current | Surge Duration | ||
|---|---|---|---|---|
| 1 ohm | 54 amps | 3.3 milliseconds | ||
| 0.2 ohm | 270 amps | 0.66 milliseconds | ||
| 0.1 ohm | 540 amps | 0.33 milliseconds |
And now I think we have our cause: you would need to get that resistance down to the 0.1 ohm range to blow that fuse. I have a 16 mm2 cable feeding that power supply, and now I come to think of it that is unique: all the other power supplies have a much thinner wire connecting them, and maybe that is just enough to have protected them so far?
In any case, back when I bought the thermistors I wondered if I could ‘soft start’ the DC-DC converter using a thermistor and prevent the fuse blowing? Aliexpress lets you buy small bags of basic electrical components easily and cheaply, so a bag of fifty of these turned up for only a few euro delivered:
This is the MF72 2.5D13 thermistor, and it has 2.5 Ohms of resistance when cold (25 C) and 0.088 Ohms at 200 C, which it should reach quickly. At its steady state current of six amps once at 200 C, it would therefore dissipate about 3.17 watts of power. As a variable resistor, it therefore initially restrains current when first switched on, then it heats up, and as its resistance falls more current is allowed to pass and the heating of the thermistor reduces until it reaches a steady temperature.
I hadn’t figured out the cause of the DC power supply blowing its fuse at the time of ordering, so to be honest I sized those based on knowing that if the input voltage is 54v and a 20 amp fuse is getting blown, then a 2.5 ohm resistor ought to cap current flowing to 21.6 amps. As exterior temperatures in Ireland are very rarely 25 C at night time, you should actually get a good bit less than 20 amps in the real world. The D13 size came from the steady state current of six amps, which as 70% of the maximum draw of this DC converter (~8.5 amps of 54v) would be the likely maximum load I would allocate to these.
Now that I do know the cause, the thermistor is definitely oversized. You only need 0.1 ohms of additional resistance to not melt the fuse, so a MF72 0.7D25 thermistor would be a better choice as it would waste up to six times less power. Still, losing a few watts on a 200w load seems reasonable if it saves me having to constantly replace DC power converters.
How quickly does the thermistor get hot? I got out my backup 54v DC power supply, and put one of these thermistors between the 54v supply and the 48-60v to 24v DC-DC converter. I then placed my battery load and capacity tester on the 24v output. It’s probably easier to show pictures of the test setup:
The power supply actually outputs 55.4v, and yes I did confirm this during testing. My battery load tester will only load up to 184 watts, so I firstly ran a test at 0.1 amps which is 2.4 watts on the output side. With conversion losses, that is at least 2.67 watts going through the thermistor:

With the thermistor at ~23 C, one should be getting around 2.5 ohms resistance so if the voltage drop is 0.198v and the current flowing is 0.048 amps, resistance should be 4.13 ohms. That’s obviously a lot more than expected, however at very low current flows the relative losses in the DC-DC converter will be high, so if say current flowing on the input side were actually 0.07 amps now you’re getting a resistance of 2.83 ohms and that feels more like it. If so, power lost to heat would be 0.014 watts, or 0.6% – this being so low because the thermistor does not radiate much heat into the environment.
Ramping it up to the maximum 180 watts which is about 200 watts on the thermistor:
The thermistor is now a toasty 130 C and the voltage drop is 0.66v. Current flowing through the thermistor should be around 3.61 amps, so power lost to heat would now be 2.38 watts, or about 1.2%. Resistance should be about 0.183 ohms, or about twice the resistance if the thermistor were at 200 C according to its datasheet.
When I first applied the 200w load, I noticed the voltage drop across the thermistor was momentarily 4.3v before rapidly falling within a second or two to less than 0.7v. If so, resistance was somewhere around the 1.2 ohm mark for whatever fraction of a second that was, and power lost to heat would have been 15.5 watts. No wonder that the thermistor gets hot so quickly!
If you leave the load tester off, the thermistor sits at about 20 C just over the ambient temperature. The parasitic draw of the unloaded DC-DC converter wastes very little heat in the thermistor. This is good to know. At a 100w draw which is probably around 110w for the thermistor, it reaches 92 C (I didn’t take a voltage drop).
Most of these DC-DC converters will be deployed into the LED strips for the outdoor lighting. The easiest solution is to run thinner wires to them which will offer the necessary protection against current surges: let’s say I fit 1.0 mm2 diameter wire, this would have a max amperage of 8-17 amps with a 4.24 volts per amp drop per 100 metres. 10 metres of such cable would offer 0.166 ohms of resistance, plenty more than the 0.1 ohms we need – so if I make sure I fit at least five meters of no thicker wire than 1.0 mm2 diameter, no more fuses will blow!
Modern fibre network testing with the Fluke LRAT-2000
Many years ago I picked up at vast cost a used Fluke LRAT-2000 which is an ethernet wiring validation tool. The LRAT-2000 was launched around year 2012, and it cost many thousands of euro – you could buy a used car for the price of a new LRAT-2000. Even used on eBay today fourteen years later, they still cost over a thousand euro which is quite remarkable given that all they do is (i) test each of the wires for being correctly connected (ii) helps you figure out which cable in a bundle is connected to which (iii) test that TCP traffic flows over the cable (iv) test PoE power loads. Why did I splash out such money like so many others on eBay still do for such legacy hardware? Simple: the quality is guaranteed to be there, so when it tells you that an ethernet cable has a break eighteen metres along, you can be confident that is where the break is before you take a kanga hammer to your wall.
One feature that it supports is fibre network testing. For this you need to insert a compatible fibre transceiver into the LRAT-2000’s SFP cage. As this is such old hardware, the fastest network supported is 1 Gbps and it turns out that a gigabit speed fibre transceiver in the legacy SFP format costs about €45 each even off Aliexpress, and of course you need two of them. €90 felt a bit steep for testing the eight or so fibre cables which are likely to be installed in my future house, so I looked for an alternative.
A few years ago I fitted 2.5G fibre transceivers as the backhaul between my Wifi 6 access points, these being the fastest possible for the legacy SFP (not the newer SFP+) cage – these were under €10 each, and they run with a relatively low power draw and very much tick the box for the problem they solve (distance backhaul). Years ago I bought a tray of those transceivers enough for all my future needs lest they fall out of production and become expensive, however of course the LRAT-2000 is too old to use those (it does recognise them if you plug one in, but it can’t find a network). What I therefore needed was some sort of box which let me connect the LRAT-2000 to a newer fibre transceiver, and it turns out that Aliexpress has exactly such an item: a cheap dumb media converter box which sends layer 2 network frames from one SFP+ cage to another. You then plug in whichever transceivers you want to have fibre to fibre, ethernet to fibre or ethernet to ethernet. There are also variants with a single SFP+ cage, and a RJ45 ethernet port.
(To be clear, you can also get branded media converter boxes from all the usual vendors e.g. TP-Link, but the unbranded models – which appear to be physically identical from pictures apart from a printed logo – are, or at least were before the tariffs, a good bit cheaper)
I ended up buying the following before the tariffs came in:
- Two 10G ethernet to SFP+ media converter boxes each for €38.33 inc VAT delivered.
- Two 10G single mode LC fibre transceivers for a fairly astonishing €7.71 inc VAT delivered. Yes, that’s a 5 km capable 1310nm wavelength ten gigabit transceiver for under a tenner.
And while this solution involves more wiring and power adapters than I would prefer, it does solve testing fibre connections with the LRAT-2000:
This was about the same cost as two of the legacy 1G fibre transceivers, so I didn’t save money – however I think this spend of ~€100 better bang for the buck.
High speed fibre transceivers have become ridiculously cheap in recent years: 40G fibre transceivers cost about €12 each, even 100G fibre transceivers are just €25 each. That makes 100G networking very feasible for a home network, which is just madness: the entire country of Ireland had 25G of international connectivity as late as year 2003. That’s 4x the entire former international connectivity of Ireland in your home!
What remains expensive is > 10G wired ethernet, as are > 10G switches. You can avoid expensive wired ethernet by fitting an inexpensive PCIe to SFP+ cage adapter to your PCs/servers and running fibre between everything, but a 10G switch with SFP+ cages is still a fair sum of money: Amazon currently lists an eight 10G ethernet port switch with SFP+ cage for €136 (albeit, it is managed not unmanaged). If you want faster than a 10G switch, used commercial switches are in the hundreds of euro range, but they are very loud and burn a lot of electricity; if you want something quiet and power efficient, it currently costs many thousands of euro. Given this, you may actually be better off building a cheap low power PC and filling it with PCIe to SFP+ cage adapters, however 40G ethernet SFP+ transceivers are not cheap nor do they sip power. One option is a switch of 40G SFP+ cages, these appear to be on sale used for about €500 right now, so you could probably build something somewhat quiet and power efficient for under a thousand euro if you populated that exclusively with 40G fibre transceivers. Still, that’s a thousand euro! Better than 10G networking remains a four figure cost for now.
And to finish, yet another bag of ESP32 dev boards …
If there is any iconic product line where Aliexpress has been absolutely stonking value for money it has been ESP32 dev boards. Two years ago I bought a bag of ESP32-C3 ‘Super Mini’ dev boards delivered and including VAT for €1.50 each. As described at the time, there were even cheaper dev boards on Aliexpress, the very decent RP2040 cost just €1.29 inc VAT delivered, but in terms of compatibility with a large existing microcontroller software ecosystem the ESP32 is hard to beat.
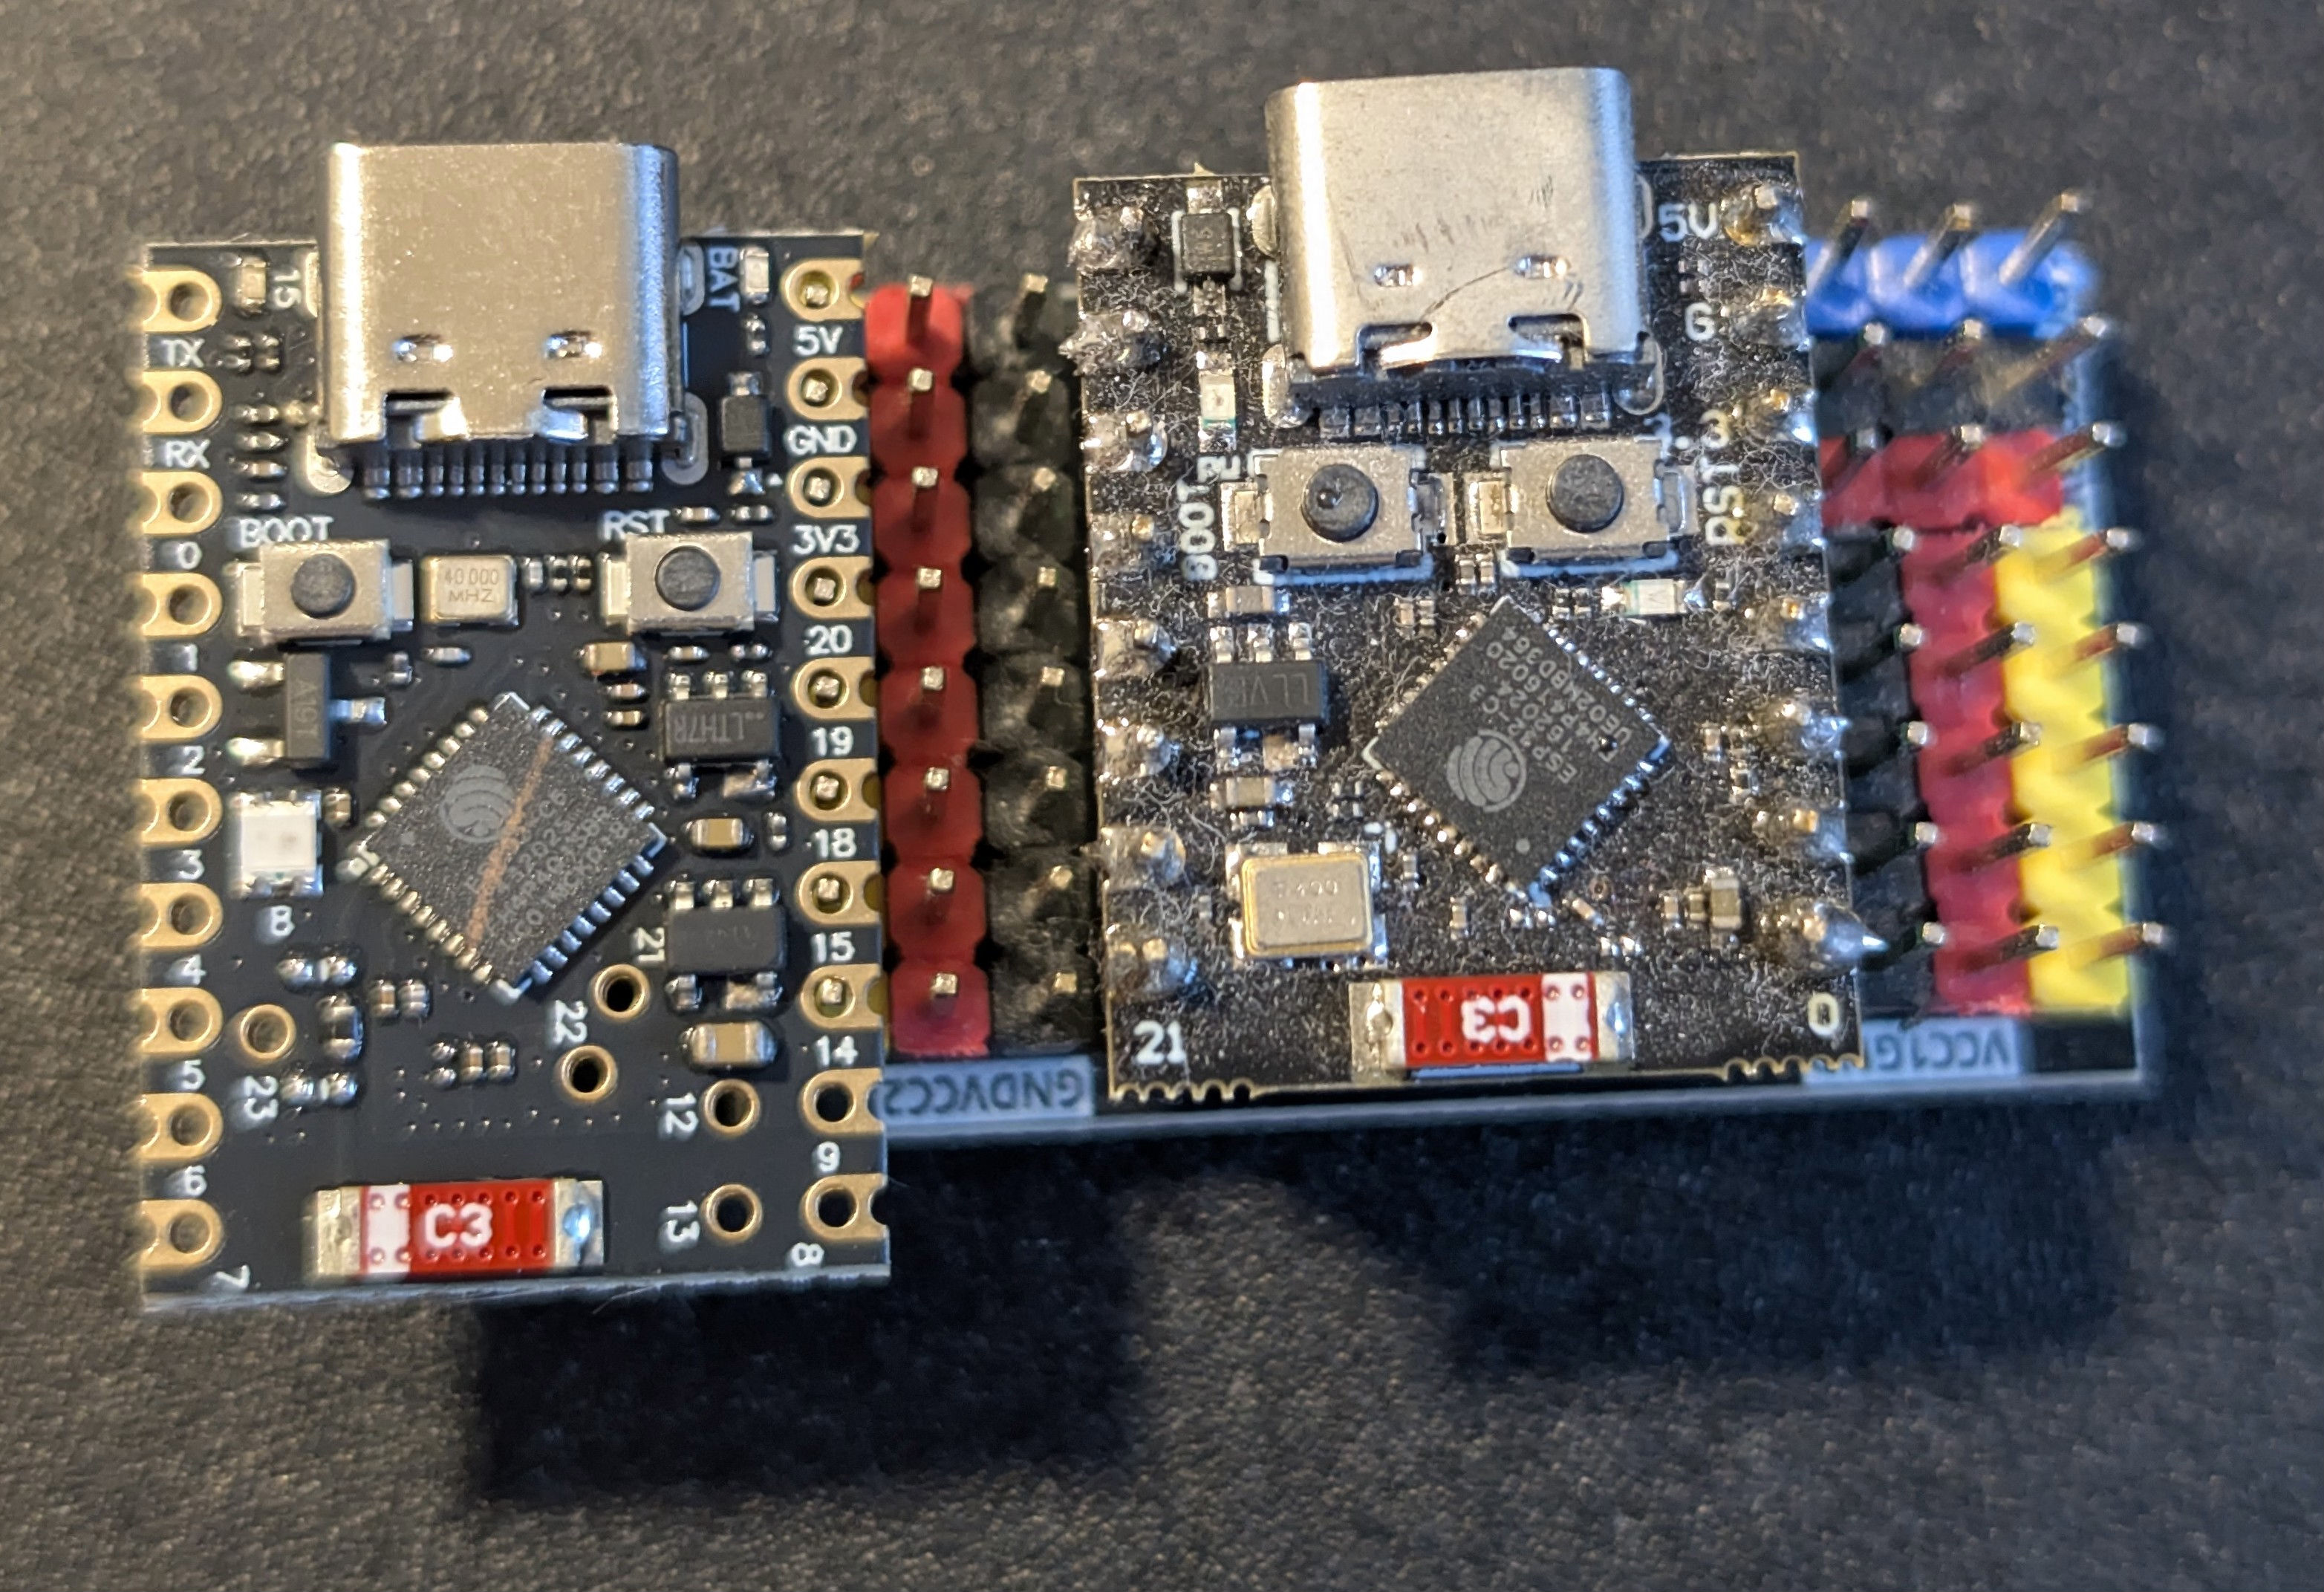
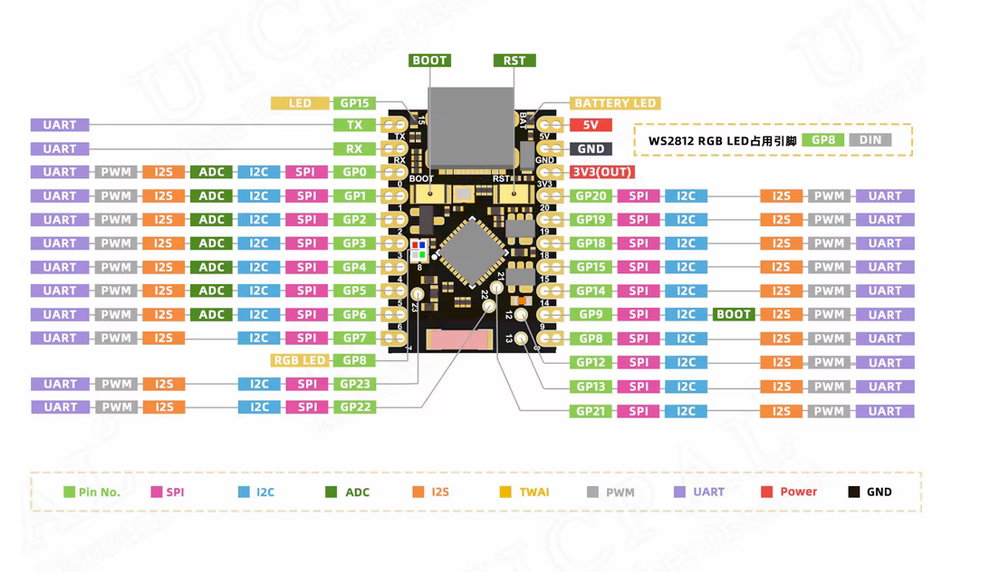
Before cheap Aliexpress went away forever, I therefore had a look around to see if any of the higher end ESP32 dev boards had come down to bargain basement prices, and indeed they had: there is now an ESP32-C6 ‘Super Mini’ dev board with most of the worst design mistakes in the C3 ‘Super Mini’ dev board fixed and those also come in bag sized quantities for tens of euro:

Comparing the C3 and C6 models directly:
| Board | Price I paid | CPUs | RAM | Flash | Wifi | Bluetooth | LR-WPAN | GPIO | Additional |
|---|---|---|---|---|---|---|---|---|---|
| ESP32-C3 Super Mini | €1.50 inc VAT in 2024 | 1x 160 Mhz RISC-V | 400 Kb | 4 Mb | v4 (2.4Ghz) | 5.0 | No | 13 | Blue LED |
| ESP32-C6 Super Mini | €2.74 inc VAT in 2026 | 1x 160 Mhz + 1x 20 Mhz RISC-V | 512 Kb | 4 Mb | v6 (2.4Ghz) | 5.3 | Yes (Zigbee, Thread etc) | 17 sides + 5 central | RGB LED, Battery charge |
The C6 is about 60% more expensive after adjusting for inflation. The C6 board is also available with a 8Mb flash variant (and it costs 4x more) which is useful if you want to run a Zigbee controller. But in essence, the C6 is the C3 except with a modern 2.4 Ghz radio hardware module implementing IEEE 802.15.4 which is a software defined wireless networking. This lets software easily implement many wireless networking protocols, such as Zigbee, Thread, Matter or anything similar. Wifi also gets modernised in the C3, going from Wifi 4 to Wifi 6, albeit still with only a 2.4 Ghz radio. And I suppose that the dev board does have 70% more i/o exposed, plus a lithium battery charge controller, if any of those things matter to you then the +60% cost may be worth it. Here is the C6 board right next to a C3 board for comparison:
For me, the main attraction of the C6 is for Zigbee routers (these extend a Zigbee network) and battery powered Zigbee end devices. Zigbee active consumes about 23-80 mA, and a Zigbee router needs to always be active, so one of my 3000 mAh lithium batteries would last only one hundred hours – still, if you had a Zigbee dead zone, firing in one of these with a bit of wire soldered onto its antenna to greatly extend range would bridge the issue, with low running costs when wired in for power.
Probably more exciting are battery powered Zigbee end devices e.g. a temperature sensor which could be dropped wherever you need them without having to wire them in. Zigbee end devices can deep sleep between periodic wakes to push data. Deep sleep on the C6 ‘Super Mini’ dev board can get down to 55 uA if you remove the RGB LED which always burns 330 uA even when off AND make sure you supply at least 3.6v to the battery pin/5v power input, otherwise the voltage buck converter burns current and it’ll horse through your battery quickly. If running off a battery, make sure to monitor the battery voltage and self disable if it gets below a certain minimum e.g. 3.4v, otherwise this board will happily run your battery down to damaging levels of empty.
The C6 has a proper low power 20 Mhz CPU for deciding whether to wake the board up or not which might be useful. The C3 has fixed function wake logic, so for example you might say ‘if pin A rises wake me’ which you can also do on the C6, but only wake the 20 Mhz CPU. It only has 16 kB of RAM accessible to it, but it CAN speak i2c and UART which is good enough to deal with a large subset of sensor boards. You could do fairly complex filtering or decision making with the 20 Mhz CPU, and wake the 160 Mhz CPU and wireless stack only if it were really necessary. This could shave off a few more percent of battery consumption.
According to real world numbers I researched from the internet, one of my 3000 mAh batteries fitted to a sleepy Zigbee end device and with a typical i2c sensor waking every ten minutes might last 10,000 hours = 1.14 years. When its battery gets low, you simply plug it in via USB and it’ll charge itself to full, then you can redeploy it. I can’t currently think of when I might use such a thing, but for the few euro to buy a bag of the C6s now before cheap Aliexpress ends it is definitely worth the hedge.
What’s next?
Most of this entry was written at the site while popups were installed. Expect a full write up and lots of pictures next entry!
| Go to previous entry | Go to next entry | Go back to the archive index | Go back to the latest entries |