- Modular
NedHAL's modular layered design strategy allows easy porting of code between different processors, architectures, boards and peripheral hardware. Scalability is inherent as modules may be included or left out depending on requirements. Code reuse is possible through the use of context blocks where necessary to hold all instance data, thus allowing multiple peripherals to be driven by the same code. - Architecture-independent
NedHAL layers its support for architectures with the highest layers being portable to all platforms. Lower layers increasingly add specific architecture support whilst maintaining maximum cross-architecture use. Hence, the amount of code requiring change across ports to new architectures is minimised. - Multiprocessing capable
Most of NedHAL will by its nature run exclusively on one processor without interaction with other processors. However, operating systems running on top of NedHAL will require portable methods of inter-processor communication and synchronisation and hence there are portable C-based macros and calls provided to utilise processor-specific instructions to achieve this. - Ease of use
NedHAL provides a consistent layered API with excellent error reporting to aid quick debugging. API names are based on the module name, hence preventing namespace clutter. API's are equally callable from assembler, C and C++ code. Minimal use is made of the standard C library, thus minimising library inclusions. - Low overheads
NedHAL can run with as little as 2Kb of DRAM for its own use - hence tiny 4Kb embedded systems are perfectly feasible. The code is written for speed whilst maintaining minimal code size and high code reuse. The modular architecture allows inherent scalability - the most minimally featured NedHAL build can be as little as 8Kb.
Modules encapsulate functionality based on interoperability. For example, if you had three revisions of the same processor and each revision had slightly different ways of performing internal functions eg; flushing the cache - then you would have a "Processor" module whose API was consistent between all revisions of that processor. Hence one can change the "Processor module" for a new revision of the processor and everything which used that API would run fine.
This ideology is taken further with groupings of modules as shown by the NedHAL source structure. If you place all architecture-specific modules in one place and have them expose a completely portable API, then moving from one architecture to another requires merely a rewrite of those modules. If you further extract board-specific code from the architecture-specific code, you now can port between implementations of that architecture merely by rewriting or changing the board-specific modules.
All the modules which comprise NedHAL reside within NedHAL's source tree which is broken into a number of directories to logically group source files based on commonality of purpose and portability derived from the above ideology:
[REPLACE THIS GRAPH WITH ONE SHOWING MODULE GROUPS BASED ON LAYERS OF MODULES]
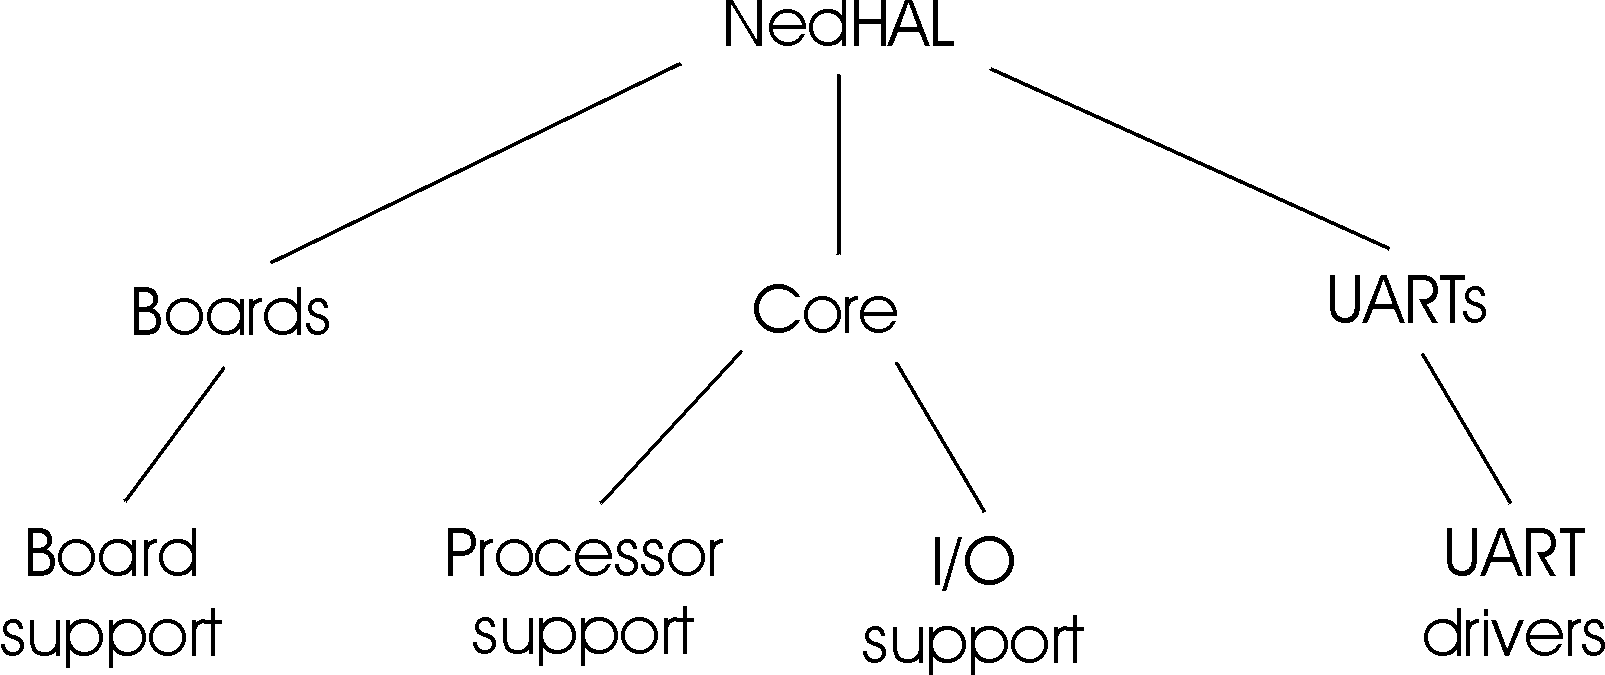
- Boards
The Boards directory contains the modules which provide board & processor specific code for a particular port of NedHAL. - Core
The Core directory contains the core source modules of NedHAL, of which there are two types: portable, and non-portable. Non-portable core source modules live within a specific processor support directory eg; the processor support for the ARM lives in the Core/ARM directory. - UARTs
The UARTs directory contains the Universal Asynchronous Receiver Transmitter (UART) driver files (the lay-man's term for UART is serial port controller). These are written in portable C code and are expected to make few assumptions about the underlying processor or architecture. The API which represents the UART uses context blocks and hence one module can driver many pieces of hardware simultaneously without recompilation.
Typically, to use NedHAL in your code, start with one of the provided templates for your particular compiler or look at the included examples.
This is not to say that the documentation isn't usable in other web browsers. It is of course usable in all web browsers with at least table support (eg; the "simple" web browser QVT/Web for Win32 from QPC Software, http://www.qpc.com, was used to test this manual), but formatting mistakes may be made by some web browsers. This may or may not aid use.
The documentation's HTML code has been written to allow use as follows (in the order of expected most likely use):
- As traditionally printed documentation (passive use)
This form has the advantages of being able to hold it in your hands, make hand-written additions or alterations and of course being able to refer to multiple parts simultaneously and while the computer monitor is otherwise engaged. - As a locally stored online reference (active use)
The form is quick, cheap and doesn't kill rain forests. It can be useful to look up things on the same development machine as your code by placing the manual in a window alongside your development windows - however, most would agree that if one can afford it, printed documentation is far more preferable in terms of ease of use. - As a remotely stored online reference on the internet (active use)
The only advantage of this over the locally stored form is that it will always be the latest version with the least errata. It does however bring the disadvantage of potentially long load times. - As a computer-based manual for visually impaired users (active and passive use)
For those with visual impairments, use of traditionally printed documentation can be difficult. Because most web browsers can change the overall size of fonts, one can view or print the documentation in a much larger overall font to increase readability.
To these meet these goals, the following features are present:
- To aid general quick reference, there is use of standardised field entries to create consistency and ease of lookup within each API entry
- To aid traditional passive use, there is lots of whitespace for errata corrections and general annotations
- To aid active use, the pages have been designed to automatically reformat themselves without breakage according to window size by always using relative sizing commands. This allows the pages to be placed anywhere on screen so they do not annoy the user and still retain full readability. A minimal window size of 640x480 (VGA) has been assumed for those pages with images upon them.
- The source HTML includes silent JavaScript created parts which when used actively, include extra HTML to warn of rendering problems or else print status messages to show how far the page has loaded (especially useful when being accessed remotely as these pages are big!). When used passively, these features are not evident.
Typeface is used to indicate what the text represents:
- Serifed font
This font is used for the main body text. It indicates that something is being described or discussed. - Sans-serifed font
This font is used in the left-hand margin to introduce new section. Bold or larger fonts introduce more generalised sections. - Monospaced font
This font is used for mainly for code listings or fragments or anywhere else a monospace font is more suitable
The use of italics, bold and underlined text has been kept to traditional values for the English language except for when code is being described. In this case, code is described in monospace initially and during the description of that code certain key parts of it will be emboldened and underlined to make them stand out:
typedef struct Example_t
{
	...
	int foo;
	...
} ExampleStruct;
... waffle ... waffle ... The member called foo describes the amount of foo-ness ... waffle ... waffle etc.
This done so one can index where the structure Example is described with the left hand column and then its individual member items through what is emboldened and underlined in the following paragraphs.
| s8, u8: | Signed and unsigned eight bit container |
| s16, u16: | Signed and unsigned sixteen bit container |
| s32, u32: | Signed and unsigned thirty-two bit container |
| s64, u64: | Signed and unsigned sixty-four bit container (on compilers supporting its use) |
However, strings are still referred to as char * rather that u8 * because:
- On many compilers, assigning a literal string to an unsigned char * throws an error even if char is naturally unsigned on that compiler.
- Some compilers may use two bytes for a char to implement unicode strings. NedHAL isn't compatible with these compilers, but if you wanted to alter NedHAL to suit such a compiler then not using u8 * makes life much easier.
typedef struct HALError_t
{
	union
	{
		u32 id[1];
		char name[8];
	} module;
	u32 code;
	char *message;
} HALError;
The name of the module which was the source of the error is stored in module and is encoded as two 32 bit words (id) or as an array of eight characters (name) as shown above (one could add one u64 to the union if your compiler supports it). The module-dependent error code and optional pointer to descriptive message is stored in code and message respectively.
This structure is almost always passed by reference for speed but even if it needs copying around it only occupies 16 bytes on most 32-bit architectures.
If you wish to take action on a reported error, compare the module name or id to the ones you wish to trap and also their error codes. If you wish to report the error, you can simply print the module name after copying it out and adding a zero byte (usually not necessary on little endian machines due to the convenient byte ordering of the u32 code entry) and then the code. You should only print the message if message is non-NULL.
The <module name> module
|
|||||||||||||||||||||||||||||||||||||||||||||||||||||||||||||||||||||||||||||||||||||||
After the standard module description, there are individual API descriptions which list every API the module exposes to be used. The name of the API is on the right hand side because if you are looking for an API quickly in the printed documentation, you will flick the pages with your right hand if the manual is bound on the left hand side (which it usually will be). Hence you will catch the name of the API very easily as it is on the right hand side:
<module prefix>_<api postfix>
|
Firstly, it is highly recommended to use Microsoft's Internet Explorer v4.0 web browser or later to print this manual (Unix or Win32 versions are fine). However, other web browsers which are fully HTML 3.0 compliant and fully support style sheets should be fine (no known version of Netscape's Navigator web browser - currently v4.72 - supports either fully).
We recommend the binding of the pages in a small A4 ring-binder folder with inserted card sectionisers to logically break up the pages into sections (whichever sections you choose is up to you). The main advantage of using ring-binding is that one can open the manual out flat so the manual does not "clump" itself closed when you're not looking as traditionally bound books do. Also, one can balance the ring-bound folder on one's lap whilst coding extremely easily - again, the same cannot be said of traditionally bound books.
You may need to enable printing of background colours in the options of your web browser as some items may not print correctly otherwise. You can also change the size of the fonts printed in most web browsers - set these so the left hand margin occupies around 20% of the page. Set the page to print in portrait form (where the width is less than the height) for best effect and easiest subsequent use. If you are able to set print margins and are following our recommendations for binding, set the left margin to at least 0.9" or 2cm and the others to whatever the minimum amount your printer and web browser allow. You may wish to add a custom header and footer if possible to aid quick indexing.
You should order the pages in growing unportability, eg; as follows::
- This Page (/index.html)
- The fully portable modules:
- The UART driver modules for the UARTs you will be using:
- The Processor support modules for the processor you will be using:
- The ARM processor:
- The ARM support modules (/Core/ARM/ARMSupport.html)
- The ARM Exception Handling module (/Core/ARM/Excepts.html)
- The ARM v3 architecture ARMCore module (/Core/ARM/3/ARMCore.html)
- The ARM v3 architecture ARMCache module (/Core/ARM/3/ARMCache.html)
- The ARM v3 architecture ARMMMU module (/Core/ARM/3/ARMMMU.html)
- The ARM processor:
- The least portable modules you will be using, the board definition modules:
The following image is active when viewed through a web browser: Click on the pictorial representation of the area of the source structure you wish to view more about (if there is documentation on that area):
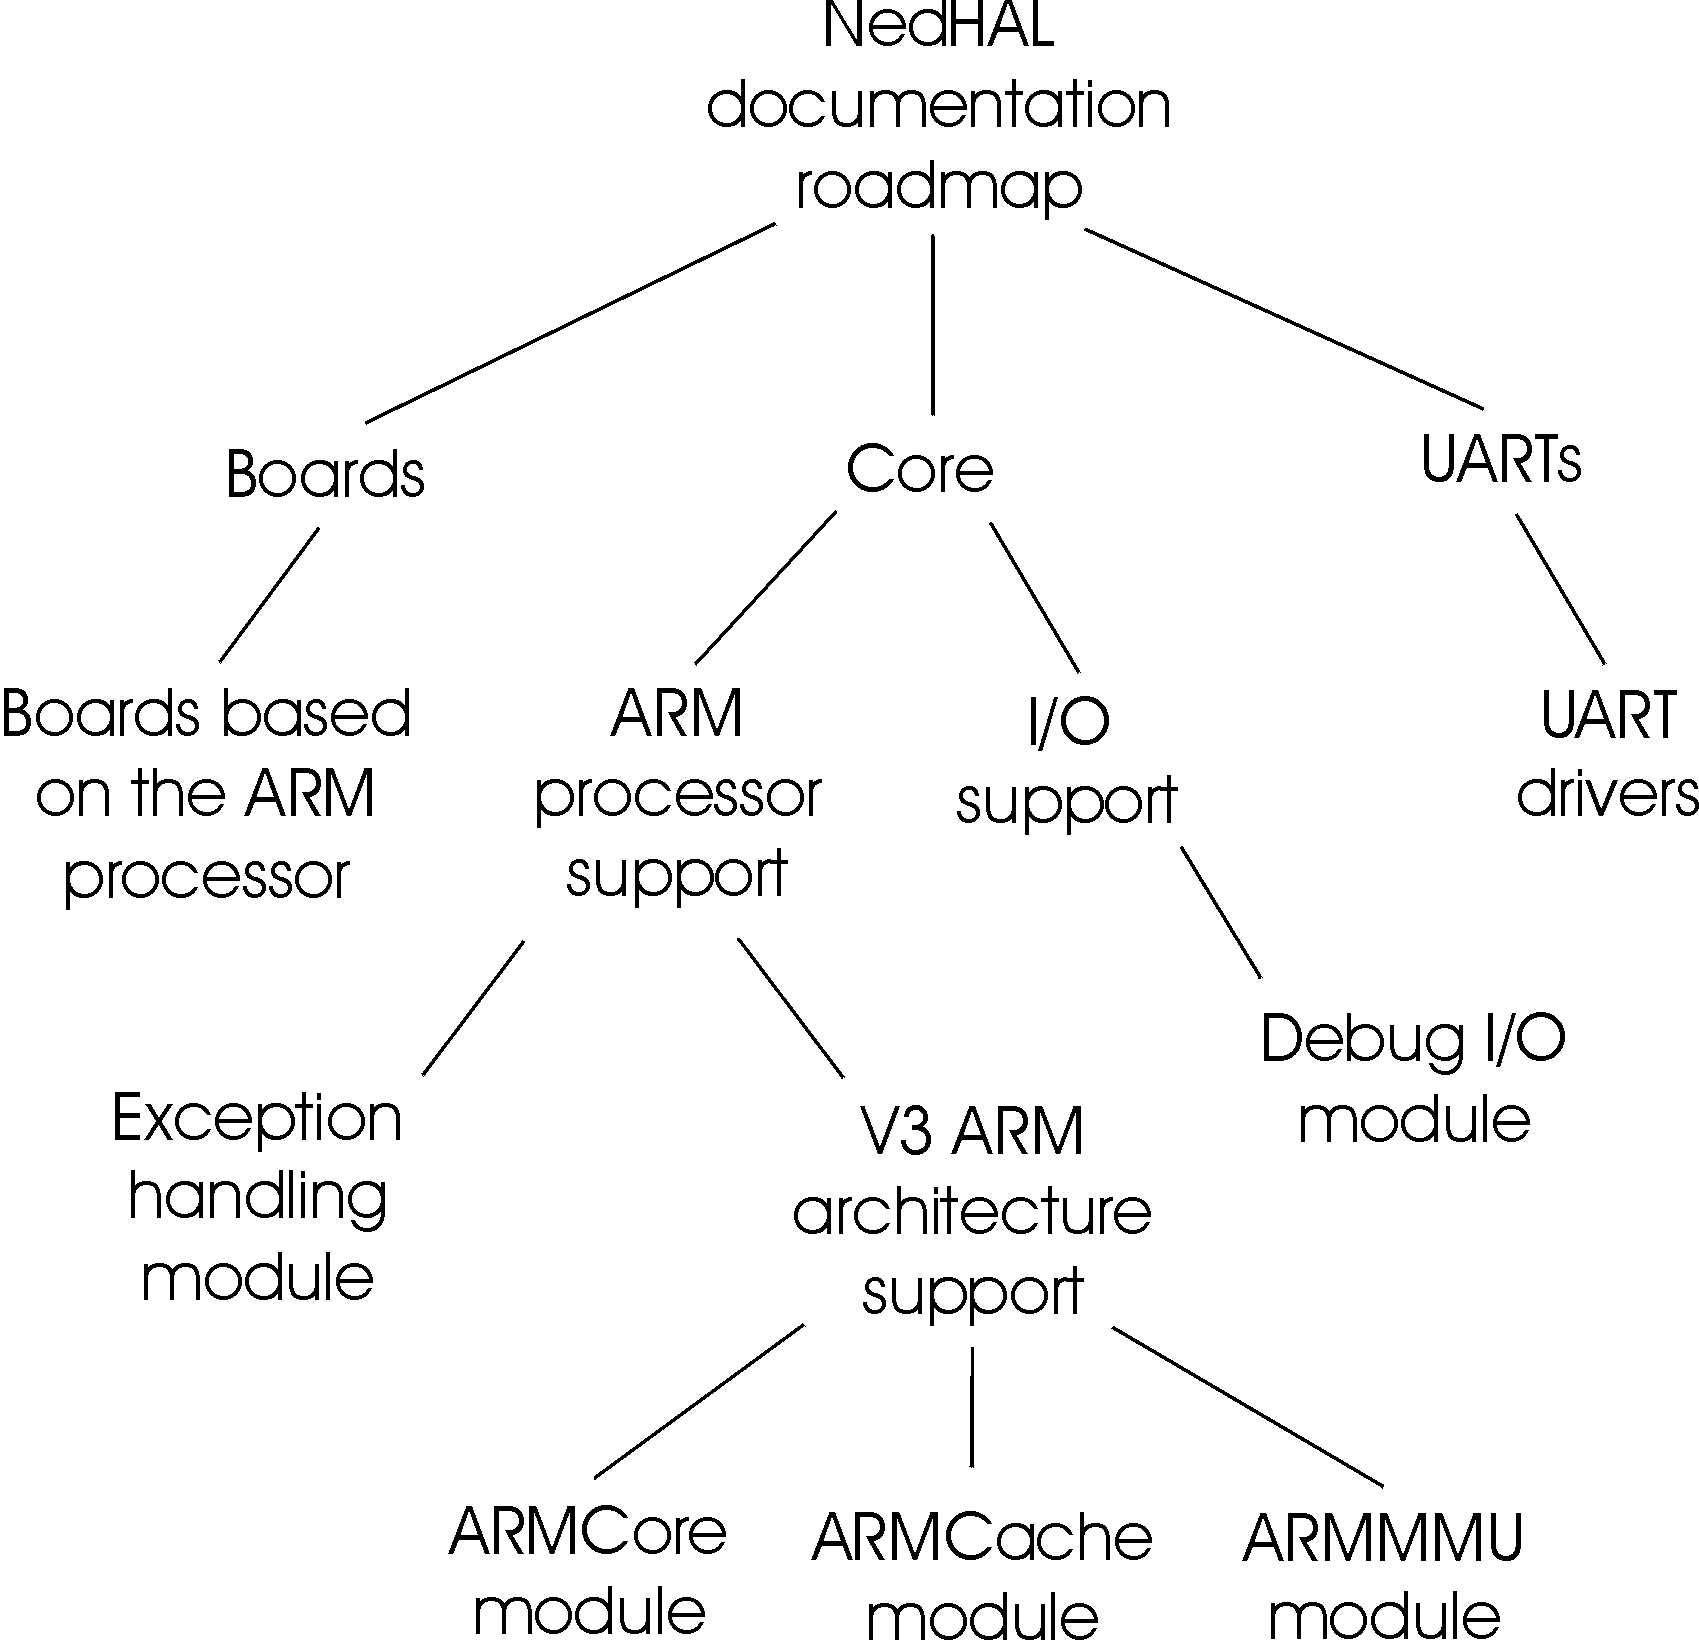
For those without image-clickable capable web browsers, or those wishing to know directly what areas of NedHAL are documented, here is a list of all the documentation concerning NedHAL:
- This Page (/index.html)
- The Board Definition files for:
- The ARM processor:
- The Core modules:
- The ARM processor support files:
- The ARM support modules (/Core/ARM/ARMSupport.html)
- The ARM Exception Handling module (/Core/ARM/Excepts.html)
- The ARM v3 architecture ARMCore module (/Core/ARM/3/ARMCore.html)
- The ARM v3 architecture ARMCache module (/Core/ARM/3/ARMCache.html)
- The ARM v3 architecture ARMMMU module (/Core/ARM/3/ARMMMU.html)
- The portable modules:
- The ARM processor support files:
- The UART driver modules manual (/UARTs/driver.html)